Important Azure Changes with Kentico 9
Kentico 9 has a lot of well-known, exciting changes like CI, MVC Support, and a number of others. It also contains a several updates that will affect your Azure deployments. In this article, I’d like to give you a cheat sheet of some of the important ones you need to know about when deploying Kentico 9 to Azure Cloud Services or Web Apps.
With every evolution of Kentico, there will always be changes. Some of these may be disruptive to an organization or project, depending on how the platform has been implemented and customized. More often than not, the changes are to add some specific functionality, address a known limitation, or in response to a framework or third party system. As anyone that has developed with Azure knows Microsoft’s Cloud is always evolving. As the architecture changes, we are constantly updating Kentico to take advantage of new functionality, update some legacy code, and just use the resources more efficiently. With Kentico 9, we have a couple changes that you will want to know about.
1. Auto Scaling
OK, so this is a big change that you may already know about. If not, just know that in Kentico 9 we reworked how scaling happens for web farms. We saw a lot of people had issues with the manual registration and maintenance of servers, so we automated the process to help things run smoother. The new functionality can handle the automatic registration (say when your Web App auto scales up and down) and then brings the server into the farm. Once it’s “ready”, Kentico will start syncing content changes to it. If the environment changes (removes a server), it will then remove the server so it doesn’t try to keep syncing changes to it.

Just know that you will still need the appropriate licenses for however many servers you want to scale up to in your environments.
If you just love doing things manually, you can still configure your web farms servers by hand. Check out the Settings/Versioning and Synchronization/Web Farm section for details.
2. Azure 2.7 SDK
With Kentico 9, you must now use the Microsoft Azure SDK 2.7.1. With each iteration of the SDK, we inevitably encounter some breaking changes that we have to program around. With the latest version, we are supporting the 2.7.1 version to make sure everything runs smoothly. Whenever you are developing for Azure, always be very mindful that you have the correct SDK installed/targeted. Not doing so will result in some build issues, not to mention some unexpected behavior.
You can read more about the Microsoft Azure SDK 2.7.1 here.
3. Cache Files Settings -> Azure CDN
This is a pretty big deal. By default, anything copied to your Azure Storage Account (and subsequently synced to the CDN) is given a default TTL of 72 hours. This means that anything you copy to your media library (assuming you are storing it in Azure Storage) will get a TTL of 72 hours before it refreshes. With Kentico 9, you can override this default by using the following methods:
1. By the CMSAzureCDNCacheMinutes web.config key.
2. By the Cache files (minutes) setting in Settings -> System -> Performance.
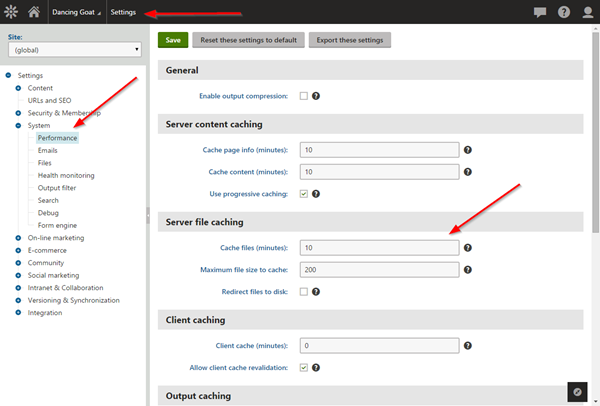
This means you can set your own TTL and expire your Azure blobs on the schedule you want. I haven’t personally tested this one out yet, but will be sure to blog more about it when I do.
You can read more about the Azure CDN here.
4. “Deploy to Azure” removed from the KIM
I personally didn’t use this feature a lot, and for good reason (explained below). If you aren’t aware, the KIM (Kentico Installation Manager) had an option to deploy directly to Azure during the site creation. What this did was create the project, and using PowerShell, copy it up to Azure into your Cloud Service. Because we did not see a lot of usage of this (and the ever-changing SDK/PowerShell commands from Microsoft), we removed this from the KIM to simplify the process.
If you want to deploy your Azure sites, you can:
- “Publish” directly from Visual Studio.
This option will allow you to build, package, and deploy directly to your Cloud Service. Just know that this will overwrite whatever is in the slot you specified (Production / Staging) with no option to restore your previous one.
- “Package” in Visual Studio and deploy manually.
I personally like this method because, after packaging, I upload my application to Azure Storage. I keep a collection of deployments there (in different containers) so I can easily “roll back” a deployment, if needed. It’s a great way to build a repository of deployments, and get back to a known-working one when something goes awry.
Wrapping Up
There are lots of other changes in Kentico 9 that may affect your Azure deployments. Be sure to check out the Release Notes and Documentation for any updates. And of course, I’d love to hear your ideas/findings in the comments. Good luck!
You can read the full Kentico 9 Release Notes here.