HTML Resource Strings Module
Sometimes you have a snippet of the HTML code or a longer text that you wish to use multiple times on your site. By default, Kentico contains the Localization application that allows you creation of custom resource strings. However, this is intended more for multi-culture sites. Therefore, I would like to show you how to create such a module from scratch.
Please note this article is only a proof of concept and further modifications to the code may be required to make it production ready. Please feel free to modify the code or to get in touch with our consulting department to help you with that.
I will call the module HTML resource strings and it will be capable of saving and categorizing HTML code snippets. HTML snippets will be then loaded through a custom macro {% GetHTMLResourceString("HTML resource string code name") %}
I would strongly recommend checking our documentation to get basics of the custom module creation: https://docs.kentico.com/k10/custom-development/creating-custom-modules
If you just wish to download the finished module right away, you can download it from here:
HTML Resource Strings Module.zip
OK, let’s start!
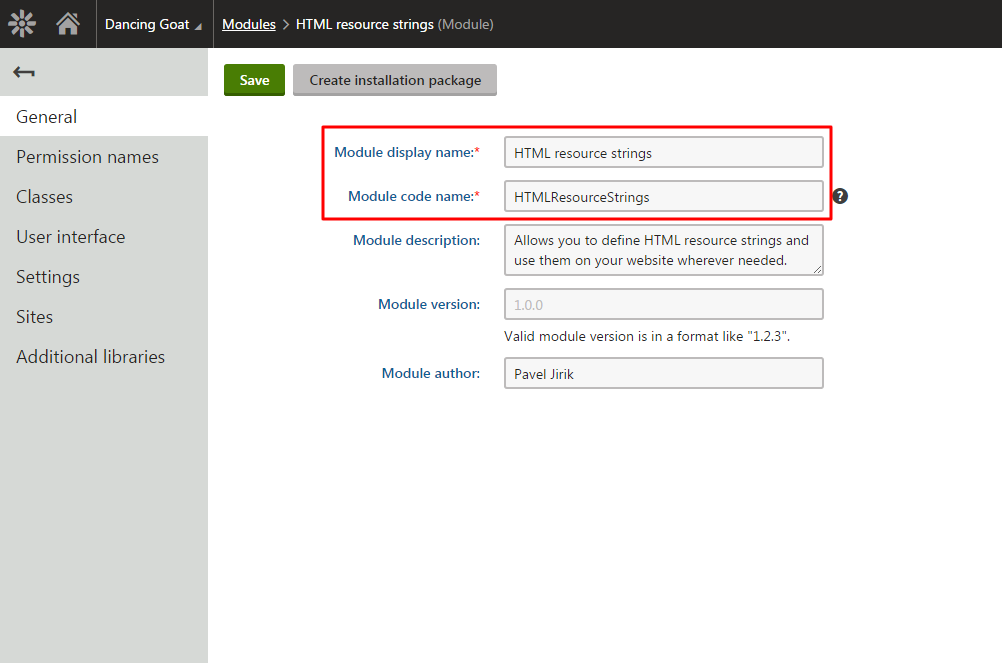
First of all, you need to create a new module in the Modules application. Name it HTML resource strings, set its code name to HTMLResourceStrings, and Save it.
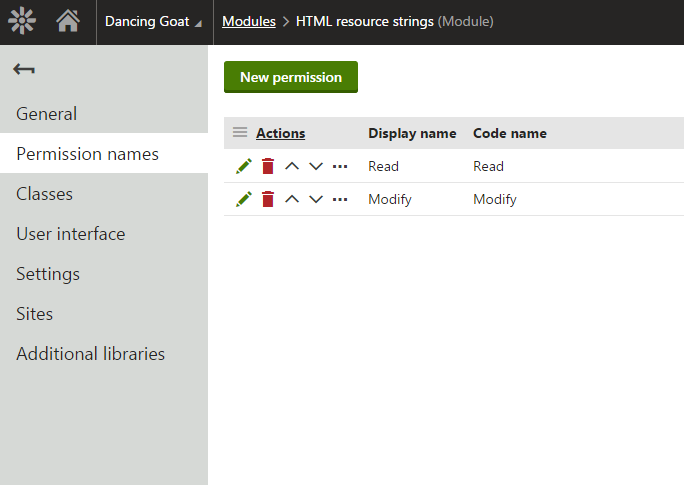
Switch to the Permission names tab and add the Read and Modify permissions to the module. Keep the Display in matrix property checked for both permissions.
Switch to the Classes tab and create two classes. The first class will be used to store HTML code snippets, and the second will be used to store resource string categories.
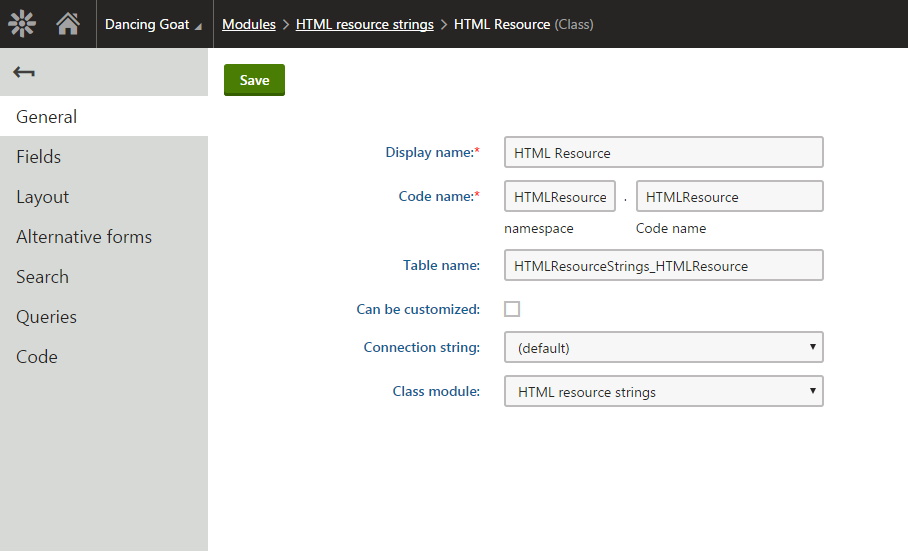
First class properties
Display name: HTML Resource
Namespace: HTMLResourceStrings
Class (Code name): HTMLResource
Table name: HTMLResourceStrings_HTMLResource
Class module: HTML resource strings
Primary key name: HTMLResourceID
Include HTMLResourceGuid field: True
Include HTMLResourceLastModified field: True
Save it and switch to the Fields tab. Create 3 additional fields:
First field
Field name: HTMLResourceCodeName
Data type: Text
Size: 200
Required: True
Unique: True
Field is system: True
Display field in the editing form: True
Field caption: HTML Resource Code Name
Form control: Code name
Second field
Field name: HTMLResourceContent
Data type: Long text
Display field in the editing form: True
Field caption: HTML Content
Form control: Large text area
Third field
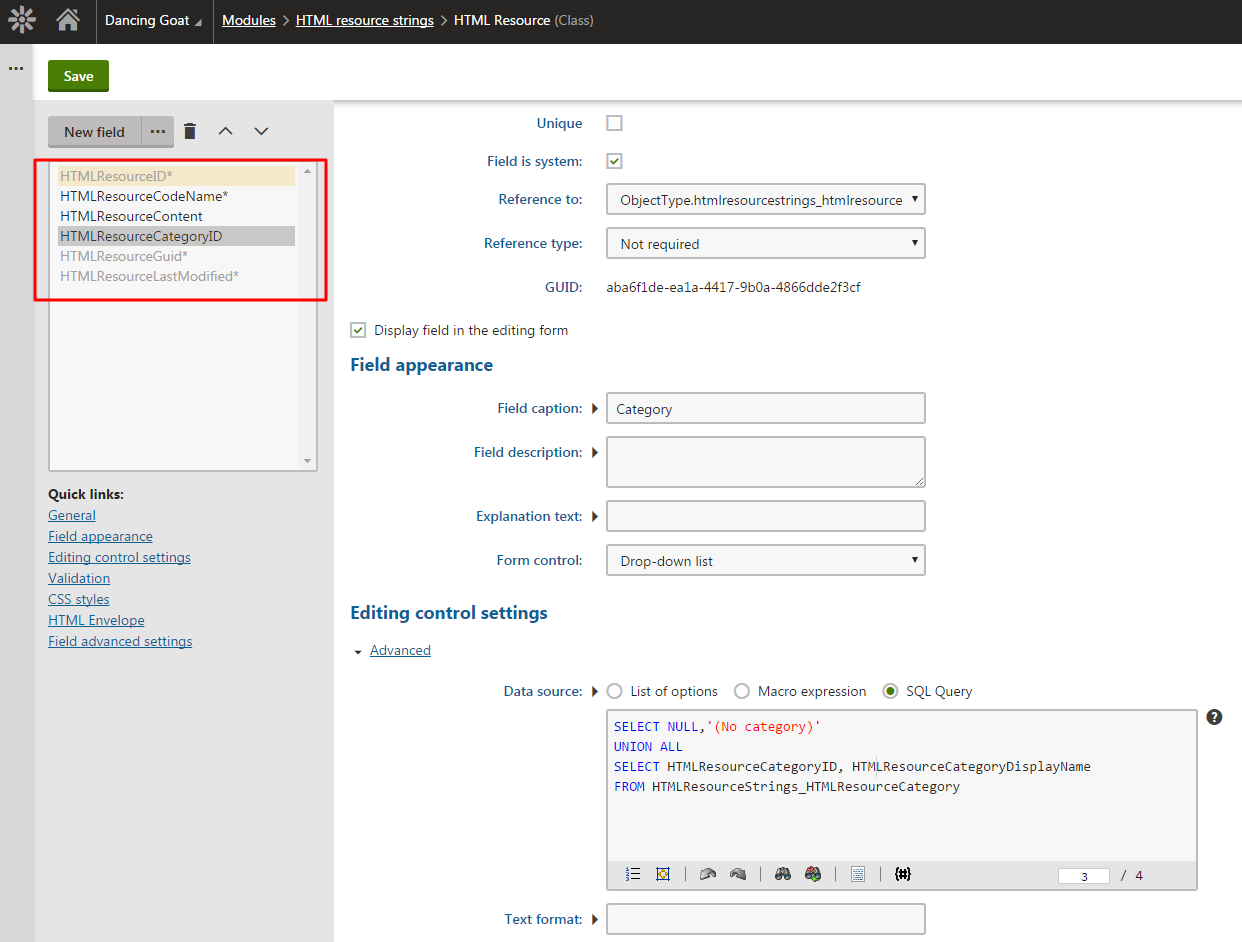
Field name: HTMLResourceCategoryID
Data type: Integer number
Field is system: True
Reference to: ObjectType.htmlresourcestrings_htmlresourcecategory (this option will become available in the dropdown list after you create the second class – until then, keep the “(none)” option selected)
Reference type: Not required
Display field in the editing form: True
Field caption: Category
Form control: Drop-down list
Data source: SQL Query
Type the following SQL query into the text area:
SELECT NULL,'(No category)'
UNION ALL
SELECT HTMLResourceCategoryID, HTMLResourceCategoryDisplayName
FROM HTMLResourceStrings_HTMLResourceCategory
The class should have 6 fields in total right now:
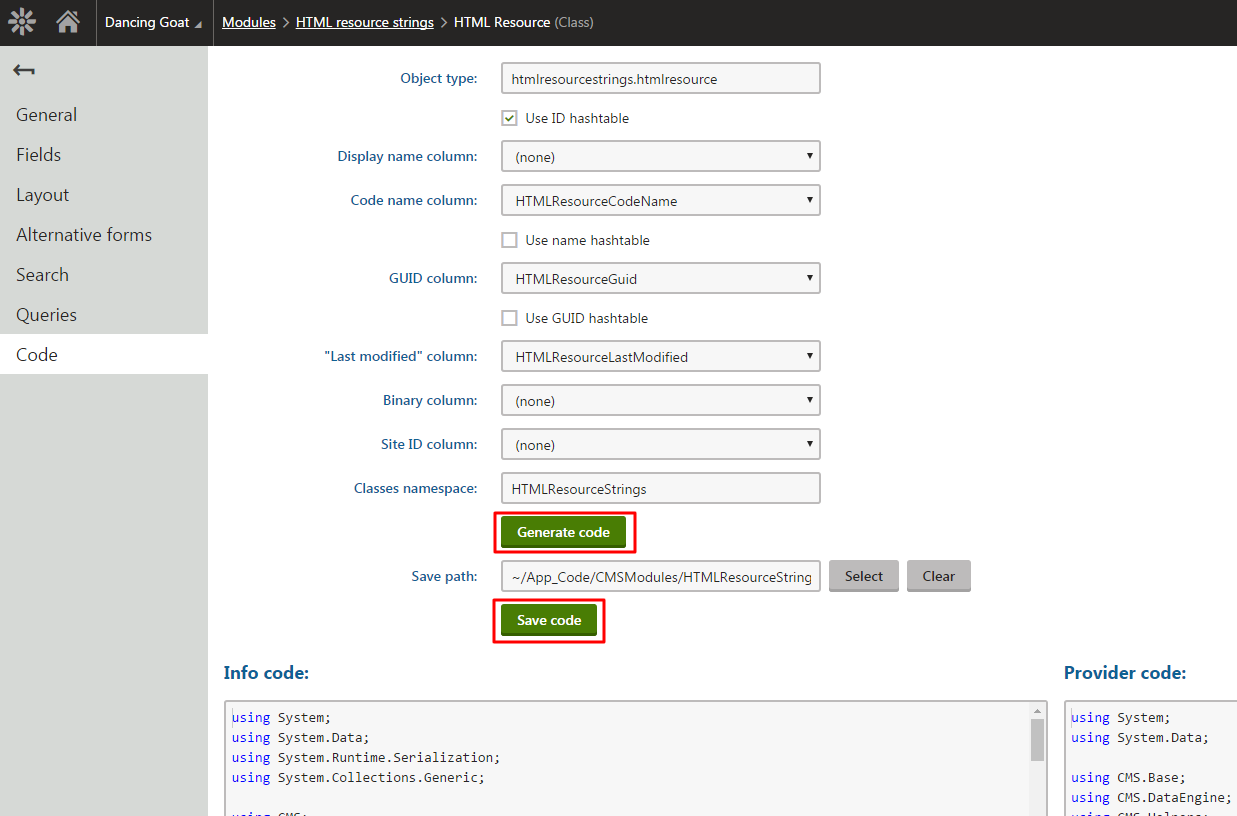
Switch to the Code tab. The columns should already be mapped like this:
Object type: htmlresourcestrings.htmlresource
Use ID hashtable: True
Display name column: (none)
Code name column: HTMLResourceCodeName
Use name hashtable: False
GUID column: HTMLResourceGuid
Use GUID hashtable: False
“Last modified” column: HTMLResourceLastModified
Binary column: (none)
Site ID column: (none)
Classes namespace: HTMLResourceStrings
Save path: ~/App_Code/CMSModules/HTMLResourceStrings
Click the Generate code button and then the Save code button. This will create Info and InfoProvider classes that will be used by system to retrieve the data.
At this moment the first class is created, so let’s go back to the Classes tab of our module and create the second class:
Second class properties
Display name: HTML Resource Category
Namespace: HTMLResourceStrings
Class (Code name): HTMLResourceCategory
Table name: HTMLResourceStrings_HTMLResourceCategory
Class module: HTML resource strings
Primary key name: HTMLResourceCategoryID
Include HTMLResourceCategoryGuid field: True
Include HTMLResourceCategoryLastModified field: True

Save it and switch to the Fields tab. Create 2 additional fields:
First field
Field name: HTMLResourceCategoryDisplayName
Data type: Text
Size: 200
Required: True
Unique: True
Field is system: True
Display field in the editing form: True
Field caption: Category Display Name
Form control: Text box
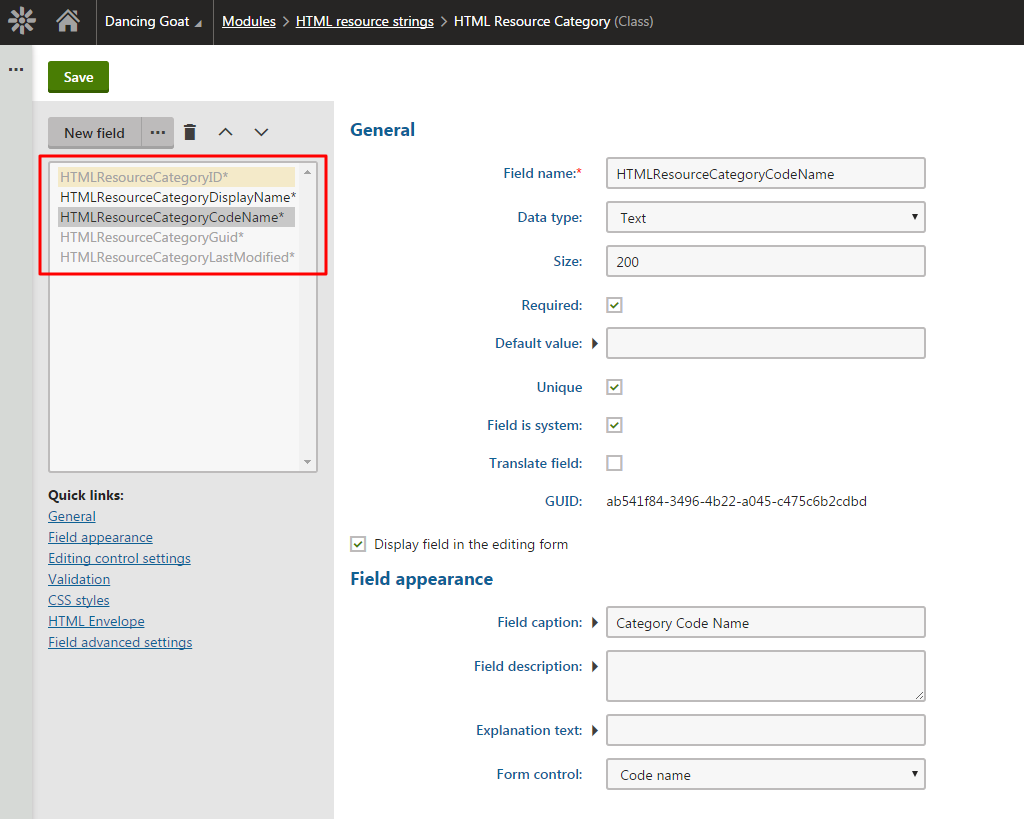
Second field
Field name: HTMLResourceCategoryCodeName
Data type: Text
Size: 200
Required: True
Unique: True
Field is system: True
Display field in the editing form: True
Field caption: Category Code Name
Form control: Code name
Now there should be 5 fields in the class:
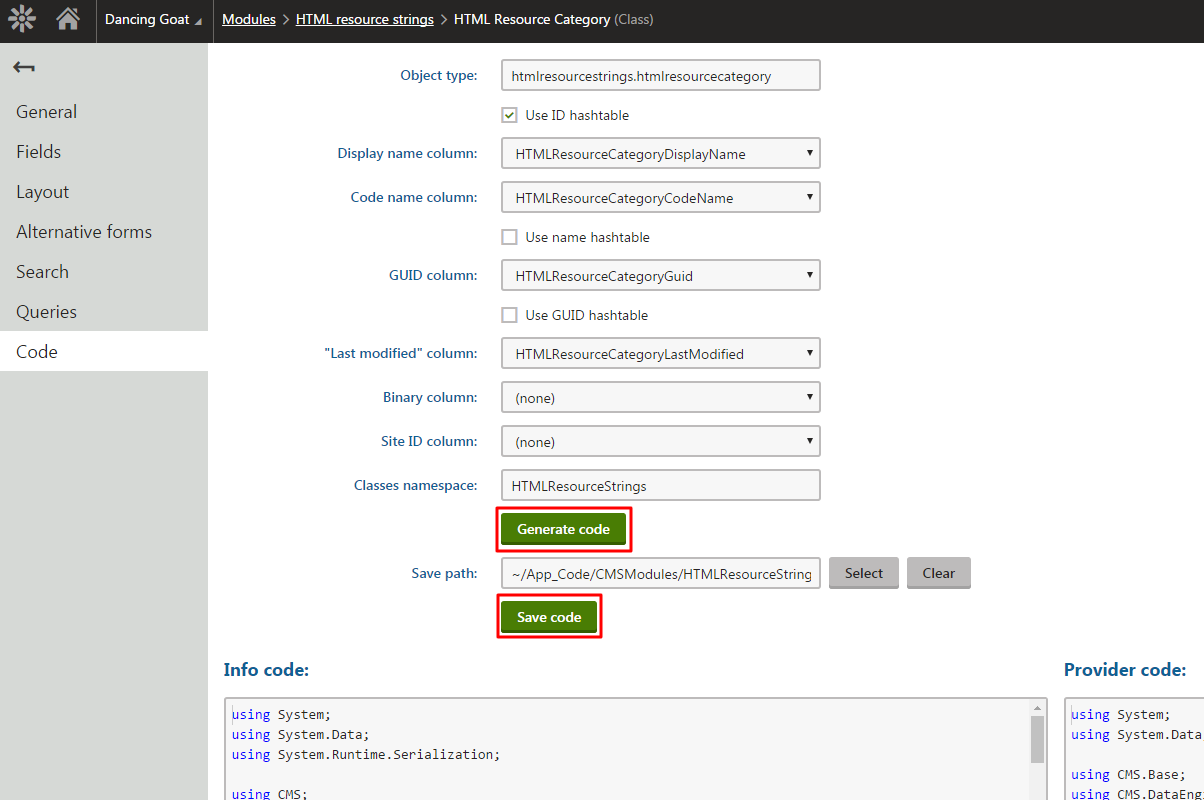
Switch to the Code tab. The columns should already be mapped in the same way as the first class. The only difference should be in these columns:
Object type: htmlresourcestrings.htmlresourcecategory
Display name column: HTMLResourceCategoryDisplayName
Code name column: HTMLResourceCategoryCodeName
GUID column: HTMLResourceCategoryGuid
“Last modified” column: HTMLResourceCategoryLastModified
Click the Generate code button and then the Save code button to create Info and InfoProvider classes.
Now that the second class has been created, go back to the Classes tab, edit the HTMLResource class, and switch to the Fields tab. Then select the HTMLResourceCategoryID field, and set its Reference to property to ObjectType.htmlresourcestrings_htmlresourcecategory as I mentioned earlier during the creation of the first class.
At this point, all necessary classes have been created and it’s time to create the module’s user interface. Go back to the module tabs and switch to the User interface tab.
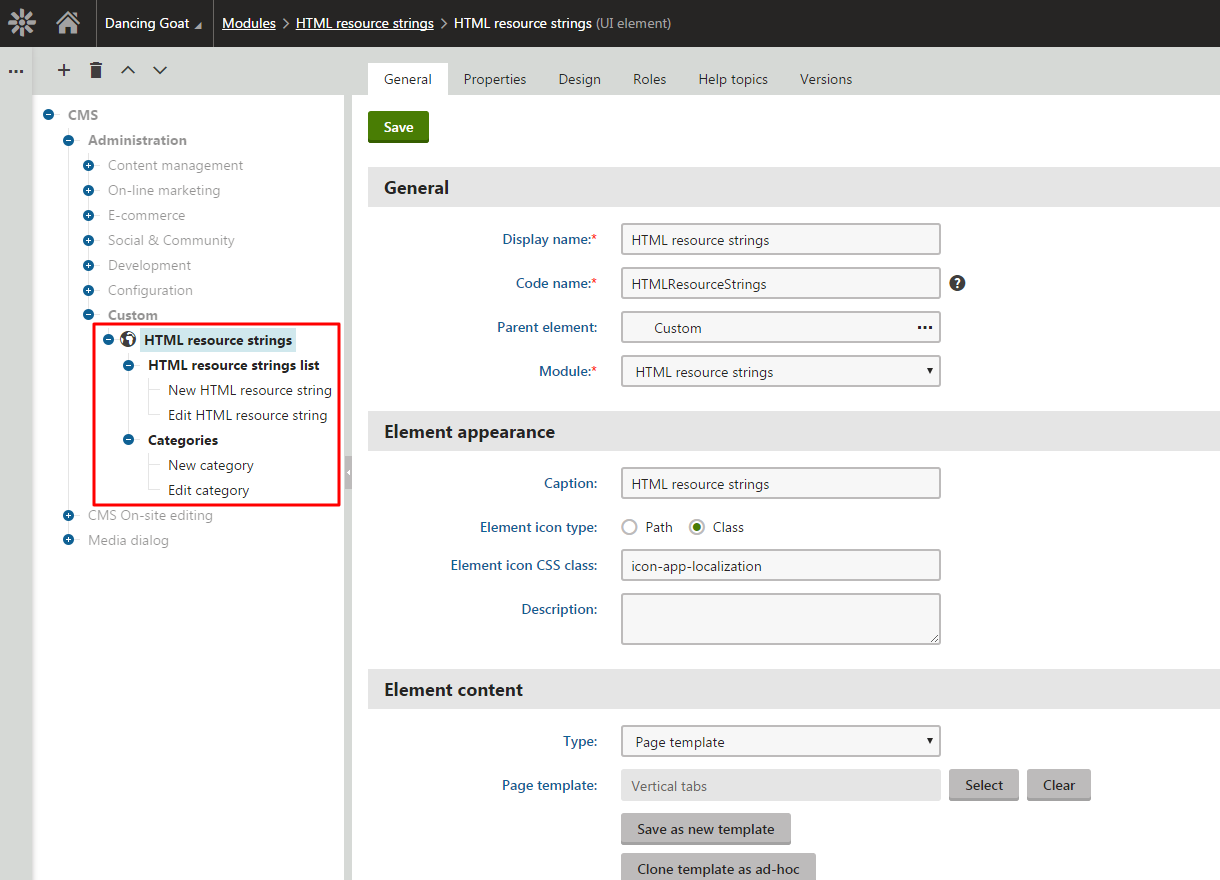
Select the CMS -> Administration -> Custom element in the tree and create a New element (+).
Use the following values:
Display name: HTML resource strings
Code name: HTMLResourceStrings
Module: HTML resource strings
Caption: HTML resource strings
Element icon type: Class
Element icon CSS class: icon-app-localization
Type: Page template
Page template: Vertical tabs
Check module “read” permission: True
Save it, select the newly created HTML resource strings element in the tree and create another element (+) with the following values:
Display name: HTML resource strings list
Code name: HTMLResourceStringsList
Module: HTML resource strings
Caption: Resource strings
Type: Page template
Page template: Object listing
Check module “read” permission: True
And Save it.
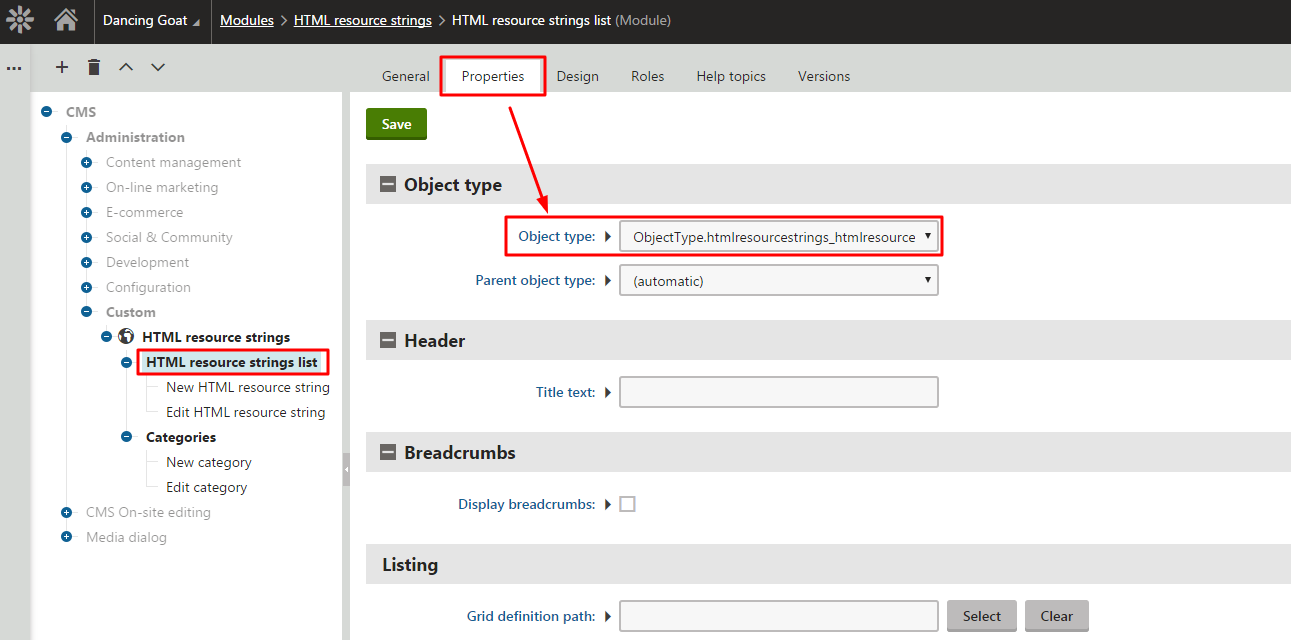
As this is an object listing UI element, you need to specify which object types should be listed. For that, click on the Properties tab and set the Object type property to ObjectType.htmlresourcestrings_htmlresource (htmlresourcestrings.htmlresource) to list data from our HTMLResource class.
Save it, select the newly created HTML resource strings list element in the tree and create another element (+) with the following values:
Display name: New HTML resource string
Code name: NewHTMLResourceString
Module: HTML resource strings
Caption: New HTML resource string
Type: Page template
Page template: New / Edit object
Check module “read” permission: True
Save it, keep the HTML resource strings list element selected in the tree and create another element (+) with the following values:
Display name: Edit HTML resource string
Code name: EditHTMLResourceString
Module: HTML resource strings
Caption: Edit HTML resource string
Type: Page template
Page template: New / Edit object
Check module “read” permission: True
Save it, select the main HTML resource strings element in the tree and create another element (+) with the following values:
Display name: Categories
Code name: Categories
Module: HTML resource strings
Caption: Categories
Type: Page template
Page template: Object listing
Check module “read” permission: True
And Save it.
As this is an object listing UI element once again, we need to specify the objects that should be listed. In this case we want to load data from our HTMLResourceCategory class. Therefore, the Object type property on the Properties tab needs to be set to ObjectType.htmlresourcestrings_htmlresourcecategory (htmlresourcestrings.htmlresourcecategory)
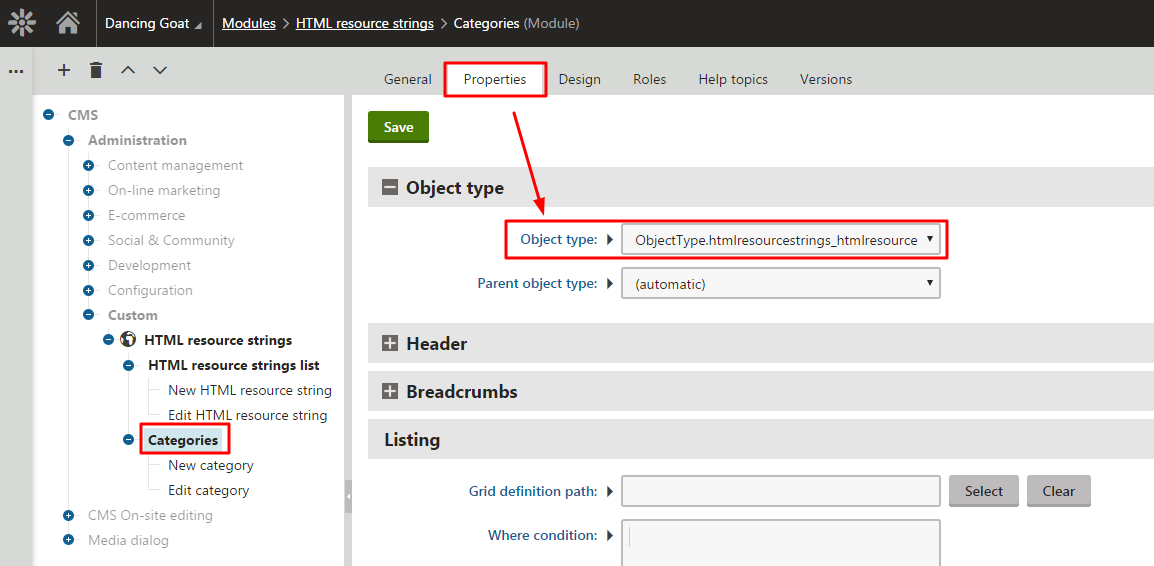
Save it, select the newly created Categories element in the tree and create another element (+) with the following values:
Display name: New category
Code name: NewCategory
Module: HTML resource strings
Caption: New category
Type: Page template
Page template: New / Edit object
Check module “read” permission: True
Save it, keep the Categories element selected in the tree and create another element (+) with the following values:
Display name: Edit category
Code name: EditCategory
Module: HTML resource strings
Caption: Edit category
Type: Page template
Page template: New / Edit object
Check module “read” permission: True
Save it.
At this point, the module’s user interface has been successfully defined:
However, it will not work corectly yet because we didn’t create an XML file to specify which columns should be loaded by a unigrid control and how. By default, Kentico expects an XML grid definition per each module class in the following path:
~/App_Data/CMSModules/<module code name>/UI/Grids/<class table name>/default.xml
Thus, we need to create two XML files as we have two custom classes. Open your project in Visual Studio and create default.xml file in the following location:
~/App_Data/CMSModules/HTMLResourceStrings/UI/Grids/HTMLResourceStrings_HTMLResource/default.xml
Use the following markup in the XML file:
<?xml version="1.0" encoding="utf-8" ?>
<grid>
  <actions>
    <action name="edit" caption="$General.Edit$" fonticonclass="icon-edit" fonticonstyle="allow" />
    <action name="#delete" caption="$General.Delete$" fonticonclass="icon-bin" fonticonstyle="critical" confirmation="$General.ConfirmDelete$" />
  </actions>
  <columns>
    <column source="HTMLResourceCodeName" caption="Resource code name" wrap="false" >
      <filter type="text" size="200" />
    </column>
    <column source="HTMLResourceContent" caption="HTML content" width="100%" maxlength="250"/>
    <column source="HTMLResourceCategoryID" caption="Category" externalsourcename="#transform: htmlresourcestrings.htmlresourcecategory.htmlresourcecategorydisplayname">
      <filter type="custom" path="~/CMSModules/HTMLResourceStrings/HTMLCategoryFilter.ascx" defaultvalue="0" />
    </column>
  </columns>
  <options>
    <key name="DisplayFilter" value="true" />
    <key name="FilterLimit" value="0" />
  </options>
</grid>
You may notice that in the code above I defined a custom filter: <filter type=“custom“ ... />
This custom filter will be a dropdown list allowing you to filter resource strings according to their categories. We will implement this filter later on in this article, so bear with me :)
Let’s create the second default.xml file in the following location:
~/App_Data/CMSModules/HTMLResourceStrings/UI/Grids/HTMLResourceStrings_HTMLResourceCategory/default.xml
Use the following markup in the XML file:
<?xml version="1.0" encoding="utf-8" ?>
<grid>
  <actions>
    <action name="edit" caption="$General.Edit$" fonticonclass="icon-edit" fonticonstyle="allow" />
    <action name="#delete" caption="$General.Delete$" fonticonclass="icon-bin" fonticonstyle="critical" confirmation="$General.ConfirmDelete$" />
  </actions>
  <columns>
    <column source="HTMLResourceCategoryDisplayName" caption="Category" width="100%" />
  </columns>
  <options>
    <key name="DisplayFilter" value="true" />
  </options>
</grid>
Great! Now the module interface is nearly ready :)
It’s time to create the custom filter that I mentioned earlier. Feel free to visit our documentation on this topic: https://docs.kentico.com/k10/references/kentico-controls/ui-controls/unigrid/creating-custom-unigrid-filters
Open your project in Visual Studio and create a new folder named HTMLResourceStrings in the ~/CMSModules folder.
Add a Web User Control named HTMLCategoryFilter.ascx into the ~/CMSModules/HTMLResourceStrings folder.
Replace the generated control’s markup with the following:
<%@ Control Language="C#" AutoEventWireup="true" CodeFile="HTMLCategoryFilter.ascx.cs" Inherits="CMSModules_HTMLResourceStrings_HTMLCategoryFilter" %>
<%@ Register Namespace="CMS.Base.Web.UI" Assembly="CMS.Base.Web.UI" TagPrefix="cms" %>

<cms:CMSDropDownList ID="drpCategories" runat="server" DataTextField="HTMLResourceCategoryDisplayName" DataValueField="HTMLResourceCategoryID" />
Switch to the user control’s code behind file and replace the generated code with the following:
using System;
using System.Data;
using System.Web.UI.WebControls;

using CMS.FormEngine.Web.UI;
using CMS.Helpers;
using HTMLResourceStrings;

public partial class CMSModules_HTMLResourceStrings_HTMLCategoryFilter : FormEngineUserControl
{
    /// <summary>
    /// Gets or sets the value selected within the filter
    /// </summary>
    public override object Value
    {
        get
        {
            return drpCategories.SelectedValue;
        }

        set
        {
            drpCategories.SelectedValue = ValidationHelper.GetString(value, "");
        }
    }

    /// <summary>
    /// Loads the filtering options during the initialization of the control
    /// </summary>
    /// <param name="e"></param>
    protected override void OnInit(EventArgs e)
    {
        base.OnInit(e);

        // Only initializes the category options on the first page load
        if (IsPostBack == false)
        {
            // Loads all the category IDs
            DataSet ds = HTMLResourceCategoryInfoProvider.GetHTMLResourceCategories().Column("HTMLResourceCategoryID, HTMLResourceCategoryDisplayName");

            // Binds the loaded categories to the filter's drop-down list
            drpCategories.DataSource = ds;
            drpCategories.DataBind();

            // Adds the '(ANY)' and '(NO CATEGORY)' filtering options
            drpCategories.Items.Insert(0, new ListItem("(No category)", String.Empty));
            drpCategories.Items.Insert(0, new ListItem("(All categories)", "0"));
        }

    }

    /// <summary>
    /// Generates the SQL Where condition used to limit the data displayed in the connected UniGrid
    /// </summary>
    /// <returns></returns>
    public override string GetWhereCondition()
    {
        // returns a condition to load only HTML resource strings with no category assigned
        if (Value as string == String.Empty)
        {
            return "(HTMLResourceCategoryID IS NULL)";
        }

        // returns an empty condition to load all categories
        if (Value as string == "0")
        {
            return String.Empty;
        }

        // returns a condition to load categories according to filter's selected value
        return "HTMLResourceCategoryID = " + Value;
    }
}
Save the changes.
Now, the custom filter (drop-down list) is ready to be used by the unigrid in the module interface.
Go back to the module tabs, select the Sites tab, and assign the module to your site:

Your module is now available in the application list and you can test it out by adding HTML resource strings and categories:
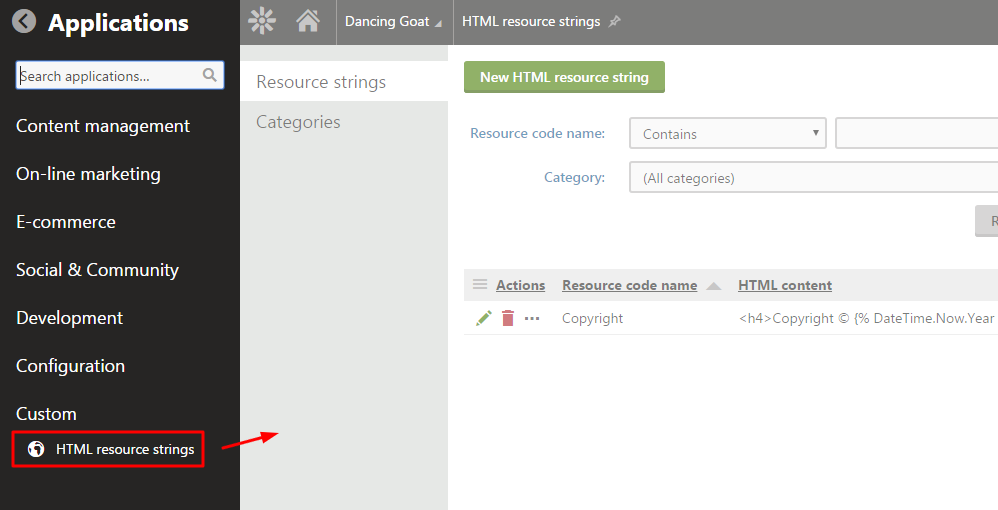
All HTML resource strings can contain macros if needed. For example, you could create the following resource string:
HTML Resource Code Name: Copyright
HTML Content: <h4>Copyright © {% DateTime.Now.Year %}
In case you need to export the module, please follow the insctructions in our documentation: https://docs.kentico.com/k10/custom-development/creating-custom-modules#Creatingcustommodules-Exportingcustommodules
Alternatively, the finished HTML resource strings module can be downloaded from here:
HTML Resource Strings Module.zip
Disclaimer: Please note this article is only a proof of concept and further modifications to the code may be required to make it production ready. Please feel free to modify the code or to get in touch with our consulting department to help you with that.