How To:Using a Nested Master Page
Master pages are one of my favorite features within .NET. By design they provide a single location for common layouts that are used across a set of web pages and allow common updates to occur in one place. The concept of a master page is taken from the world of traditional print and design layout. The traditional master page in this concept is a nonprinting page. It is used to create a consistent layout that contains elements that are repeated on each page within a larger document. For the print world this translates to things like headers, footers, and page numbers. The ASP.NET 2.0 master page infrastructure adheres to a similar concept and actually consists of two parts: the master page and one or more linked content pages. The master page is responsible for defining the page layout, which can include things like static text, HTML elements and server controls. The master page also contains the top level elements for a page such as <html>, <head> and <form> tags.
Fundamentally, a master page is simply an ASP.NET file that has an extension of .master. Once added to a Visual Studio project the master page contains a special @Master directive that replaces the standard @Page directive used in ordinary ASP.NET pages. For example the directive may look like the following
<%@ Master Language="C#" AutoEventWireup="true" CodeFile="Root.master.cs" Inherits="CMSTemplates_CorporateSiteASPX_Root" %>
By default a master page is designed to contain the common appearance and behavior for all linked content pages. Within a master page you add placeholders called ContentPlaceHolders as shown below. This is where at run time the child pages will insert their rendered page output.
<div class="zoneMainContent">
<asp:ContentPlaceHolder ID="plcMain" runat="server">
</asp:ContentPlaceHolder>
One of the benefits of master pages is that they allow you to create other componentized master pages. For example, you may have one overall master page that defines the look of the site. Different site sub sites can define their own child pages that reference the site master and that in turn define the look of the individual site within the layout defined by the site master. A child master page has the file extension .master, as with any master page. The child master page typically contains content controls that are mapped to content placeholders on the parent master page. In this context the child master page is laid out like any content page. However, the child master page also has content placeholders of its own to display content supplied by its own child pages.
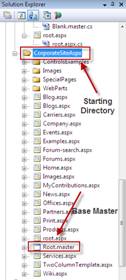
In this example, we will create a nested master page within the Kentico CMS project. For simplicity I am using the CorporateSiteASPX starter site as shown below. Within this directory is the default Root.Master that we will use as the base master page.
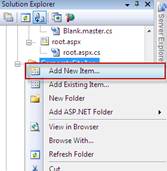
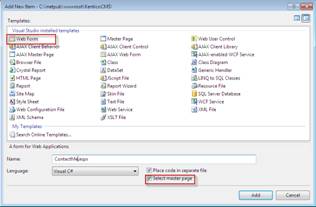
We first need to build the inherited master page using the following steps.
1. Select Add New item
2. Create the new Inherited master page
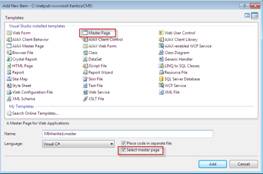
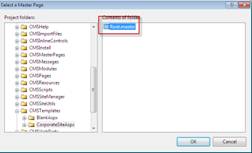
3. Select the page to inherit from
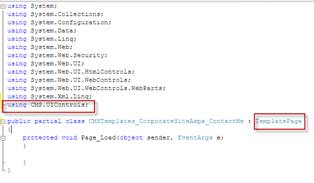
Once these steps are completed a quick verification shows that this master page is inherited from the Root.master as shown below in the page source.

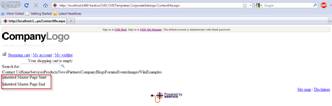
For the inherited master page I am going to add some simple text to show where we are using the inherited master page.
Update the <asp:content> to include the following source:
<asp:Content ID="Content1" ContentPlaceHolderID="plcMain" runat="Server">
2nd master start
<asp:ContentPlaceHolder ID="plcMain" runat="server" />
</asp:panel>
2nd master end
</asp:Content>
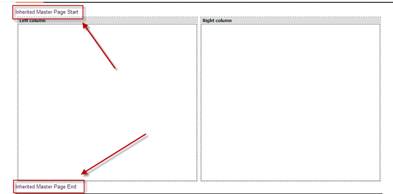
Now that we have created the inherited master page lets create a new Kentico ASPX template using the following steps. For this example we will create a simple Contact Us page with two columns that contain editable regions.
1. Add the Web Form (Kentico ASPX template)
2. Select the inherited master page

Note: Make sure that you select the inherited page (MInherited.master)
3. Add the @Register directive that enables the use of the Kentico CMS controls on your page.
<%@ Register Assembly="CMS.Controls" Namespace="CMS.Controls" TagPrefix="ccl" %>
4. Add the following code inside the <asp:content> element
<asp:Content ID="Content1" ContentPlaceHolderID="plcMain" Runat="Server">
<table width="100%">
<tr>
<td width="50%">
<cc1:CMSEditableRegion ID="txtLeft" runat="server" DialogHeight="400"
RegionType="HtmlEditor" RegionTitle="Left column" />
</td>
<td width="50%">
<cc1:CMSEditableRegion ID="txtText" runat="server" DialogHeight="400"
RegionType="HtmlEditor" RegionTitle="Right column" />
</td>
</tr>
</table>
</asp:Content>
Note: The CMSEditableRegion control defines an editable region will be displayed as an HTML editor in editing mode. One the live site the control ensures displaying of the rendered HTML.
4. Modify the code behind page
Note: These changes allow the page to become a page template in Kentico CMS.
We have completed the updates to the page and we can go ahead and run it within the Kentico project.
The next step is to register it within the Kentico CMS as an ASPX template. The dev tutorial here has the rest of the walk through that you can use to complete these steps. Once this is completed this creates the final page shown below.
6TNGEB29UXEY