How to create a lightbox image gallery
You have learned from the previous article that we are planning to remove all lightbox web parts in Kentico 9. The reason for that is that these web parts generate a specific HTML, which in most cases doesn't suit your needs. It's not possible to easily modify the output and the provided lightbox script may not always be the one you want.
In this article I am going to give you an example how you can achieve the same behavior with a set of our basic web parts which give you much more flexibility.
Our lightbox web parts don't do any special magic. They basically take some data, display it on a page and apply the lightbox effect. They consist of three core parts: data source, repeater, lightbox script. As you can see, you can replace each of these parts with our basic web parts:
- Data source web part
- Basic repeater - this gives you full control over the generated HTML.
- Javascript web part - if the chosen script needs initialization, you can place it here.
Example
Let's say I want to display a list of product images on the product page and I want to use the lightbox effect for the images.
I will only need the 'Attachments data source' and 'Basic repeater' web parts for this purpose. I have chosen a lightbox script that doesn't need initialization. This means that I don't need to use the JavaScript web part in this example.
Let's see the configuration of these web parts.
Attachments data source

The Attachments data source doesn't need any special configuration. However, you should at least specify the Columns property which reduces the amount of data retireved from the database.
Note: I don't need to specify the Path property - if left blank, the data source web part takes all the attachments on the current page.
Basic repeater

The Basic repeater web part needs to be linked to the Attachments data source and have its item transformation specified.
Item transformation
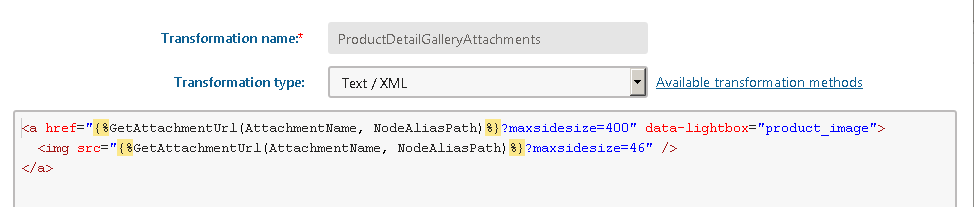
Note: I have chosen the Text/XML transformation type for this example. I am using Lightbox2, which automatically activates the lightbox effect for all elements which are marked with the data-lightbox attribute.
Script files
<script type="text/javascript" src="https://code.jquery.com/jquery-1.11.0.min.js"></script>

<script type="text/javascript" src="https://cdnjs.cloudflare.com/ajax/libs/lightbox2/2.7.1/js/lightbox.min.js"></script>
Insert these script files at the bottom of the page layout (Design tab -> Edit layout).
CSS
<link href="https://cdnjs.cloudflare.com/ajax/libs/lightbox2/2.7.1/css/lightbox.css" type="text/css" rel="stylesheet"/>
Insert the stylesheet into the Header section of the used page template (Template -> Edit template properties -> Header).
Result
The Product detail page now contains a list of attachment images.

After clicking on any of the images, you can see the detail.

All credit for creating the lightbox effect goes to: Lokesh Dhakar
Applies to: Kentico 8.x