Digging into the Kentico EMS Azure Search Integration
Every version of Kentico is packed full of amazing features and updates. With Kentico 11, one of the biggest advancements was our built-in integration with Azure Search. In this article, I’m giving you a crash course in this new functionality. In the end, you should be able to get your sites up and running quickly on Microsoft’s Search as a Service.
Anyone one that knows me knows that I’m a huge fan of Azure. After working with it for years, I find it one of the best platforms to develop on, with seemingly endless possibilities. When we decided that we wanted integrate Kentico EMS directly with Azure Search, I was…uhm…let’s say more than a little excited! Out of the box, our platform would offer people the ability to create some amazing search experiences, all using Azure Search.
In this blog, I want to take some time to walk you through this integration. Transitioning to cloud-based search can seem like a aunting task, so I wanted to take you step by step through the process. In the end, it’s pretty simple, but the result is anything but! Once you leverage Azure Search for your sites, you’ll wonder why you spent so much time building custom solutions in the past. So, let’s take a look our integration.
Creating the index
When we integrated Azure Search with Kentico EMS, we wanted to make the process as smooth as possible. We leveraged the existing Smart Search module and functionality, to keep the transition seamless. From an editor perspective, Azure Search indexes work just the same as Smart Search indexes, allowing editors to customize and configure the search data to their needs.
To get started, I needed an Azure Search index service in my Azure account. In my case, I leveraged my existing service that use for my personal site. I copied my Access Keys, to use during my Kentico index configuration.
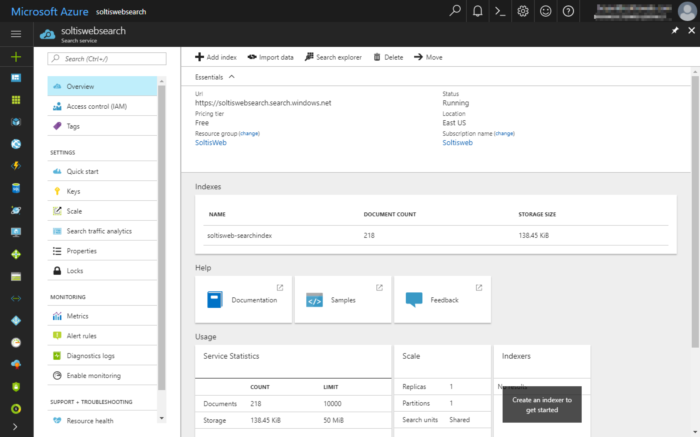
In the Smart Search Module, I create a new index for my product data. I entered the index name, codename, and set the Index type to Pages. I then added the Azure Search service credentials.
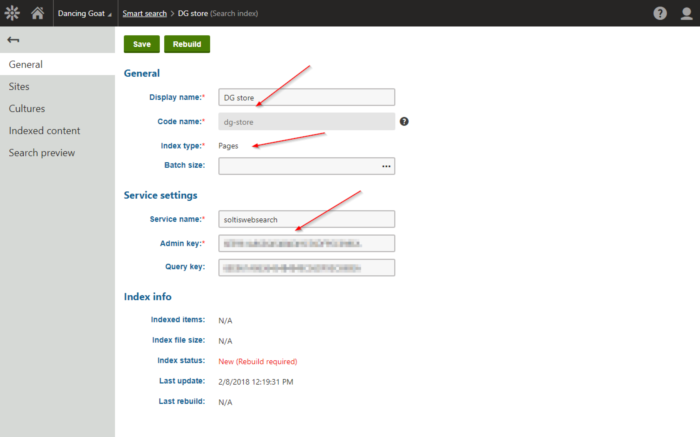
Next, I added my site content to the Indexed content.
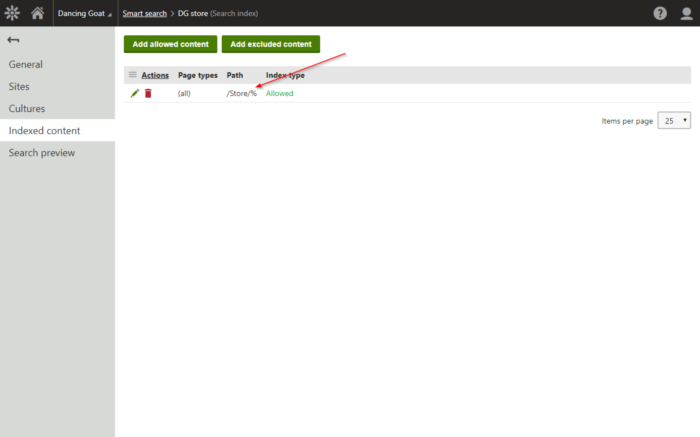
Finally, I built the index to confirm it was successfully created.
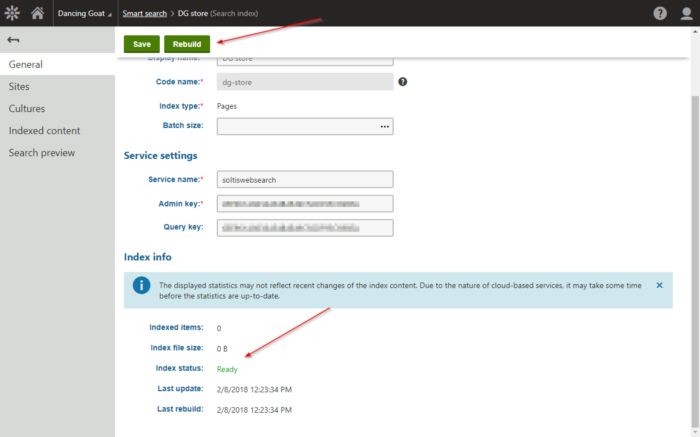
In the Azure portal, I checked to makes sure the index was created.
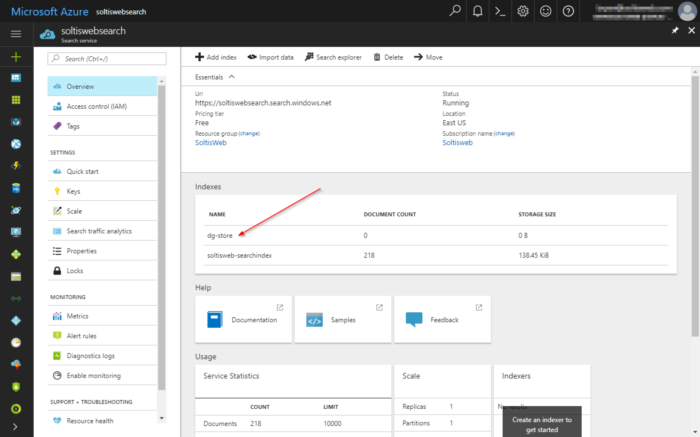
With the index successfully created, I was ready to start my custom development.
Customizing the index
Azure Search provides a ton of functionality to developers looking to make dynamic, powerful search solutions. Faceting, highlighting, and scoring profiles are just some of the capabilities the service brings. As part of our integration, we included references to the Azure Search API to allow you to quickly create your own custom modules for all your customizations. By adding an event handler to the CreatingOrUpdatingIndex, you can easily add any modification to the index that will be implemented whenever it is rebuilt or updated.
Documentation
Creating custom modules
Scoring profiles
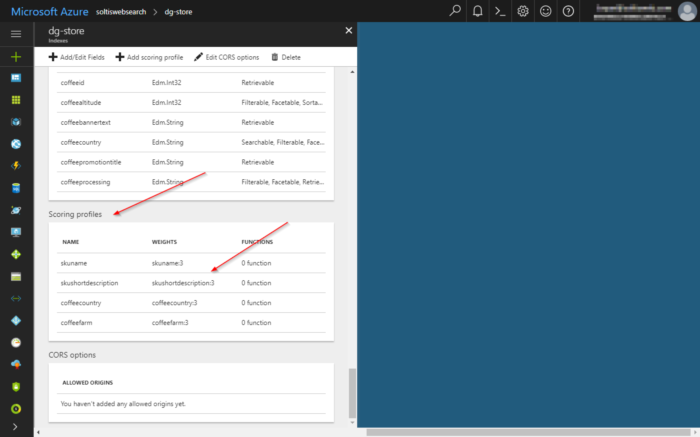
As part of my integration, I wanted to add some custom scoring profiles to allow users to set their results to fit their needs. In my custom module, I added the following code to create new scoring profiles, weighted on different columns in the index.
In our documentation, you can find a tutorial for adding scoring profiles. I used this as a starting point, however, replaced the AddScoringMethod method with my own custom code (full method code).
Documentation
Adding scoring profiles to Azure Search indexes
            // Create scoring profiles
            List<ScoringProfile> lstScoringProfiles = new List<ScoringProfile>();

            // Create weight based scoring profiles
            // SKU Name
            Dictionary<string, double> dictSKUName = new Dictionary<string, double>();
            dictSKUName.Add("skuname", 3);
            TextWeights twskuname = new TextWeights(dictSKUName);

            lstScoringProfiles.Add(new ScoringProfile()
            {
                Name = "skuname",
                TextWeights = twskuname
            });

            // Short Description
            Dictionary<string, double> dictSKUShortDescription = new Dictionary<string, double>();
            dictSKUShortDescription.Add("skushortdescription", 3);
            TextWeights twskushortdescription = new TextWeights(dictSKUShortDescription);
            lstScoringProfiles.Add(new ScoringProfile()
            {
                Name = "skushortdescription",
                TextWeights = twskushortdescription
            });

            // Coffee Country
            Dictionary<string, double> dictCoffeeCountry = new Dictionary<string, double>();
            dictCoffeeCountry.Add("coffeecountry", 3);
            TextWeights twcoffeecountry = new TextWeights(dictCoffeeCountry);
            lstScoringProfiles.Add(new ScoringProfile()
            {
                Name = "coffeecountry",
                TextWeights = twcoffeecountry
            });

            // Coffee Farm
            Dictionary<string, double> dictCoffeeFarm = new Dictionary<string, double>();
            dictCoffeeFarm.Add("coffeefarm", 3);
            TextWeights twcoffeefarm = new TextWeights(dictCoffeeFarm);
            lstScoringProfiles.Add(new ScoringProfile()
            {
                Name = "coffeefarm",
                TextWeights = twcoffeefarm
            });

            // Set the scoring profiles
            index.ScoringProfiles = lstScoringProfiles;
Suggester
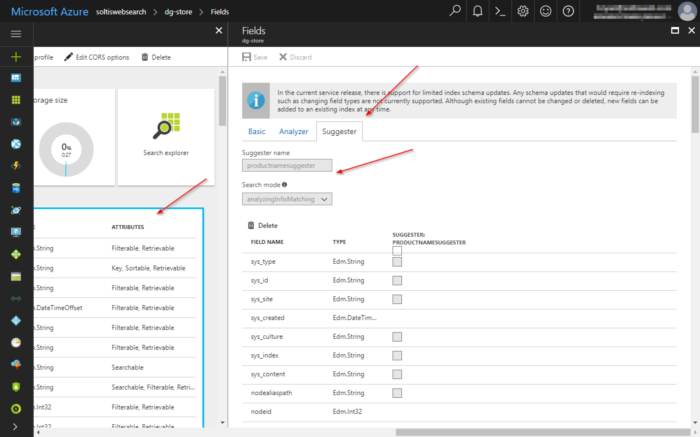
Another powerful capability of Azure Search is the ability to use Machine Learning to suggest possible phrases and values. By creating a suggester for your index, you can provide users “valid” content as they search, ensuring they find what they’re looking for quickly. And by enabling fuzzy searching, they don’t even know need to know the exact spelling to get valid suggestions.
Our documentation provides a great walkthrough for adding a suggester. I implemented that code in my code to set up a suggester for the skuname field.
Documentation
Implementing suggestions for Azure Search
Rebuild index
With my customizations in place, I was ready to update my index. After rebuilding my solution, I clicked Rebuild on my index in the Smart Search module. Because I added my event handler to the CreatingOrUpdatingIndex event, my custom module executed and updated the index with my scoring profiles and suggester.
Creating a webpart
Because Azure Search is so customizable and requires in-depth knowledge of the underlying data, Kentico does not provide web parts out of the box for displaying results on your site. But don’t worry! Our document has a great tutorial to get you up and running quickly.
Documentation
Integrating Azure Search into pages
Building off that tutorial, I updated my web part with several enhancements.
Custom highlighting
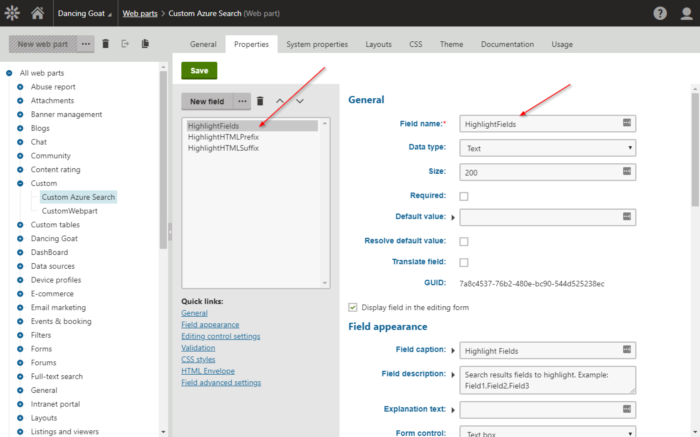
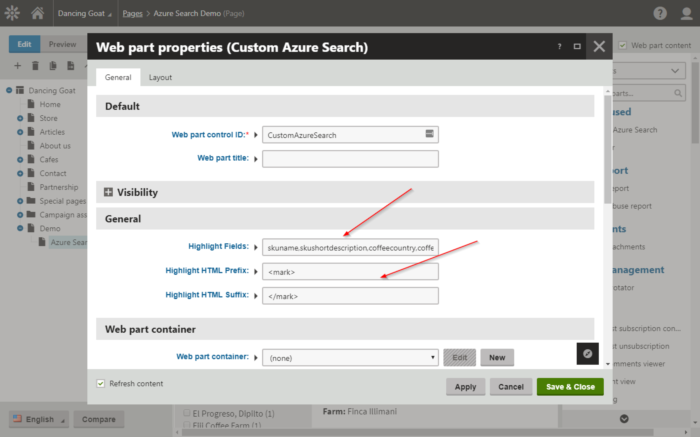
First, I added some properties to my configuration for setting the HighlightHTMLPrefix and HighlightHTMLSuffix values. These values can be used to “wrap” the searched value in the results, allowing you to quickly decorate the HTML using your custom styles and formatting.
I also wanted to allow an editor to specify which fields to highlight. I added a property to hold a list of fields to specify.
In my web part configuration, I added the new properties.
In my web part code, I created new properties for the values.
    public string HighlightFields
    {
        get
        {
            return ValidationHelper.GetString(GetValue("HighlightFields"), "");
        }
        set
        {
            SetValue("HighlightFields", value);
        }
    }

    public string HighlightHTMLPrefix
    {
        get
        {
            return ValidationHelper.GetString(GetValue("HighlightHTMLPrefix"), "");
        }
        set
        {
            SetValue("HighlightHTMLPrefix", value);
        }
    }


    public string HighlightHTMLSuffix
    {
        get
        {
            return ValidationHelper.GetString(GetValue("HighlightHTMLSuffix"), "");
        }
        set
        {
            SetValue("HighlightHTMLSuffix", value);
        }
    }
I then added code to the Page_Load method to use the entered values in my custom code.
            if (cbShowHighlights.Checked)
            {
                if (this.HighlightFields != "")
                {
                    searchParams.HighlightFields = this.HighlightFields.Split(',').ToList();

                    searchParams.HighlightPreTag = this.HighlightHTMLPrefix;
                    searchParams.HighlightPostTag = this.HighlightHTMLSuffix;
                }
            }
Lastly, I added the following to the GenerateResultView to check if the results have highlighting. If your results do contain highlighting the Azure Search response will have a new section, containing the highlighted values.
            // Displays the 'skushortdescription' field's value for result items without highlights matching the search text
            if (result.Highlights == null)
            {
                resultText.Append("<h3><a href='" + URLHelper.ResolveUrl(ValidationHelper.GetString(result.Document["nodealiaspath"], "/")) + "'>" + ValidationHelper.GetString(result.Document["skuname"], "") + "</a></h3>");
                resultText.Append("<p>" + ValidationHelper.GetString(result.Document["skushortdescription"], "") + "</p>");
                resultText.Append("<p><strong>Country:</strong> " + ValidationHelper.GetString(result.Document["coffeecountry"], "") + "</p>");
                resultText.Append("<p><strong>Farm:</strong> " + ValidationHelper.GetString(result.Document["coffeefarm"], "") + "</p>");
            }
            // Displays highlights matching the search text from the 'HighlightFields' specified in the SearchParameters
            else
            {
                if (result.Highlights.ContainsKey("skuname"))
                {
                    resultText.Append("<h3><a href='" + URLHelper.ResolveUrl(ValidationHelper.GetString(result.Document["nodealiaspath"], "/")) + "'>" + result.Highlights["skuname"][0].ToString() + "</a></h3>");
                }
                else
                {
                    resultText.Append("<h3><a href='" + URLHelper.ResolveUrl(ValidationHelper.GetString(result.Document["nodealiaspath"], "/")) + "'>" + result.Document["skuname"] + "</a></h3>");
                }

                if (result.Highlights.ContainsKey("skushortdescription"))
                {
                    resultText.Append("<p>" + ValidationHelper.GetString(result.Highlights["skushortdescription"][0], "") + "</p>");
                }
                else
                {
                    resultText.Append("<p>" + ValidationHelper.GetString(result.Document["skushortdescription"], "") + "</p>");
                }

                if (result.Highlights.ContainsKey("coffeecountry"))
                {
                    resultText.Append("<p><strong>Country:</strong> " + ValidationHelper.GetString(result.Highlights["coffeecountry"][0], "") + "</p>");
                }
                else
                {
                    resultText.Append("<p><strong>Country:</strong> " + ValidationHelper.GetString(result.Document["coffeecountry"], "") + "</strong></p>");
                }

                if (result.Highlights.ContainsKey("coffeefarm"))
                {
                    resultText.Append("<p><strong>Farm:</strong> " + ValidationHelper.GetString(result.Highlights["coffeefarm"][0], "") + "</p>");
                }
                else
                {
                    resultText.Append("<p><strong>Farm:</strong> " + ValidationHelper.GetString(result.Document["coffeefarm"], "") + "</strong></p>");
                }
            }
NOTE
In my web part code, I have some field-specific code to check for highlighting. While I do allow a user to specify the fields to highlight, there needs to be the corresponding code to display it properly.
Adding suggestions
Suggestions are great for people who aren’t skilled typists, or maybe they just can’t remember how something is spelled. By leveraging fuzzy searching in Azure Search, you can use Machine Learning to figure out what the user may be trying to type, and offer suggestions to them.
In order to implement suggestions, I added an event handler for the Search box Text_Changed event. In that function, I leveraged the Azure Search API to retrieve suggestions from the service and populate a list of suggestions.
    protected void txtSearch_TextChanged(object sender, EventArgs e)
    {
        pnlSuggestions.Visible = false;
        lblSuggestions.Text = "";

        // Check if there are any suggestions
        if (!String.IsNullOrWhiteSpace(txtSearch.Text))
        {
            if (txtSearch.Text.Length > 2)
            {
                // Retrieves suggestions based on search input using 'productnamesuggester'
                SuggestParameters sp = new SuggestParameters();
                sp.UseFuzzyMatching = true;
                sp.Top = 3;
                DocumentSuggestResult suggestResult = searchIndexClient.Documents.Suggest(txtSearch.Text, "productnamesuggester", sp);
                if(suggestResult.Results.Count > 0)
                {
                    foreach(SuggestResult result in suggestResult.Results)
                    {
                        LinkButton lb = new LinkButton();
                        lb.Text = result.Text;
                        lb.OnClientClick = "return setSearch('" + result.Text + "');";
                        pnlSuggestions.Controls.Add(lb);
                        pnlSuggestions.Controls.Add(new LiteralControl("<br />"));
                    }
                    pnlSuggestions.Visible = true;
                }
            }
        }
    }
When the user types more than 2 characters, the code will retrieve the list of suggestions and display them as links. For the links, I added a simple JavaScript function to update the txtSearch box with the selected suggestion.
Showing scores
Azure Search returns results based on their score. This means the most relevant results are listed first, based on the scoring profiles and parameters you passed the service. I sometimes find it useful to display these scores to the user, so they can see where each result ranked.
<asp:CheckBox runat="server" ID="cbShowScore" Text=" Show score?" AutoPostBack="true" />
In my code-behind in the GenerateResultView method, I added check for the input. If checked, I added the score to the displayed results.
if (cbShowScore.Checked)
            {
                resultText.Append("<p>Score: " + result.Score + "</p>");
            }
Scoring Profiles
To allow the user to change the results, I added a DropDownList to my page to allow then to specify the scoring profile.
                <h4>Scoring Options</h4>
                <asp:DropDownList ID="ddlScoringProfile" runat="server" Visible="true" CssClass="ContentDropDownList" AutoPostBack="true">
                    <asp:ListItem Value="">Default</asp:ListItem>
                    <asp:ListItem Value="skuname">Name</asp:ListItem>
                    <asp:ListItem Value="skushortdescription">Description</asp:ListItem>
                    <asp:ListItem Value="coffeecountry">Country</asp:ListItem>
                    <asp:ListItem Value="coffeefarm">Farm</asp:ListItem>
                </asp:DropDownList>
In my code-behind, I added a check for the selected value and set the scoring profile, if needed.
            // Check if a scoring profile was selected
            if (ddlScoringProfile.SelectedValue != "")
            {
                searchParams.ScoringProfile = ddlScoringProfile.SelectedValue;
            }
NOTE
With the data I used in my demo, the scoring profiles didn’t change the results much. This is because the same values where listed in the same fields for each record. This means that their score was often the same. If your data is considerably different from one record to the next, scoring profiles will prove very powerful at allowing the user to customize their results.
Testing
After all my configuration was complete, I was ready to test. In my Pages module, I added my Azure Search web part to a page and set its properties.
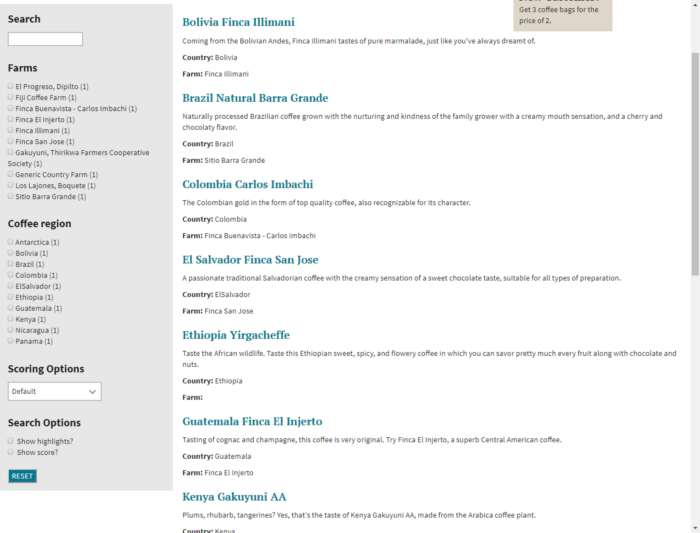
Next, I hit my demo page to confirm the default data displayed.
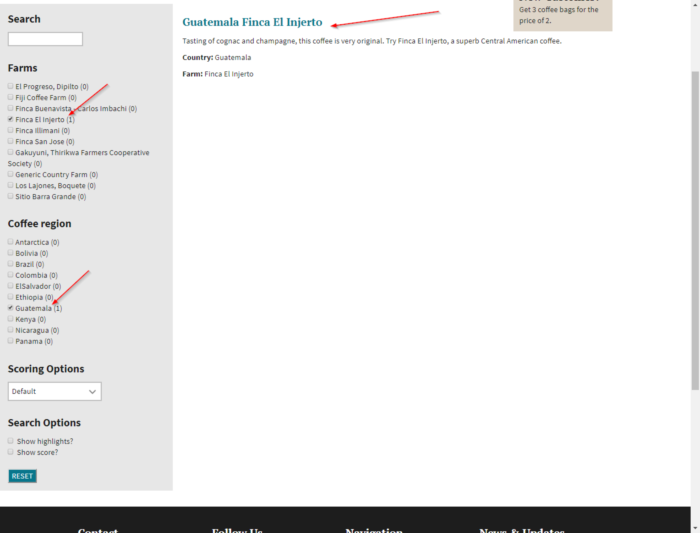
Next, I tested the Facets functionality.
Next, I searched for a specific value. I also selected Show highlights, to highlight the selected value in the results.
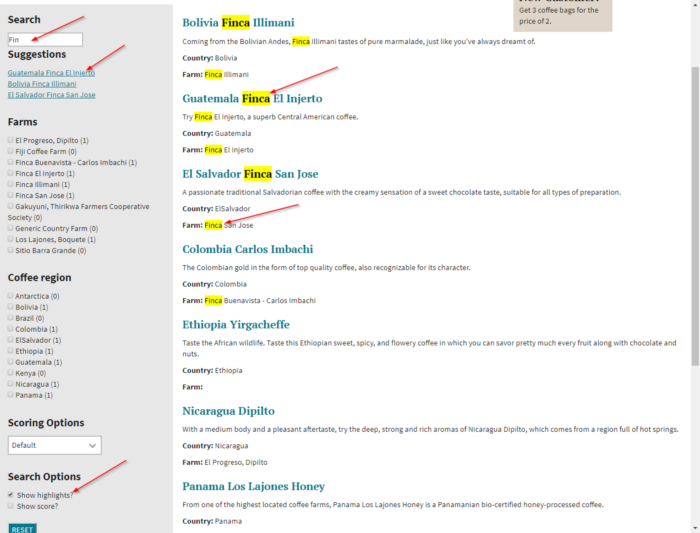
This test confirmed the highlighting was displaying properly in the designated fields. Also, by typing a value into the Search box, I confirmed the site was displaying suggested SKUName values.
Lastly. I clicked the Show score option to display the results, as well as set a Scoring profile.
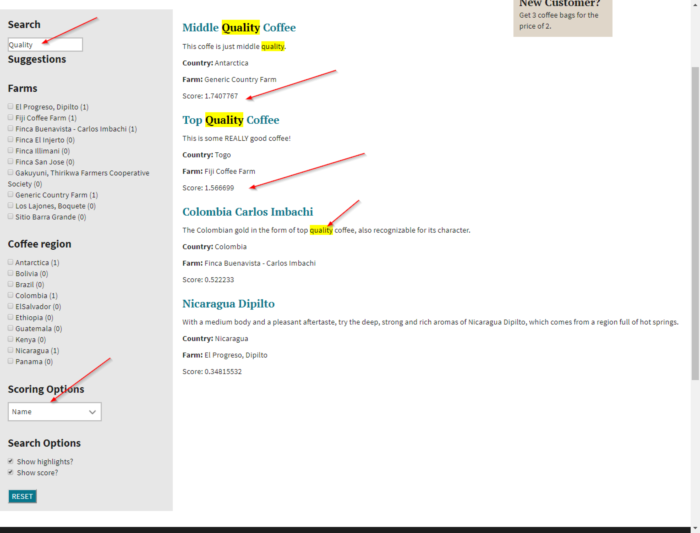
This shows that when the value is found in the title and description, the score is higher. Also, the searched value in the Name results in a higher score than if found in the Description.
Other stuff
In addition to what I covered in this blog, Azure Search still has even more tricks up its sleeve! Here’s a list of other capabilities you can implement in your solutions.
Analyzers
Modifying how Azure Search analyzes your content can have a significant impact on the results. You can change the language, how the text is search (front to back, back to front, etc.) and a number of other options.
Documentation
Language analyzers in Azure Search
Setting analyzers for Azure Search
Custom scoring functions
In this demo, I did pretty basic scoring functions, weighting the results on a single column. You can also combine weights of multiple columns for dynamic results. You can also add your own custom functions to poll averages, determine ranges, and even geographical distance calculations.
Documenation
Add scoring profiles to a search index (Azure Search Service REST API)
Synonym mapping
Sometimes your users will search for data using various phrases and text. By using synonym mapping in Azure Search, you can return results for a give value, even if it doesn’t exist in your content.
Documentation
Synonym Map Operations (Azure Search Service REST API)
Moving forward
Azure Search is a pretty amazing service, with some tremendous functionality and customization possibilities. This blog was intended to show you how to integrate the new Azure Search capabilities into your site. As I said, our documentation has a lot of great tutorials. I wanted to combine them into a single solution to show you how to take advantage of this great new capability within your sites. I can’t wait to see what kind of awesome solutions you come up! Good luck!
Get the code
Download the full custom module code
Download the full web part code