Creating Module Installation Packages
Installation packages create an easy way for developers to install, update, and uninstall your custom module, but they can take a bit of configuration before they’re ready to ship. This article should clarify the necessary steps to finalize your installation package.
Our documentation has very detailed instructions for creating installation packages: https://docs.kentico.com/k10/custom-development/creating-custom-modules/creating-installation-packages-for-modules. However, there are some important details that are not described, and some people prefer to see the steps visually.
This process can be divided into four steps:
- Create the project
- Copy the project files to the Kentico solution
- Include the project in the Kentico solution
- Develop the module
Create the project
https://docs.kentico.com/k10/custom-development/creating-custom-modules/creating-installation-packages-for-modules#Creatinginstallationpackagesformodules-Creatingtheproject
1. Create a new web application project in Visual Studio, not within the Kentico solution. The project name should have the same name as your custom module's code name in Kentico. Here, we’re using my “CoolModule” code name.

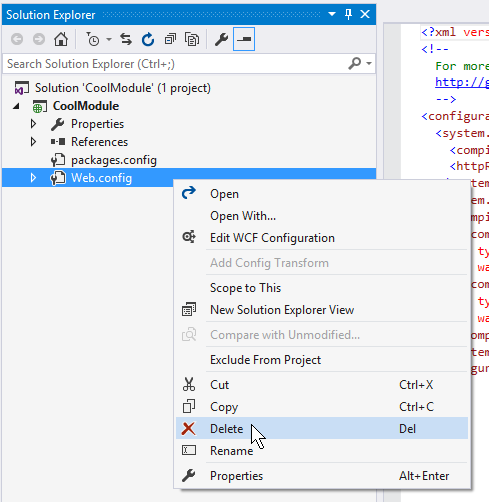
2. Delete the web.config.
.png)
3. If the project contains a packages.config file, rename it to packages.<project name>.config.

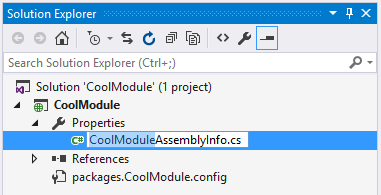
4. Rename /Properties/AssemblyInfo.cs to /Properties/<project name>AssemblyInfo.cs
.png)
5. Save the project.
Copy the project files to the Kentico solution
https://docs.kentico.com/k10/custom-development/creating-custom-modules/creating-installation-packages-for-modules#Creatinginstallationpackagesformodules-CopyingtheprojectfilestotheKenticosolution
- Open the module’s project directory and the Kentico project directory side-by-side in Windows.
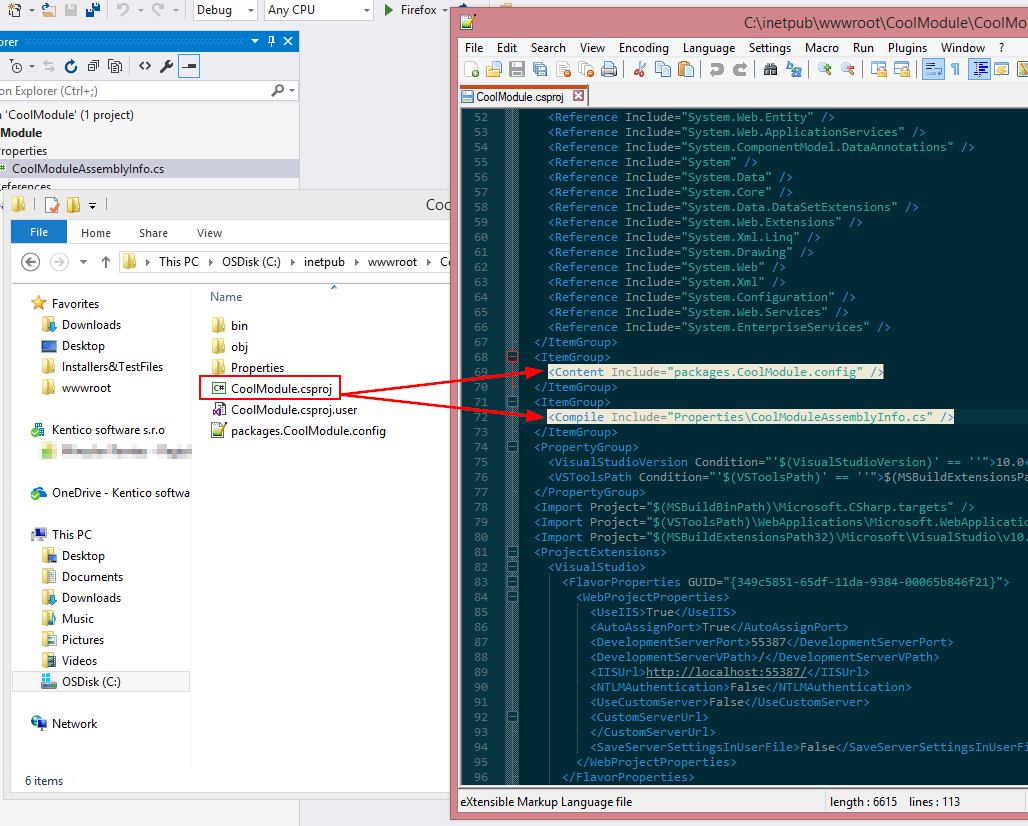
- In the module’s directory, ensure that the .csproj file contains the changes made in the previous steps.
.png)
3. Copy the .csproj, packages.<project name>.config, and /Properties folder to the Kentico project’s /CMS folder.
Include the project in the Kentico solution
https://docs.kentico.com/k10/custom-development/creating-custom-modules/creating-installation-packages-for-modules#Creatinginstallationpackagesformodules-IncludingtheprojectintheKenticosolution
1. Open the Kentico solution in Visual Studio.
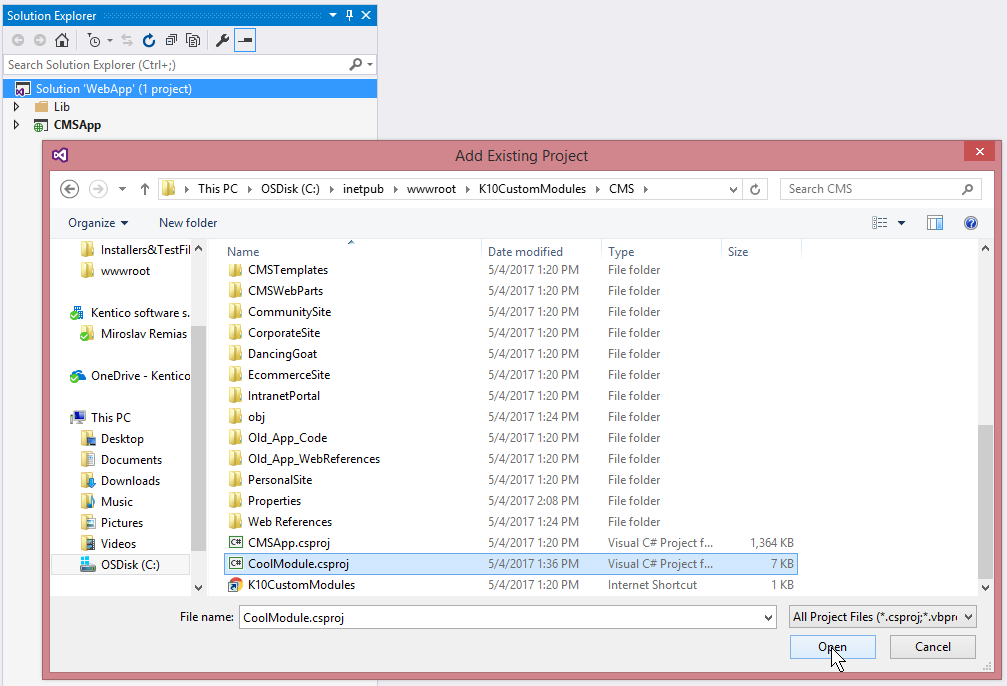
2. Add your custom module project to the Kentico solution using Add > Existing project and the <project name>.csproj file in the /CMS directory.
.png)
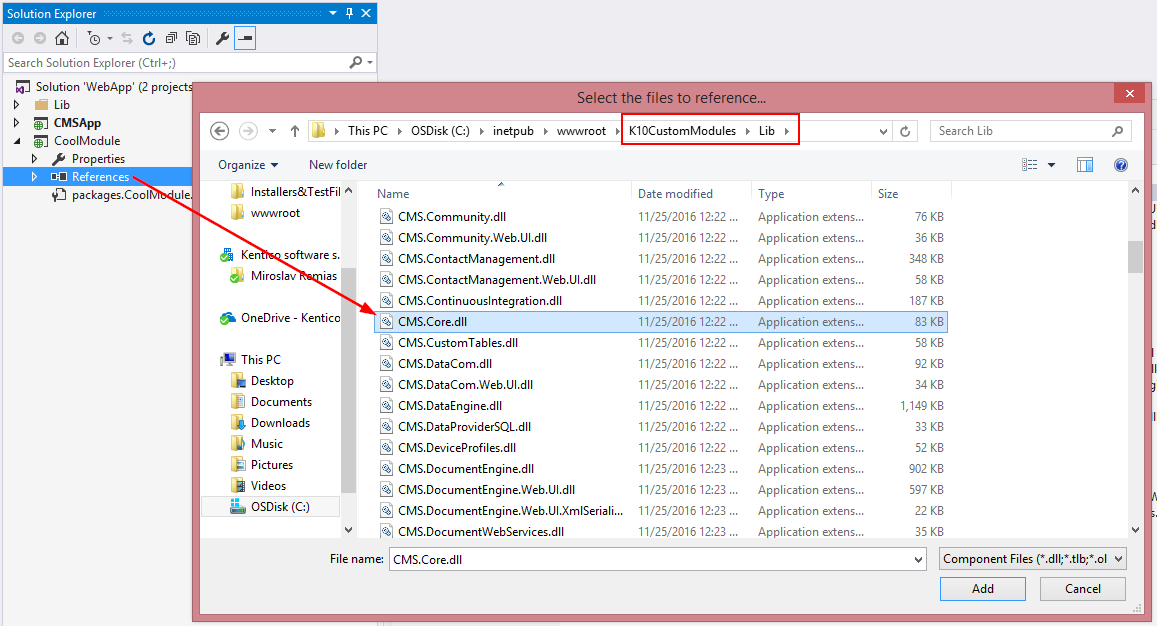
3. Add any references required by the custom module to the custom module project. You can always add more references later, so if you’re unsure, just add CMS.Core.dll for now. Add the references from the Kentico project’s /Lib directory.
.png)
4. Add the AssemblyDiscoverable attribute to the custom module project’s <project name>AssemblyInfo.cs under Properties.
.png)
5. Save everything!
Develop the module
You’re now ready to start developing your module, by placing all necessary files in the custom module project. The custom module project should not depend on any files within the Kentico project, aside from DLL references.
This has major implications if you plan on using any Kentico controls, like the UniGrid. For example, let’s say my Cool Module has a tab which displays a grid of users in the system, and I want to manually create this interface using this approach: https://docs.kentico.com/k10/custom-development/creating-custom-modules/manually-creating-the-interface-for-custom-modules. I would start by creating a CoolModule folder in /CMS/CMSModules. I can then include this folder in my custom module project by clicking the “Show all files” button in Solution Explorer, right-clicking the folder, and selecting “Include in project.”
.png)
In my custom module project, I create the HomePage.aspx page which will be used as the target URL for the UI element of my module. I then add a UniGrid to the page as usual, but when I compile I see the following error:
.png)
The custom module project doesn’t have the /CMSAdminControls folder or any of its contents, so it can’t load the UniGrid control. We also can’t simply include the /CMSAdminControls/UI/UniGrid/UniGrid.ascx file, so what can we do?
Copy all controls!
In order to use Kentico controls in your custom module, you will need to clone them in your custom module. This will most likely introduce a number of additional controls that need to be cloned, because they are being used by that control. In the end, to use the UniGrid on my HomePage.aspx page, I needed to clone seven additional controls.
Here you can see I’ve copied and pasted the required /CMSAdminControls/UI/UniGrid/UniGrid.ascx control into my custom module’s CMSModules/CoolModule/Controls folder, and renamed it.
.png)
I’ve also renamed the class in the .ascx and .ascx.cs to reflect this change:

.png)
Back in my HomePage.aspx file, I can now reference my fully custom UniGrid control. You should also change the TagPrefix from “cms” to something custom such as “uc1.” Attempting to build the project now will produce many errors:
.png)
As I stated earlier in this section, using a single control such as the UniGrid will introduce new requirements for the controls used by that control as well as required DLLs. You can tackle these error messages one-by-one, referencing the needed DLLs and cloning controls using the same process as the UniGrid.
In the end, all controls and pages should reference your own custom controls with a custom TagPrefix:
.png)
I swear I’ve done everything right, but there’s still tons of errors!
Things can get messy with all of this cloning and renaming. If, after all is said and done, you still get build errors, try re-generating the designer files for your custom controls. To do this, delete the existing designer files:
.png)
After they’re all deleted, select your custom module project, then go to Project > Convert to Web Application. This will generate any missing designer files in your project, with the correct references.
.png)
You may also want to check the generated designer files for errors. In rare cases, Visual Studio can generate erroneous or even empty designer files!
That’s it!
Once you’re done developing your module, you can create the installation package from the Modules application, on your module’s General tab. Kentico will display a list of physical files and database objects contained within the package:
.png)
Code files are not listed here, as they are compiled into a DLL. You will want to closely review this information to ensure that all expected files are included. If some files or objects are not included in this list, I would recommend checking this page: https://docs.kentico.com/k10/custom-development/creating-custom-modules/creating-installation-packages-for-modules#Creatinginstallationpackagesformodules-Reference-Custommoduleconventions. This describes the different locations your physical files should be located in order to be automatically included in the installation package. For example, resource strings should be added to ~/CMSResources/<module code name>/Default.resx instead of the database.