Creating a Sortable User Selector form control in Kentico
Form controls are a powerful component of Kentico. By creating these custom interfaces, developers can provide an intuitive and dynamic experience for their users. While Kentico has many controls out of the box, projects often require more complex solutions to achieves specific goals. In this blog, I’ll show you how to create a form control that allows drag & drop ordering for multiple objects.
Creating custom form controls is a big part of a developer’s job when they are creating enterprise applications. Because each project is different in how they consume and use information, customizing the editing experience is a key step to ensuring user satisfaction and usability. For the Kentico Consultants, helping developers architect and implement these solutions is an everyday thing.
Recently, Richard Sustek from our Consulting was presented with creating a sortable object selector for a client. The goal was to create an interface where users could select multiple objects, and sort them using drag and drop functionality. In this blog, I’ll walk you through the solution we provided to hopefully help you in your projects, as well.
Note
This control has several parts to achieve the desired functionality. I will highlight many of these in this article. You can view the full source of the control to see the entire solution/functionality.
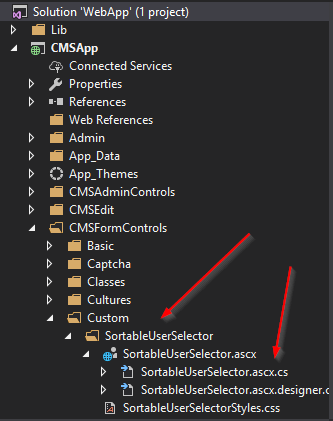
Create user control
The first step was to create the user control. In my CMSFormControls/Custom folder, I created a new user control for my selector. I opted to create the control within a sub folder, to organize my supporting files.
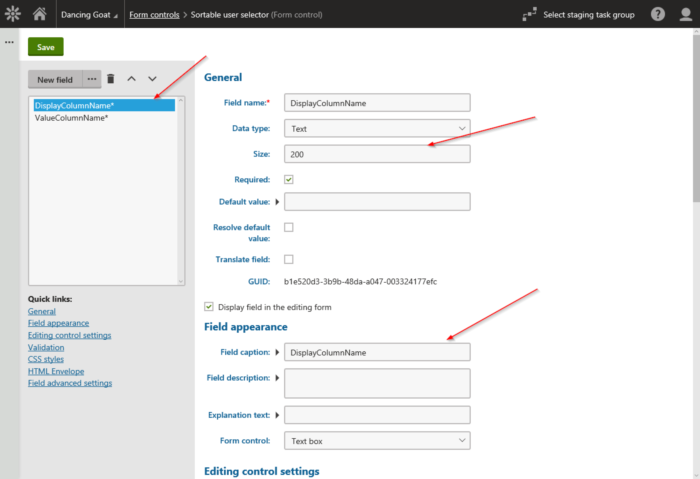
Control properties
The next step was the create the form control properties. These objects defined what type of objects the control collected and stored. Because the goal was a universal control for any object type supported by the uniselector, I had to specify userinfo-specific classes in my implementation.
        /// <summary>
        /// Represents display name of item
        /// </summary>
        public string DisplayColumnName
        {
            get
            {
                return "UserName";
            }
        }

        /// <summary>
        /// Represents returned value of item
        /// </summary>
        public string ValueColumnName
        {
            get
            {
                return "UserID";
            }
        }

        /// <summary>
        /// Casts given dataSource to appropriate BaseInfo type
        /// </summary>
        private InfoDataSet<UserInfo> GetDataSource(object dataSource)
        {
            return (InfoDataSet<UserInfo>)dataSource;
        }
Control layout
On the control, I registered the uniselector control and set the properties. This control is a standard part of many Kentico forms and allows the selection of objects from a collection.
<%@ Register Src="~/CMSAdminControls/UI/UniSelector/UniSelector.ascx" TagName="UniSelector" TagPrefix="cms" %>
<cms:UniSelector ID="MultipleSelector" runat="server" RememberOriginalValue="true" ObjectType="cms.user" AdditionalColumns="UserName" SelectionMode="Multiple" ReturnColumnName="UserID" />
Next, I added a repeater to display the selected items. This list would be populated when a user selects the objects in the uniselector.
        <asp:Repeater runat="server" ID="ItemList">
            <ItemTemplate>
                <li id='<%# SortableItemIDPrefix %><%# Container.ItemIndex + 1 %>' data-display='<%# Eval("ItemText") %>' data-value='<%# Eval("ItemValue") %>' class="sortedItem"><%# Eval("ItemText") %><span><i aria-hidden="true" class="RemoveItem icon-bin cms-icon-50"></i></span></li>
            </ItemTemplate>
        </asp:Repeater>
Populating the repeater
To populate the selected items, I added the following code the SelectionChanged event for the uniselector. This code gets the selected items and creates a ListItem collection to populate the ItemList repeater datasource property.
           // get all selected items
           var itemsDS = GetDataSource(this.MultipleSelector.UniGrid.DataSource);
            // prepare Value for uniselector "preselection"
           var uniValue = "";
            if (itemsDS != null)
           {
                // add each item to the sortable list
               var itemList = new List<Item>();
               foreach (var item in itemsDS)
               {
                   itemList.Add(new Item() { ItemText = item.GetStringValue(DisplayColumnName, ""), ItemValue = item.GetStringValue(ValueColumnName, "") });
                   uniValue += item.GetStringValue(ValueColumnName, "") + itemSeparator;
               }
                // assign items to list
               ItemList.DataSource = itemList;
               ItemList.DataBind();
           }
            // assign value to uni selector
           this.MultipleSelector.Value = uniValue;
Add JavaScript
Another important piece was controlling how the uniselector and repeater worked together. This required some complex JavaScript to control how the control looked, as well as how it functioned. There was a lot of code added, but it’s commented to help you understand what each section does.
    $(function () {
        // get the ID of wrapper (so that multiple form controls can be used on the same page)
        var wrapperID = '<%# FieldID %>';

        // hide table content (so that its not displayed twice)
        $("#" + wrapperID + " .MultipleObjectSelectorTable .unigrid-content").hide();

        // hide "Remove selected" button
        $("#" + wrapperID + " .MultipleObjectSelectorTable .btn-actions > div:first-of-type").hide();

        // initialize sortable list
        $("#" + wrapperID + " .MultipleObjectSelector_List").sortable({
            stop: function (event, ui) {
                // position of item changed - update hidden field
                console.log("New position: " + ui.item.index() + " " + ui.item.data("value"));
                UpdateHiddenField();
            },
        });
        $("#" + wrapperID + " .MultipleObjectSelector_List").disableSelection();

        var itemSeparator = ";";
        var attributeSeparator = ",";

        // initialize hidden field on first page load/post back
        UpdateHiddenField();

        // remove item from DOM upon click
        $("#" + wrapperID + " .MultipleObjectSelector_List .RemoveItem").click(function () {
            // remove element from DOM
            $(this).closest('li').remove();

            // recalculate hidden field
            UpdateHiddenField();
        });

        // updates value in Hidden fields based on current sortable state
        function UpdateHiddenField() {
            var valueOfHiddenField = "";

            var idsInOrder = $("#" + wrapperID + " .MultipleObjectSelector_List").sortable("toArray"); // gets ordered items
            $.each(idsInOrder, function (index, elementID) {
                var element = $("#" + elementID);
                var itemValue = element.data("value");
                var itemDisplay = element.data("display");

                // create separated value (object ID + attribute separator + display + item separator)
                valueOfHiddenField += itemValue + attributeSeparator + itemDisplay + itemSeparator;
            });
            // set value of hidden field
            $("#" + wrapperID + " .HiddenFieldWrapper > input").val(valueOfHiddenField);
        }
    });
To make the code work if multiple form controls were selected for a form, code was added to set the IDs for elements to unique values. Because the uniselector has its own interfaces that are usually displayed, jQuery code was added to control what the user sees on the page.
jQuery, Bootstrap, and CSS
To leverage JavaScript libraries and custom styles, I needed to register the libraries within the control itself. Because form controls cannot access the parent page, this meant using the ScriptHelper API to register the scripts and custom style sheet.
            // Registers the default CSS and JavaScript files onto the page (used to style the UniSelector)
            CssRegistration.RegisterBootstrap(Page);
            ScriptHelper.RegisterBootstrapScripts(Page);

            // load custom jQuery and jQuery UI with theme
            ScriptHelper.RegisterScriptFile(this.Page, "https://code.jquery.com/jquery-1.12.0.min.js");
            ScriptHelper.RegisterScriptFile(this.Page, "https://code.jquery.com/ui/1.11.4/jquery-ui.js");

            // register custom styles
            CssRegistration.RegisterCssLink(this.Page, "~/CMSFormControls/Custom/SortableUserSelector/SortableUserSelectorStyles.css");
These API calls registered the specified jQuery and Bootstrap libraries needed for the JavaScript to function.
You can find out more about the ScriptHelper API here.
Register the form control
With the form control created, I was ready to register the control within Kentico. In the Form controls app, I registered the new control.
General
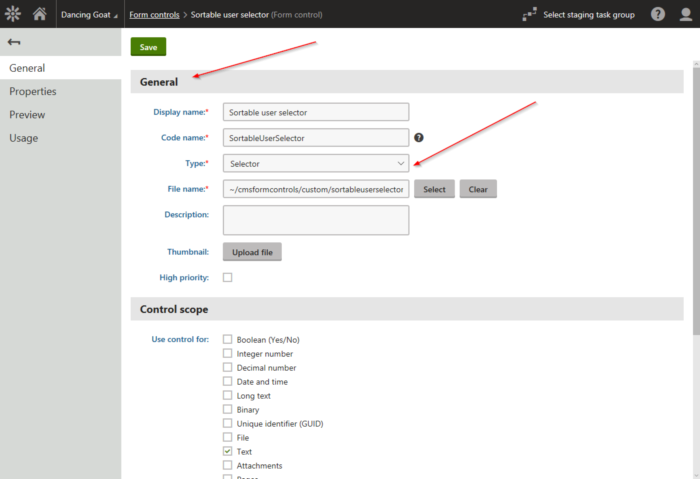
Properties
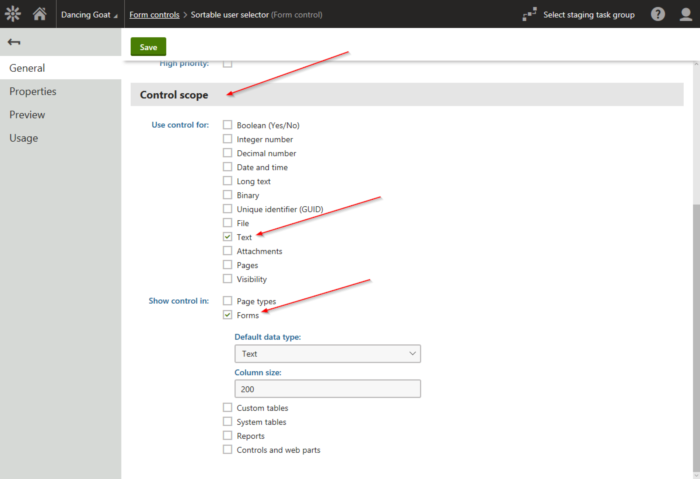
Control scope
Testing
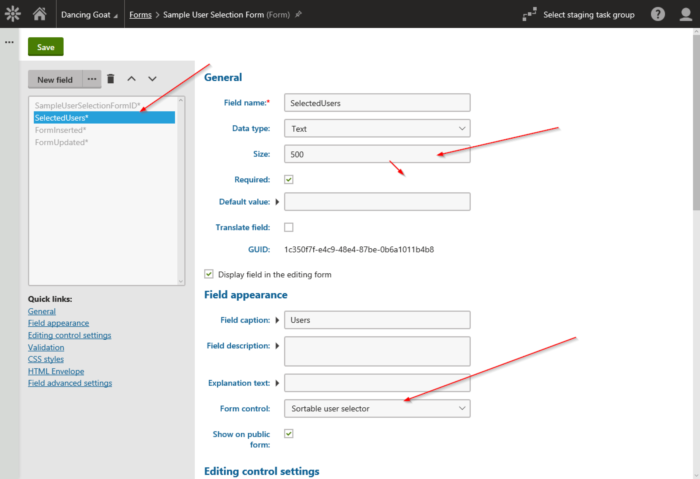
With the form control registered, I was ready to test the control. I created a new sample form and added a field with the new control selected.
I then previewed the form and confirmed the control was working properly. Here’s a short video of the form control in action.
In the video, I added new users, changed their order, and then saved them. This set the Users field to a comma-delimited list of the users and their IDs. I then removed a user and saved the list.
NOTE
This example uses the UserID for tracking the users. You may need to use the UserGUID or other unique value if you move this control to another environment.
Moving forward
Creating custom form controls is a great way to ensure your users have a good experience when using their Kentico forms. By incorporating jQuery and other libraries, you can build out your functionality to meet the needs of any project. In this example, I only covered part of the code so be sure to check out the full source code below to see how it all works.
Good luck!
UPDATE
This control has also been released on the DevNet Marketplace.
Get the code
This blog is intended for informational purposes only and provides an example of one of the many ways to accomplish the described task. Always consult Kentico Documentation for the best practices and additional examples that may be more effective in your specific situation.