Creating a SendGrid Email Provider
Nearly every project with Kentico requires some sort of custom development to create an integrated solution that solves a business problem. One of the most common integration points is leveraging 3rd party SMTP systems for offloading email processing, such as SendGrid or Mail Chimp. These systems often offer functionality for monitoring and tracking messages and logging bounces and other errors. This article details the process of creating a Custom Email Provider that utilizes the SendGrid API for all email communication within a Kentico site.
1. Creating the email provider
The first step in the process is to create a custom class for my Email Provider. The Kentico documentation has an example of this and is a great place to start from. Essentially, I need to create a new class in Old_App_Code (or App_Code if using a website project) for my custom class that will hold my SendGrid functionality.
- Create the custom class
- Add the appropriate using statements
- Inherit form EmailProvider
- Override the SendEmailInternal and SendEmailAsyncInternal methods
- Register our custom Email Provider
[assembly: RegisterCustomClass("SendGridEmailProvider", typeof(SendGridEmailProvider))]

public class SendGridEmailProvider : EmailProvider
{
    /// <summary>
    /// Synchronously sends an email through the SMTP server.
    /// </summary>
    /// <param name="siteName">Site name</param>
    /// <param name="message">Email message</param>
    /// <param name="smtpServer">SMTP server</param>
    protected override void SendEmailInternal(string siteName, MailMessage message, SMTPServerInfo smtpServer)
    {
    }

    /// <summary>
    /// Asynchronously sends an email through the SMTP server.
    /// </summary>
    /// <param name="siteName">Site name</param>
    /// <param name="message">Email message</param>
    /// <param name="smtpServer">SMTP server</param>
    /// <param name="emailToken">Email token that represents the message being sent</param>
    protected override void SendEmailAsyncInternal(string siteName, MailMessage message, SMTPServerInfo smtpServer, EmailToken emailToken)
    {
    }

    /// <summary>
    /// Raises the SendCompleted event after the send is completed.
    /// </summary>
    /// <param name="e">Provides data for the async SendCompleted event</param>
    protected override void OnSendCompleted(AsyncCompletedEventArgs e)
    {
        base.OnSendCompleted(e);
    }
}
With the base class created, I need to register it within the system. This requires adding the following config section to the web.config file.
  <!-- Extensibility BEGIN -->
  <cms.extensibility>
    <providers>
      <add name="EmailProvider" assembly="App_Code" type="SendGridEmailProvider" />
    </providers>
  </cms.extensibility>
  <!-- Extensibility END -->
2. Adding the SendGrid API
Once I have my class set up, I can add in my custom functionality. The first step here is to add the SendGrid API to my project. I can do this by using the following NuGet package:
Install-Package SendGrid
This command adds the SendGrid APIs to my project and all the files needed to integrate their API into my code. I add a reference to the SendGrid dlls to the CMS_AppCode project.
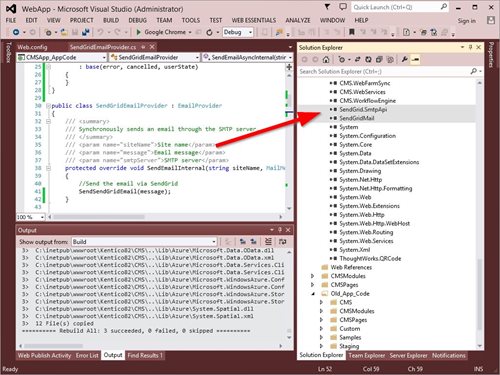
3. Adding the “Send” functionality
Now that I have my custom provider configured, it’s time to add some custom functionality. I have created a single method to send the email using the SendGrid API (SendSendGridEmail). In the SendEmailInternal and SendEmailAasyncInternal methods I call this method to ensure all emails are routed through my custom functionality.
/// <summary>
/// Synchronously sends an email through the SMTP server.
/// </summary>
/// <param name="siteName">Site name</param>
/// <param name="message">Email message</param>
/// <param name="smtpServer">SMTP server</param>
protected override void SendEmailInternal(string siteName, MailMessage message, SMTPServerInfo smtpServer)
{
    //Send the email via SendGrid
    SendSendGridEmail(message);
}


/// <summary>
/// Asynchronously sends an email through the SMTP server.
/// </summary>
/// <param name="siteName">Site name</param>
/// <param name="message">Email message</param>
/// <param name="smtpServer">SMTP server</param>
/// <param name="emailToken">Email token that represents the message being sent</param>
protected override void SendEmailAsyncInternal(string siteName, MailMessage message, SMTPServerInfo smtpServer, EmailToken emailToken)
{
    //Send the email via SendGrid
    SendSendGridEmail(message);
}
In my method, I am extracting the Kentico MailMessage details and populating my SendGridMessage object with the values. After setting the appropriate properties, I am calling the Deliver function to send my email using the API.
/// <summary>
/// This function will send the email via SendGrid.
/// </summary>
/// <param name="kMessage">MailMessage - Message object to send</param>
protected void SendSendGridEmail(MailMessage kMessage)
{
    try
    {
        // Create the email object first, then add the properties.
        var sgMessage = new SendGridMessage();

        // Add the message properties.
        sgMessage.From = new MailAddress(kMessage.From.ToString());

        // Add multiple addresses to the To field.
        foreach (MailAddress address in kMessage.To)
        {
            sgMessage.AddTo(address.Address);
        }

        sgMessage.Subject = kMessage.Subject;

        // HTML & plain-text
        if (kMessage.AlternateViews.Count > 0)
        {
            foreach (AlternateView view in kMessage.AlternateViews)
            {
                // Position must be reset first
                if (view.ContentStream.CanSeek)
                {
                    view.ContentStream.Position = 0;
                }

                using (StreamWrapper wrappedStream = StreamWrapper.New(view.ContentStream))
                {
                    using (StreamReader reader = StreamReader.New(wrappedStream))
                    {
                        if (view.ContentType.MediaType == MediaTypeNames.Text.Html)
                        {
                            sgMessage.Html = reader.ReadToEnd();
                        }
                        else if (view.ContentType.MediaType == MediaTypeNames.Text.Plain)
                        {
                            sgMessage.Text = reader.ReadToEnd();
                        }
                    }
                }
            }
        }

        //Handle any attachments
        foreach (Attachment attachment in kMessage.Attachments)
        {
            sgMessage.AddAttachment(attachment.ContentStream, attachment.Name);
        }

        //Enable click tracking
        sgMessage.EnableClickTracking(true);

        // Create credentials, specifying your user name and password.
        var credentials = new NetworkCredential("[SendGridLogin]", "[SendGridPassword]");

        // Create an Web transport for sending email.
        var transportWeb = new Web(credentials);

        // Send the email.
        transportWeb.Deliver(sgMessage);
    }
    catch (Exception ex)
    {
        EventLogProvider.LogException("SendSendGridEmail", "EXCEPTION", ex);
    }
}
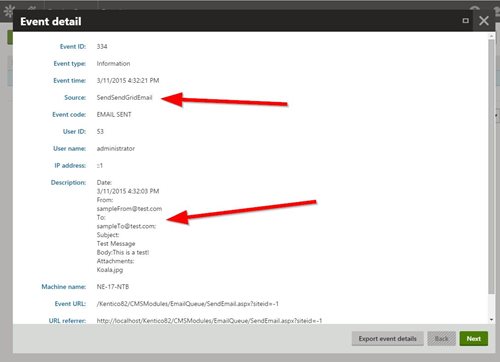
I’ve added some logging of the email properties to store in the Event Log. This ensures there is a record of the email within Kentico. I’ve added lines specific to the To, From, Subject, Body, and Attachments.
        StringBuilder sb = new StringBuilder();
        sb.Append("Date:");
        sb.AppendLine();
        sb.Append(DateTime.Now.ToString());
        sb.AppendLine();
        sb.Append("From:");
        sb.AppendLine();
        sb.Append(sgMessage.From.Address);
        sb.AppendLine();

        // Add multiple addresses to the To field.
        sb.Append("To:");
        sb.AppendLine();
        foreach (MailAddress address in kMessage.To)
        {
            sgMessage.AddTo(address.Address);
            sb.Append(address.Address + ";");
        }
        sb.AppendLine();
        sb.Append("Subject:");
        sb.AppendLine();
        sb.Append(sgMessage.Subject);
        sb.AppendLine();
        sb.Append("Body:");
        if (ValidationHelper.GetString(sgMessage.Html, "") != "")
        {
            sb.Append(sgMessage.Html);
        }
        else
        {
            sb.Append(sgMessage.Text);
        }
        sb.AppendLine();

        //Handle any attachments
        sb.Append("Attachments:");
        sb.AppendLine();
        foreach (Attachment attachment in kMessage.Attachments)
        {
            sb.Append(attachment.Name);
            sb.AppendLine();
        }

        //Log the email details to the Event Log
        EventLogProvider.LogInformation("SendSendGridEmail", "EMAIL SENT", ValidationHelper.GetString(sb, ""));
Note
If you only need to send some emails through SendGrid, you could easily add some logic to the SendEmailInternal and SendEmailAsyncInternal methods to only use your custom logic if the email matches your criteria. If the message doesn’t, just call the base.SendEmailInternal method instead to use the standard Kentico functionality.
4. Testing the system
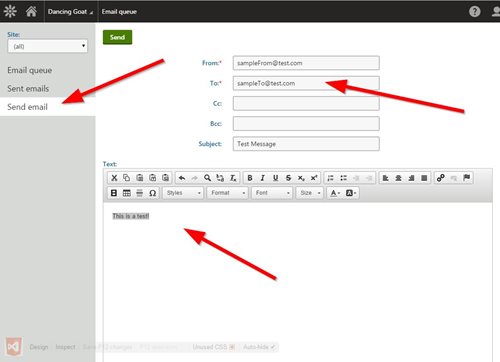
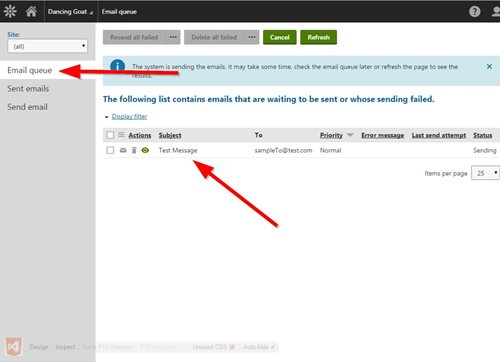
Now that I have my custom provider setup, it’s time to test out my code. In the Email Queue application I created a sample message, attached a file, and sent it.
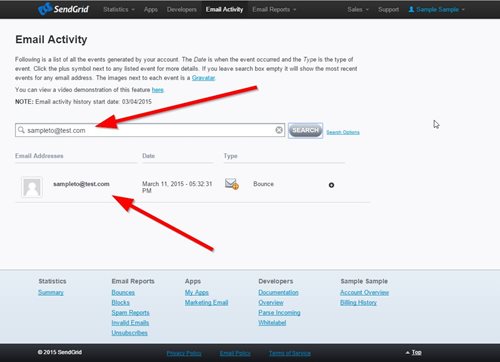
In my SendGrid portal, I can see the email message is queued up and ready to go.
I also need to make sure the email leaves the queue. This is accomplished by getting Kentico to “think” the email is sent. In order to do this I created a new class that derives from AsyncCompletedEventArgs, created a new object in the SendEmailAsyncInternal method, set its UserState property to the email token, and call OnSendCompleted. This tells Kentico the email has been processed and removes it from the queue.
public class CustomCompletedEventArgs : AsyncCompletedEventArgs
{
    public CustomCompletedEventArgs(Exception error, bool cancelled, object userState)
        : base(error, cancelled, userState)
    {
    }
protected override void SendEmailAsyncInternal(string siteName, MailMessage message, SMTPServerInfo smtpServer, EmailToken emailToken)
{
    //Send the email via SendGrid
    SendSendGridEmail(message);

    CustomCompletedEventArgs args = new CustomCompletedEventArgs(null, false, emailToken);
    OnSendCompleted(args);
}
With that code in place my email should leave the queue after being processed.
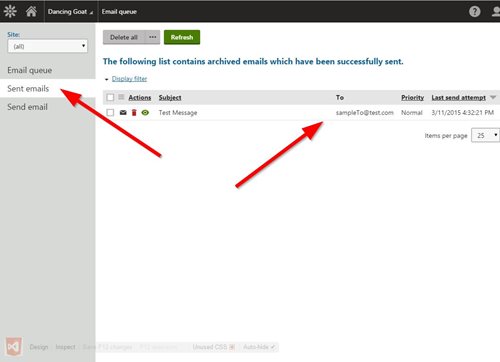
Lastly, I verified that my Event Log entry was added that shows the email had been sent.
Final Thoughts
Creating a custom email provider is a great way to handle every email sent through the site. With the above code, I can easily track all of the emails in SendGrid and leverage their “ClickThrough” and other tracking features. Hopefully this helps you in your development and shows you how to easily leverage 3rd party SMTP systems in your projects!
Oh, you want the code? Well, here is it is!
This blog is intended to demonstrate one of many ways to accomplish this task. Always consult the Kentico Documentation for best practices and additional examples.