Creating a Blackout Calendar Form Control in Kentico
Many companies often have several contributors to their website’s content. With so many authors producing articles, it becomes essential that publishing rules are established and enforced to prevent multiple articles being released at the same time. Enforcing those rules can be a challenging task but can be easily done with a little custom code. In this article, I’ll show you how to create a custom form control to limit the number of articles that can be published on a specific day.
Here at Kentico, we have many authors publishing content to DevNet. With so much great content, we have to take special care to ensure we do not release too many articles at one time. In order to achieve this, we have defined rules by our content team that only two articles can be published on a given date. This ensures that we don’t flood the channel with communications and we space out articles appropriately.
While we could rely on people following the rules and only publishing two articles a day, it would be great if there were an automated way to handle it instead. The answer? A custom form control! Because each blog has an assigned date when it will be posted, we can easily add a form control for the page type that will check to make sure the correct number of articles are scheduled.
Creating the form control
The first step I took was to create a new form control. This control is very similar to the existing Calendar control and its properties, but I added a few new configuration options to handle my custom functionality.
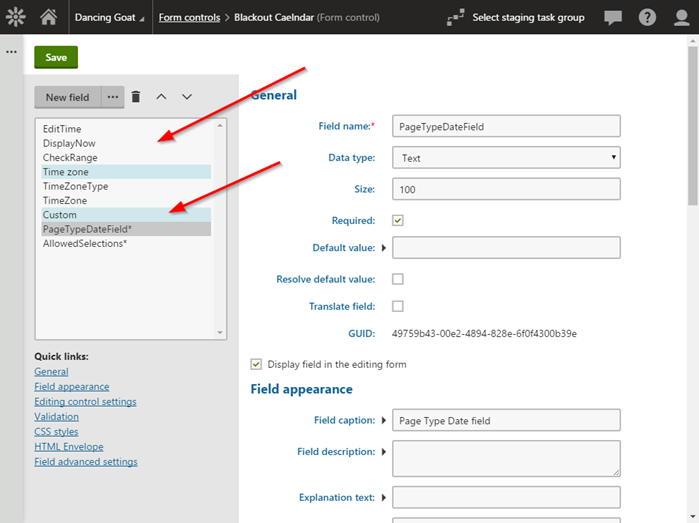
For the control, I created the following new properties (in addition to the ones for the existing Calendar control):
PageTypeDateField
Text - 100
Class field selector
Defines which field is used to determine how many pages are assigned to the selected date
AllowedSelections
Integer Number – 0
Text box
Defines how many selections are allowed for the selected date—if 0, then the number is unlimited
Adding the conditional logic
Once my control was created, I added the following logic to use my custom properties:
        // Determine if the control should limit selections
        if (this.AllowedSelections > 0)
        {
            // Get the class for the selected date field
            DataClassInfo pagetype = DocumentTypeHelper.GetDocumentTypeClasses().WhereContains("ClassFormDefinition", ValidationHelper.GetString(this.PageTypeDateField, ""));
            if (pagetype != null)
            {
                // Parse out the XML to determine which field is the date to searh by
                XDocument doc = XDocument.Parse(pagetype.GetStringValue("ClassFormDefinition", ""));

                // Get the field name that matches the guid
                XElement elem = doc.Descendants("field").FirstOrDefault(item => (string)item.Attribute("guid") == ValidationHelper.GetString(this.PageTypeDateField, ""));

                if (elem != null)
                {
                    string strFieldName = (string)elem.Attribute("column");

                    // Get the collection  of objects for the selected date
                    var pages = DocumentHelper.GetDocuments(pagetype.ClassName)
                        .WhereGreaterOrEquals(strFieldName, timePicker.SelectedDateTime.Date)
                        .And()
                        .WhereNotEquals("DocumentNodeID", Request.Params["nodeid"]);

                    // Check if there are already the allowed number of obejcts assigned
                    if (pages.Count >= this.AllowedSelections)
                    {
                        intPageCount = pages.Count;
                        return false;
                    }
                }
            }
        }
This code allowed me to determine how many pages were assigned to the selected date and verify that it did not exceed the allowed number.
Assigning the form control to a page type
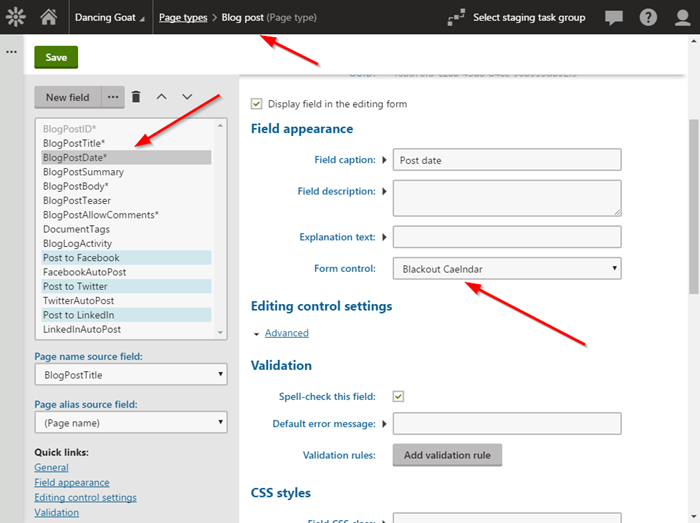
In order to test the functionality, I needed to update a page type to utilize the new form control. For the BlogPost page type, I updated the BlogPostDate field to use the Blackout Calendar form control.
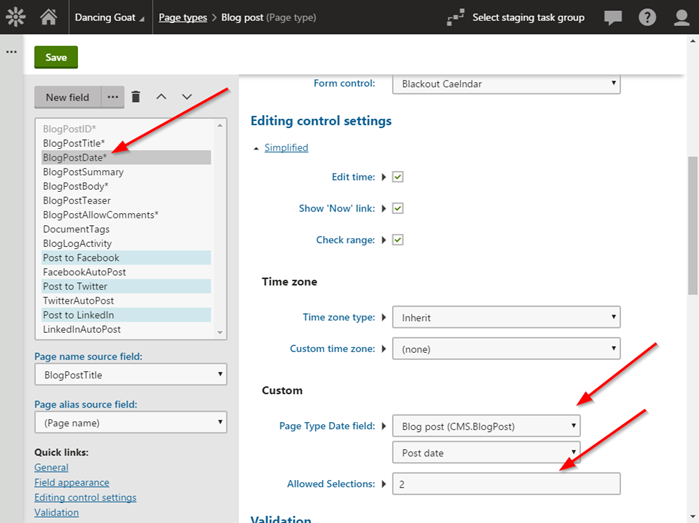
Under the Editing control settings / Advanced / Custom section, I configured the Page type Date field to Post date and set the limit to 2 pages for the selected date.
Testing
With everything configured, I was ready to test. I created two Blog Post pages within my site for the same date.

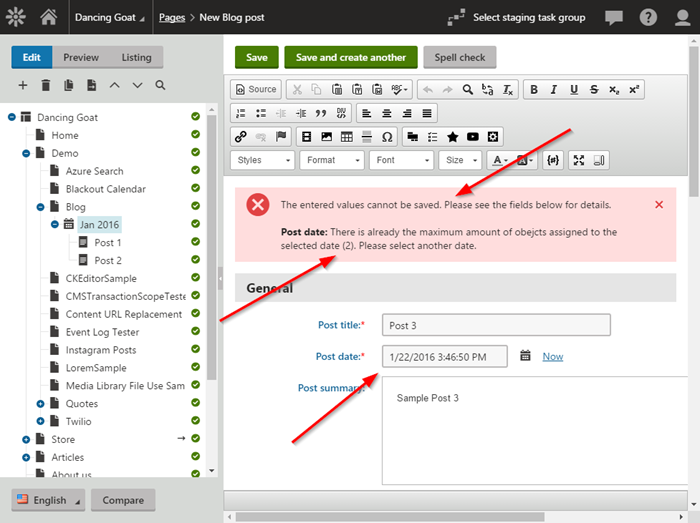
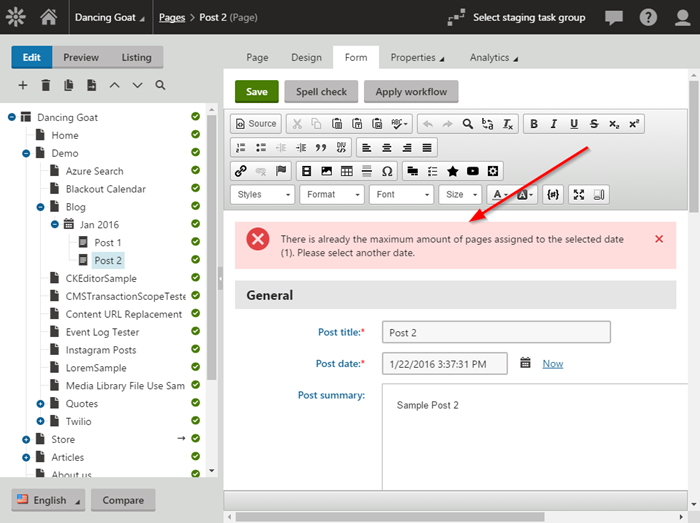
I then created a new Blog Post page for the same date. I confirmed the form control would not allow saving due to the allowed number of pages had already been assigned.
Improving the Validation
Once I got the main functionality working, I wanted to make the control a little smarter. I didn’t like the fact that it required saving the page type in order to validate the date, so I added functionality to validate it within the form control itself. To accomplish this, I added a hidden button to the page and some JavaScript to call it when the button was selected.
<cms:CMSUpdatePanel ID="upBlackoutCalendar" runat="server">
    <ContentTemplate>
        <cms:DateTimePicker ID="timePicker" runat="server" />
        <asp:Label ID="lbl1" runat="server"></asp:Label>
        <script src="http://code.jquery.com/jquery-1.9.1.js"></script>
        <script src="http://code.jquery.com/ui/1.10.2/jquery-ui.js"></script>
        <script>
            var $ = jQuery.noConflict();
            $(document).ready(function () {
                $("#ui-datepicker-div").on("click", ".btn-primary", function () {
                    document.getElementById('btnCheckDate').click();
                }
                );

                $("#ui-datepicker-div").on("click", ".btn-default", function () {
                    document.getElementById('btnCheckDate').click();
                }
);
            });
        </script>
        <div style="display: none;">
            <asp:Button ID="btnCheckDate" runat="server" OnClick="btnCheckDate_Click" ClientIDMode="Static" />
        </div>
    </ContentTemplate>
</cms:CMSUpdatePanel>
In the button click event, I added the same functionality to validate the date. It’s key here to display an error message. To do this, I utilized the Form.ShowError method to display my message.
    protected void btnCheckDate_Click(object sender, EventArgs e)
    {
        if(!ValidateDate())
        {
            Form.ShowError("There is already the maximum amount of pages assigned to the selected date (" + intPageCount + "). Please select another date.");
        }
    }
This causes the control to validate the date selection when the user selects it rather than when it is submitted on the form.
Moving Forward
Creating form controls is a great way to implement custom functionality for your content editing process. With this control, you can limit the number of blog posts released on a specific day or modify it to perform any form of validation, ensuring the content matches your criteria. Good luck!
Get the code
This blog is intended for informational purposes only and provides an example of one of the many ways to accomplish the described task. Always consult Kentico Documentation for the best practices and additional examples that may be more effective in your specific situation.