Analyzing Kentico Media Files with the Azure Cognitive Vision API
Editors have a lot to do. From crafting perfect content to managing campaigns, they are often overwhelmed with tasks needed to manage an application. With more and more regulations being adopted for usability, ensuring a site is compliant is paramount. An often-overlooked area is media descriptions. In this article, I’m going to show you how to leverage the Azure Cognitive Vision API to automate your image descriptions within Kentico.
We’ve all been a developer on a huge project that just launched. You spent countless weeks architecting and developing a brilliant site. Your editors have painstakingly updated each page, ensuring the guidelines and styles are followed to a T. You launch, and the bubbles start flowing! Then, the audit happens, and you find out none of your images are properly tagged. Buzzkill.
Before you repeat history on your next project, let me show you can prevent such an issue, with a little help from Azure. The Azure Cognitive Vision API is a powerful, cloud-based service that can analyze images and provide a ton of AI-backed knowledge. From general descriptions to tags and ratings, the CV API is an on-demand AI-powerhouse ready for all your analyzing needs. You just need to integrate it into your Kentico site. How? Global Event Handlers. Here’s how I did it…
Creating a custom module
As with most custom development in Kentico, it all started with a custom module. I created a base module in my project to hold my CV API code. I opted to create a separate module from other code, however, your application structure may differ.

Need a refresher on the process? Check out the documentation here.
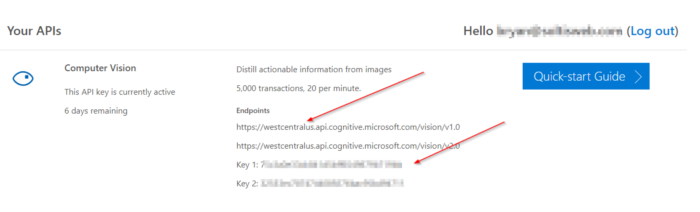
Creating an API Key
My next step was to create the Cognitive Vision API key I would use for my code. Currently, this is done through the Azure site in a simple process. Seeing how my application was a demo, I opted for the 7-day free trial. Once I signed up, I noted the key and location (this is important in your code).
Learn more about the Azure Cognitive Vision API
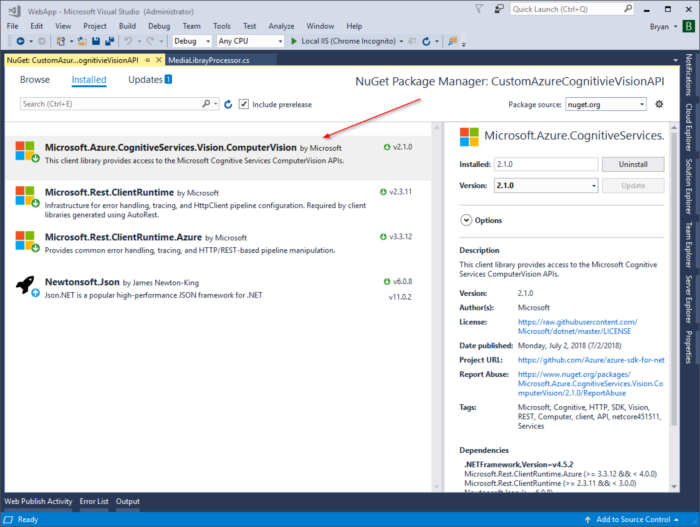
Adding the NuGet package
The next step was adding the CV API .NET SDK NuGet package. This single package contained everything I needed to easily integrate with the API.
Adding a Global Event Handler
With the CV API package added, I was ready to add my custom code. First, I created an event handlder for the inserting of Media library files. Because I wanted to analyze media images, I leveraged the MediaFileInfo class to access the Insert.After event.
        // Contains initialization code that is executed when the application starts
        protected override void OnInit()
        {
            base.OnInit();
            MediaFileInfo.TYPEINFO.Events.Insert.After += MedialFileInfo_InsertAfterEventHanlder;
        }

        private void MedialFileInfo_InsertAfterEventHanlder(object sender, ObjectEventArgs e)
        {
            …
        }
Analyzing uploaded media files
Next up was adding the CV PI code. In my event handler, I added code to process the image using the API. First, I checked to make sure the media library file was an image.
  var fileinfo = e.Object as MediaFileInfo;
  // Only process for image files
  List<string> lstImages = new List<string>() { "image/png", "image/jpg", "image/jpeg", "image/bmp" };
  if (lstImages.Contains(fileinfo.FileMimeType))
  {
  	ProcessFileAsync(fileinfo);
}
In my ProcessFileAsync method, I accessed the CV API to analyze the file. Note that I convert the file to a Stream for processing, as well as specified the correct AzureRegion value.
                // Retrieve a description using Azure Cognitive Vision API
                string subscriptionKey = "XXXXXXXXXXXXXXXXXXXXXXXXXXXXXXXXXXXXX";

                List<VisualFeatureTypes> features =
                    new List<VisualFeatureTypes>()
                    {
                        VisualFeatureTypes.Categories, VisualFeatureTypes.Description,
                        VisualFeatureTypes.Faces, VisualFeatureTypes.ImageType,
                        VisualFeatureTypes.Tags
                    };

                ComputerVisionAPI computerVision = new ComputerVisionAPI(
                    new ApiKeyServiceClientCredentials(subscriptionKey),
                    new System.Net.Http.DelegatingHandler[] { });

                computerVision.AzureRegion = AzureRegions.Westcentralus;

                // Get the stream of the image
                Stream stream = new MemoryStream(fileinfo.FileBinary);

                // Anaylze the image
                ImageAnalysis analysis = computerVision.AnalyzeImageInStreamAsync(stream, features).Result;
If it was successful, I extracted the description and updated the media file property.
                if (analysis.Description.Captions.Count > 0)
                {
                    //Update the file with the description
                    fileinfo.FileDescription = analysis.Description.Captions[0].Text;
                    fileinfo.Update();
                    EventLogProvider.LogEvent(EventType.INFORMATION, "CustomAzureCognitiveVisionAPI.MediaLibrayProcessor", "INFORMATION", "File description updated: " + fileinfo.FileName + " - " + analysis.Description.Captions[0].Text);
                }
Here’s the full code block, for easier reading.
        private void MedialFileInfo_InsertAfterEventHanlder(object sender, ObjectEventArgs e)
        {
            try
            {
                var fileinfo = e.Object as MediaFileInfo;
                // Only process for image files
                List<string> lstImages = new List<string>() { "image/png", "image/jpg", "image/jpeg", "image/bmp" };
                if (lstImages.Contains(fileinfo.FileMimeType))
                {
                    ProcessFileAsync(fileinfo);
                }
            }
            catch (Exception ex)
            {
                EventLogProvider.LogException("CustomAzureCognitiveVisionAPI.MediaLibrayProcessor", "ERROR", ex);
            }
        }

        // Analyze a remote image
        private void ProcessFileAsync(MediaFileInfo fileinfo)
        {
            try
            {
                // Retrieve a description using Azure Cognitive Vision API
                string subscriptionKey = "XXXXXXXXXXXXXXXXXXXXXXXXXXXXXXXXXXXXX";

                List<VisualFeatureTypes> features =
                    new List<VisualFeatureTypes>()
                    {
                        VisualFeatureTypes.Categories, VisualFeatureTypes.Description,
                        VisualFeatureTypes.Faces, VisualFeatureTypes.ImageType,
                        VisualFeatureTypes.Tags
                    };

                ComputerVisionAPI computerVision = new ComputerVisionAPI(
                    new ApiKeyServiceClientCredentials(subscriptionKey),
                    new System.Net.Http.DelegatingHandler[] { });

                computerVision.AzureRegion = AzureRegions.Westcentralus;

                // Get the stream of the image
                Stream stream = new MemoryStream(fileinfo.FileBinary);

                // Anaylze the image
                ImageAnalysis analysis = computerVision.AnalyzeImageInStreamAsync(stream, features).Result;

                if (analysis.Description.Captions.Count > 0)
                {
                    //Update the file with the description
                    fileinfo.FileDescription = analysis.Description.Captions[0].Text;
                    fileinfo.Update();
                    EventLogProvider.LogEvent(EventType.INFORMATION, "CustomAzureCognitiveVisionAPI.MediaLibrayProcessor", "INFORMATION", "File description updated: " + fileinfo.FileName + " - " + analysis.Description.Captions[0].Text);
                }
            }
            catch (Exception ex)
            {
                EventLogProvider.LogException("CustomAzureCognitiveVisionAPI.MediaLibrayProcessor.ProcessFileAsync", "ERROR", ex);
            }
        }
Testing
With that little bit of code, I was ready to test my functionality. To make the process easier to see, I created the following video. In the process, I upload a new media library file, confirm the Event Log is noted correctly, and that the description is properly set.
What else can you do?
The power of Cognitive Services is not limited to descriptions. With these services, you can identify faces, find approximate ages, and even evaluate the adult content rating of media library files. By leveraging Azure, you can automate your content tagging and classification. AI-powered systems can leverage machine learning to improve content relevancy and reduce human error.
Read more about Azure Cognitive Services
Moving forward
With a global event handler and a little code, you can add some powerful, Azure-based functionality to your Kentico sites. By leveraging the Cognitive Vision API, you can use AI to return a description, tags, and even a content rating for the file uploaded. This can simplify your editors lives by pre-populating image details and help you keep your sites compliant. Good luck!