Adding custom fields into RegistrationForm web part
Following article shows how you can add new field (UserCity in our example) into 'User' system table and then allow user to enter value of this field when he is registering to the site using RegistrationForm web part.
First of all, please note that this article relates to the version 3.1. The newer versions include the
Custom registration form web part. Please see here:
Creating a custom registration form for more details. Instructions for the older versions are below:
Please clone registration form web part ('SiteManager -> Development -> Web parts' section, 'Membership' category) at first. You can give e.g. following name to cloned web part: MyRegistrationForm
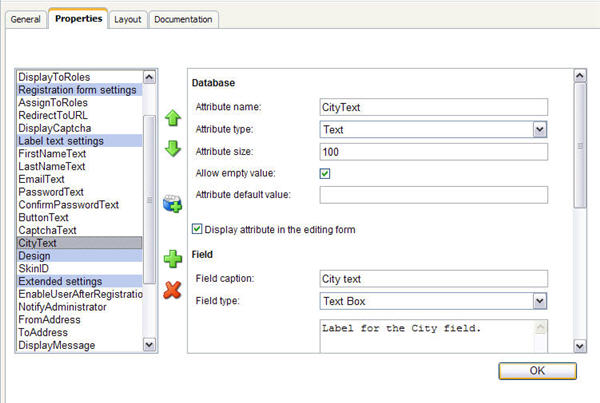
Open 'Properties' tab for cloned web part (in 'SiteManager -> Web parts' section). You can see there are attributes like FirstNameText in this category. They enable designer of the web site to specify label of the fields of Registration form web part (in 'Design -> configuration' dialog). Please add new property to enable designer to set label of the new field:
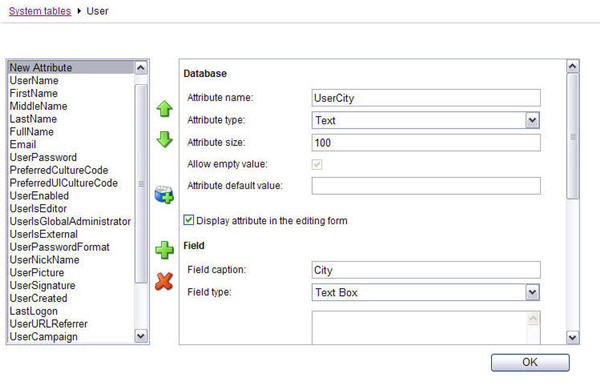
Add new field, where the city of each user will be stored, in 'SiteManager -> Development -> System tables -> edit User -> Fields' section:
Please open cloned web part .ascx file (e.g. ~\CMSWebParts\Membership\myregistrationform.ascx) and add sample code bellow into this file (the gray text is original code, black text is new code, green text is comment - you don't need to add it):
<tr>
<td>
<asp:Label ID="lblLastName" runat="server" AssociatedControlID="txtLastName"></asp:Label>
</td>
<td>
<cms:ExtendedTextBox ID="txtLastName" EnableEncoding="true" runat="server" CssClass="LogonTextBox" MaxLength="100"></cms:ExtendedTextBox><br />
<asp:RequiredFieldValidator ID="rfvLastName" runat="server" ValidationGroup="RegForm"
ControlToValidate="txtLastName" Display="Dynamic"></asp:RequiredFieldValidator>
</td>
</tr>
<tr>
<td>
<asp:Label ID="lblCity" runat="server" AssociatedControlID="txtCity"></asp:Label>
</td>
<td>
<cms:ExtendedTextBox ID="txtCity" EnableEncoding="true" runat="server" CssClass="LogonTextBox" MaxLength="100"></cms:ExtendedTextBox><br />
<asp:RequiredFieldValidator ID="rfvCity" runat="server" ValidationGroup="RegForm"
ControlToValidate="txtCity" Display="Dynamic"></asp:RequiredFieldValidator>
</td>
</tr>
<tr>
<td>
<asp:Label ID="lblEmail" runat="server" AssociatedControlID="txtEmail"></asp:Label>
</td>
Please open cloned web part .ascx.cs file (e.g. ~\CMSWebParts\Membership\myregistrationform.ascx.cs) and add sample code bellow into this file (the gray text is original code, black text is new code, green text is comment - you don't need to add it):
//line about 65 in version 3.1
public string LastNameText
{
get
{
return DataHelper.GetNotEmpty(this.GetValue("LastNameText"), ResHelper.LocalizeString("{$Webparts_Membership_RegistrationForm.LastName$}"));
}
set
{
this.SetValue("LastNameText", value);
lblLastName.Text = value;
}
}
/// <summary>
/// Gets or sets the city text
/// </summary>
public string CityText
{
get
{
return DataHelper.GetNotEmpty(this.GetValue("CityText"), ResHelper.LocalizeString("{$Webparts_Membership_RegistrationForm.City$}"));
//You will also need to add resource string (that will act as default value of CityText property, i.e. default label of the City field) for following key: Webparts_Membership_RegistrationForm.City
}
set
{
this.SetValue("CityText", value);
lblCity.Text = value;
}
}
/// <summary>
/// Gets or sets the e-mail text
/// </summary>
public string EmailText
//line about 347 in version 3.1
rfvLastName.Enabled = false;
rfvCity.Enabled = false;
//disables validator if processing of web part is stopped
}
//line about 358 in version 3.1
lblCaptcha.Text = this.CaptchaText;
lblCity.Text = this.CityText;
//sets value of 'CityText' property as label of 'City' field
// Set required field validators texts
rfvFirstName.ErrorMessage = ResHelper.GetString("Webparts_Membership_RegistrationForm.rfvFirstName");
//line about 365 in version 3.1
rfvConfirmPassword.ErrorMessage = ResHelper.GetString("Webparts_Membership_RegistrationForm.rfvConfirmPassword");
rfvCity.ErrorMessage = ResHelper.GetString("Webparts_Membership_RegistrationForm.rfvCity");
//You will also need to add resource string (that will act as error message if validation of City field fails) for following key: Webparts_Membership_RegistrationForm.rfvCity
// Set SkinID
if (!this.StandAlone && (this.PageCycle < PageCycleEnum.Initialized))
//line about 389 in version 3.1
lblConfirmPassword.SkinID = skinId;
lblCity.SkinID = skinId;
txtCity.SkinID = skinId;
//sets skin ID for textbox and label
txtFirstName.SkinID = skinId;
//line about 462 in version 3.1
ui.UserCampaign = CMSContext.CurrentUser.Campaign;
ui.SetValue("UserCity", txtCity.Text);
//when form is submitted, value from 'City' field of form is stored in 'UserCity' field of 'User' system table
// Check limitations for Global administrator
if (ui.IsGlobalAdministrator)
//line about 514 in version 3.1, change line: string[,] replacements = new string[4, 2] to:
string[,] replacements = new string[5, 2];
//line about 522 in version 3.1
replacements[3, 1] = ui.UserName;
replacements[4, 0] = "usercity";
replacements[4, 1] = ValidationHelper.GetString(ui.GetValue("UserCity"), "");
//when e-mail is sent to administrator, eventual {%usercity%} macros in 'New registration' e-mail template are replaced with value from 'UserCity' field of 'User' system table
EmailTemplateInfo mEmailTemplate = null;
Now you can add cloned web part onto the page and try to submit some data. You should be able to see value entered into 'City' field in Administration -> Users -> edit registered user -> Custom fields.
See also: Modifying the code of standard web parts
Developing Web partsApplies to: Version 3.1