Example: Using contact scoring |

|

|

|

|
|
Example: Using contact scoring |

|

|

|

|
|
|
||
The following step-by-step example defines a score on the sample Corporate site and demonstrates how the system adds score points for contacts that match the rules.
Prerequisites:
•Enable activity logging for the website.
1. Go to CMS Desk -> On-line marketing -> Scoring.
2. Click ![]() New score.
New score.
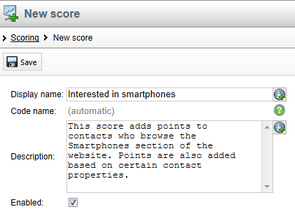
3. Enter the following details in the New score dialog:
•Display name: Interested in smartphones
•Description: enter text describing the score
•Enabled: yes (checked)
4. Click ![]() Save.
Save.
oThe system creates the score and opens the General tab of the score's editing interface.
5. Switch to the Rules tab and click ![]() New rule.
New rule.
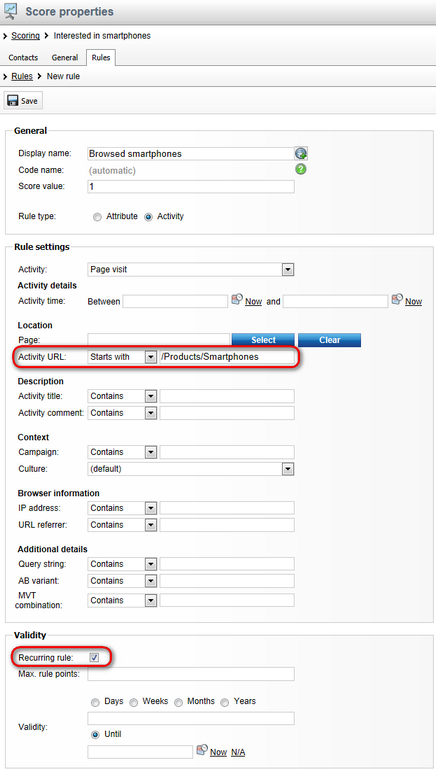
6. Specify the following configuration options in the New rule dialog:
•Display name: Browsed smartphones
•Score value: 1
•Rule type: Activity
•Activity: Page visit
•Activity URL: Starts with /Products/Smartphones
•Recurring rule: yes (checked)
This rule adds one score point to contacts who view any page in the /Products/Smartphones section of the website (i.e. the list of available smartphone products and individual smartphone detail pages). The rule is recurring, which means that points are added even for repeated visits of the pages.
7. Leave the remaining options blank or with their default values and click Save.
8. Click ![]() New rule next to the Save button and enter the following configuration:
New rule next to the Save button and enter the following configuration:
•Display name: Works as manager
•Score value: 5
•Rule type: Attribute
•Attribute: Job title
•Condition: Contains manager
This attribute rule adds 5 score points to contacts who have the word manager in their job title (such contacts are likely to need smartphones in their job).
9. Save the rule and repeat the procedure one more time to create the final rule:
•Display name: Has business phone
•Value: 5
•Rule type: Attribute
•Attribute: Business phone
•Condition: Is not empty
This rule adds 5 score points to contacts who have a business phone number (such contacts can also be considered as potential smartphone buyers).
If you switch back to the score's Rules tab, you can see a list of the defined rules.
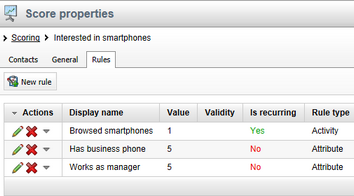
Sample score with three rules
Now that you have defined the rules for the score, you can test how the system adds points to contacts.
This example uses two new contacts, which the system creates automatically when you access the website as a public visitor from two different browsers. If you already have contact information stored in your browsers (for example after going through Example: Creating a sample contact), your contact data may be different, but the scoring functionality still works as demonstrated in the example.
|
Delay in activity rule points
By default, the system adds score points for activity rules about one minute after the activity occurs. When testing scores, you can enable immediate logging of activities, which ensures that activity score points are updated almost instantly.
To enable immediate logging of activities, administrators with access to the project's file system need to add the following key to the appSettings section of the web.config file:
Note: To maintain optimal database performance, remove this web.config key before deploying the live version of the website. |
1. Sign out of the administration interface, navigate to the /Products/Smartphones section of the Corporate Site, and view several product detail pages of smartphones.
2. Log back in to CMS Desk, go to On-line marketing -> Scoring and edit (![]() ) the Interested in smartphones score.
) the Interested in smartphones score.
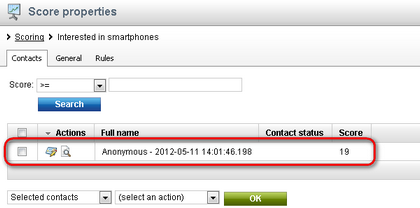
3. Open the Contacts tab.
oYou should see a new contact with a score that matches the number of pages that you viewed in the Smartphones section.
4. Open a different web browser and access the website's /Products/Smartphones section as an anonymous visitor again. This time, only view the list of smartphones once.
5. Switch back to the first browser and refresh the Contacts tab.
oYou should see another contact, with only one point added for viewing the list of smartphones.
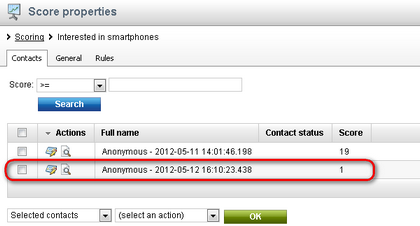
6. Click View contact details (![]() ) next to the second contact.
) next to the second contact.
oA dialog appears where you can modify the properties of the given contact. The options are the same as the main contact editing interface (see the Contacts chapter for details).
7. On the General tab, fill in a Business phone number and a Job title containing the word manager.
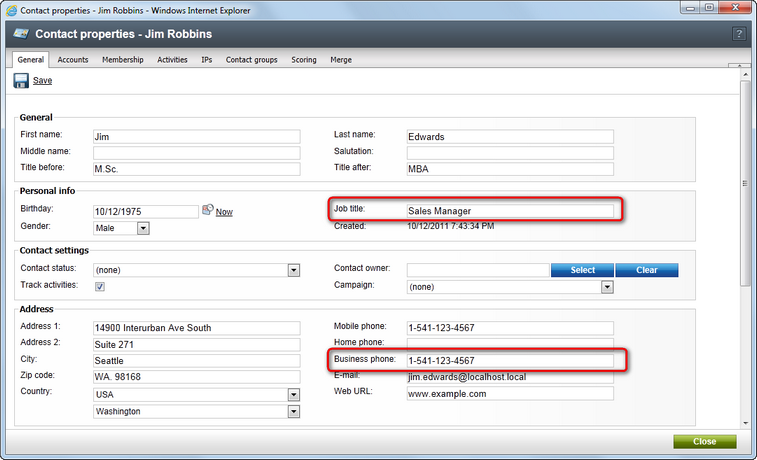
8. Click Save and Close the dialog.
oBack on the Contacts tab, you should see that the second contact now has 11 points (you may need to refresh the tab). The system added 5 points because the contact has a business phone and another 5 due to the word manager in the contact's job title.
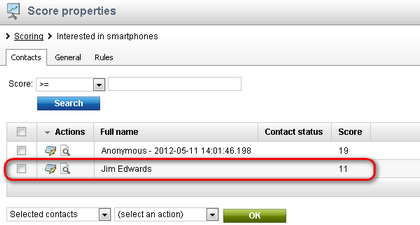
9. Click View score details (![]() ) next to the contact.
) next to the contact.
oThe score details dialog shows exactly which rules have contributed to the contact's total score.
