|
|

Enabling tracking of activities |

|

|

|

|
|
Enabling tracking of activities |
|
|

|
|
|
|
Enabling tracking of activities |
|
|
|
|
|
Enabling tracking of activities |
|
|
|
|
|
|
||
To allow tracking of activities for contacts, you need to:
1. Go to Site Manager -> Settings -> On-line marketing and ensure that Enable on-line marketing is checked for your website.
2. Navigate to the On-line marketing -> Contact management -> Activities settings category and enable Log activities.
3. Enable or disable logging of specific activity types using the other settings in the category.
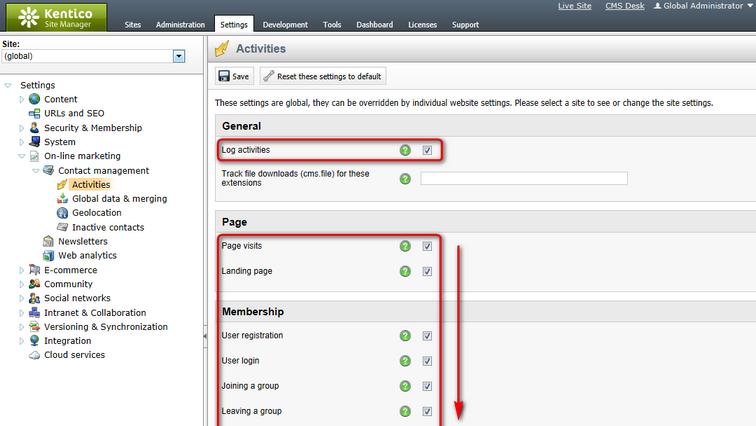
Enabling activities in the website settings
4. ![]() Save the settings.
Save the settings.
You can additionally configure logging of activities for specific pages, visitors and certain features. The system only tracks activities within a given scope if all related settings are enabled. See the sections below for more information.
|
Logging activities immediately
By default, the system logs activities into temporary files and batch-processes them periodically using a scheduled task. As a result, there is a slight delay of up to several minutes before activity-related data is updated in the user interface.
You can configure the system to log activities directly into the database. Immediately logging activities can generate a very high database load, so it is only recommended when evaluating or testing the functionality of activities, not for live websites.
To enable immediate logging of activities, administrators with access to the project's file system need to add the following key to the appSettings section of the web.config file:
|
|
Tracking file downloads
The system can track file downloads as Page visit activities for files stored as CMS.File documents in the content tree of a website. The Track file downloads (cms.file) for these extensions setting in the General section specifies which types of files the tracking includes.
Enter the allowed file types as a list of extensions separated by semicolons, for example: pdf;docx;png
If left empty, the system tracks all file types. |
You can enable or disable logging of page-related activities (e.g. Page visit, Landing page or Content rating activity types) for individual pages on your website.
1.Select the document representing the page in the CMS Desk content tree.
2.Open the Properties -> General tab.
3.Toggle the Log on-line marketing activity checkbox on or off.
oIf the Inherit field is checked, the document loads the value from the parent document.
4.Click ![]() Save.
Save.
By default, documents inherit the value of the Log on-line marketing activity property from their parent document. This state allows you to configure activity logging for all documents on the website through the root document.
The system provides two different ways of logging activities related to website traffic (Page visit and Landing page):
Processing activities on every web request |
Using JavaScript |
Advantages:
•Provides statistics for all types of web requests. |
Advantages:
•Filters out activities generated by non-human tools such as RSS readers and web crawlers. •Provides more relevant data for most public-facing websites. |
Disadvantages:
•May log irrelevant activities for non-human contacts such as web crawlers, RSS readers and other bots. |
Disadvantages:
•Ignores users with browsers that do not support JavaScript or have it disabled (typically less than 1% of all visitors). •May not work correctly on pages that run custom JavaScripts (if conflicts occur). The logging is compatible with all default Kentico CMS scripts. |
In most cases, it is recommended to use JavaScript logging. Switching to JavaScript logging does not reduce the performance of the website.
To enable JavaScript logging:
1.Go to Site Manager -> Settings -> On-line marketing -> Web Analytics.
2.Enable the Log via JavaScript snippet setting.
3.Save the settings.
Note: The Log via JavaScript snippet setting also determines how the system logs web analytics.
By default, the system tracks activities for all contacts. You can disable activity tracking for individual contacts or the user accounts of registered users.
Contacts:
1.Go to CMS Desk -> On-line marketing -> Contacts.
2.Find and edit the given contact.
3.Disable Track activities on the General tab.
4.Click ![]() Save.
Save.
Users:
1.Go to Administration -> Users.
2.Find and edit the given user account.
3.Open the Settings tab.
4.Disable the Log activities property.
5.Click ![]() Save.
Save.
The activities performed by the visitor (or registered user) will no longer be recorded.
You can choose whether the system logs the related activity types for individual instances of the following items:
Feature |
Related activity types |
To enable/disable activities |
Newsletters |
•Newsletter subscription •Newsletter unsubscription •Opened newsletter e-mail •Clicked newsletter link |
1.Go to CMS Desk -> Tools -> Newsletters. 2.Edit a newsletter. 3.Set Log on-line marketing activities on the Configuration tab. |
Forums |
•Forum post •Forum post subscription |
1.Go to CMS Desk -> Tools -> Forums. 2.Edit a forum group or specific forum. 3.Set Log on-line marketing activity on the General tab. |
Message boards |
•Message board comment •Message board subscription |
1.Go to CMS Desk -> Tools -> Message boards. 2.Select the Boards tab. 3.Edit a message board. 4.Set Log on-line marketing activity on the Configuration tab. |
Polls |
•Poll voting |
1.Go to CMS Desk -> Tools -> Polls. 2.Edit a poll. 3.Set Log on-line marketing activity on the General tab. |

