|
|

Google analytics |

|

|

|

|
|
Google analytics |
|
|

|
|
|
|
Google analytics |
|
|
|
|
|
Google analytics |
|
|
|
|
|
|
||
Kentico CMS allows you to use Google analytics as an alternative way of measuring and analyzing key metrics of your website. This is done by placing Google analytics web part on your web page. This topic provides you with steps necessary to set up your own Google analytics account and place the web part on your Kentico web page.
To be able to configure the web part, you need to have an existing Google analytics account set up with the website you want to track added to its accounts.
On the Google analytics website, you can either Sign in to your existing account or Create an account if you don't have one already.
![]()
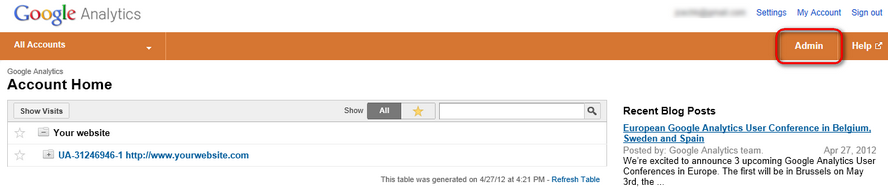
If you sign in using an existing Google analytics account, you will be redirected to a page listing your currently tracked websites. Click on Admin at the top right corner of the page to access Account administration.
In Account administration, click on New Account. Rest of the procedure is described in the following Create an account section.

Once you choose to create a new account, you will be asked to fill in information about the website you want Google analytics to track:
•Account Name - the name under which you want your website to be listed in Google analytics.
•Website's URL - the URL used to access the website you want tracked by Google analytics.
Fill in the rest of the options based on your preferences. To finish creating the account, you need to turn the Terms and conditions checkbox on and click Create Account.

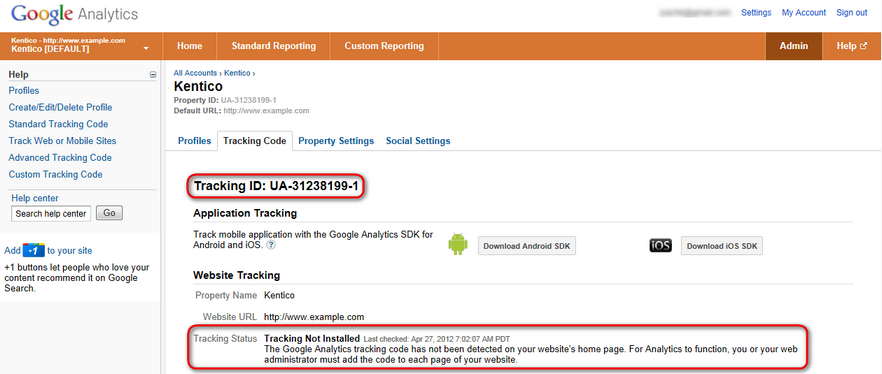
On the next page, you will be provided a Tracking ID, which you will use to configure the Google analytics web part in Kentico CMS. Also notice the Tracking Status attribute, which now notes that tracking hasn't been installed on your website.
Now that your Google analytics account is ready and you have your Tracking ID, it is time to put the Google analytics web part on the web page itself. Navigate to CMS Desk in Kentico CMS.
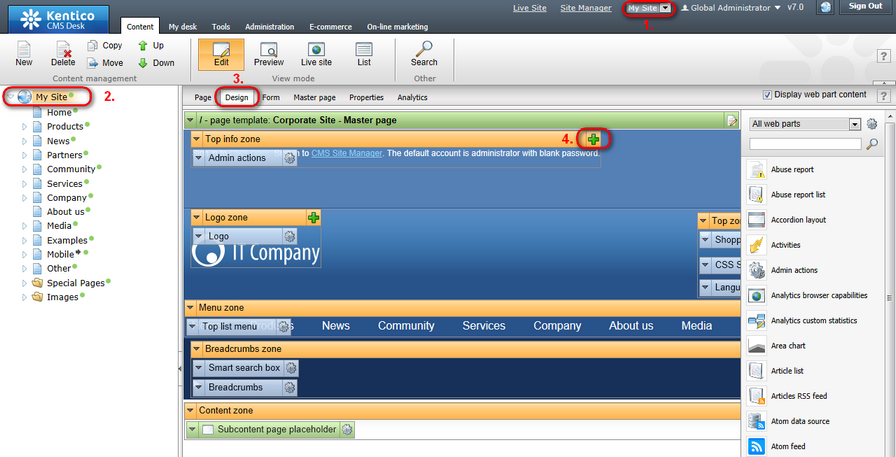
1. Make sure you choose the correct site in the drop-down list at the top of the page.
2. In the left content tree, click on the root of your site.
3. Switch to the Design tab.
4. Click on the Add web part (![]() ) button in a web part zone of the page.
) button in a web part zone of the page.
|
Please note
We recommend putting the web part to a web part zone that is inherited by the rest of the pages under the current site. This way, you can make sure the web part will be present on all of your pages. You can find more information on inheriting content in Developer's guide -> Development -> Web development overview -> Portal engine development model -> Visual inheritance.
The Google analytics web part has no impact on the page's final layout.
|
A new dialog listing the web parts available in Kentico CMS opens.
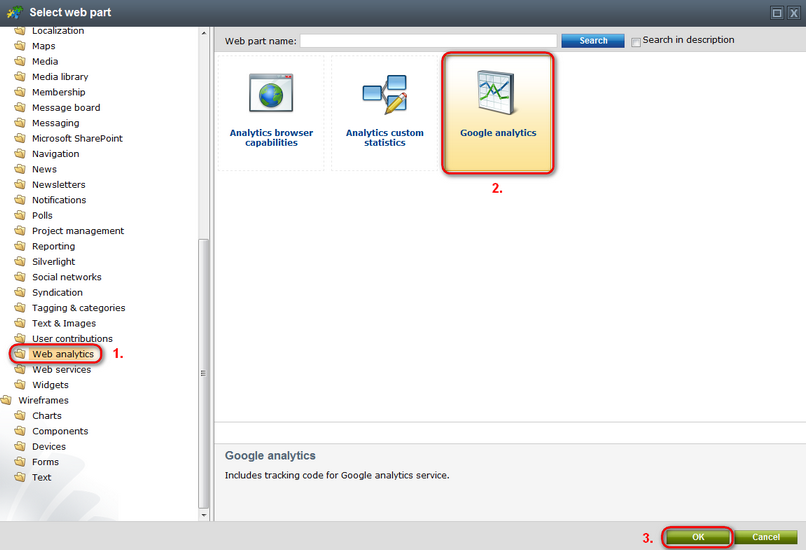
1. In the left content tree, choose Web analytics.
2. Choose Google Analytics.
3. Click OK.
The Web part properties dialog of the Google analytics web part appears.
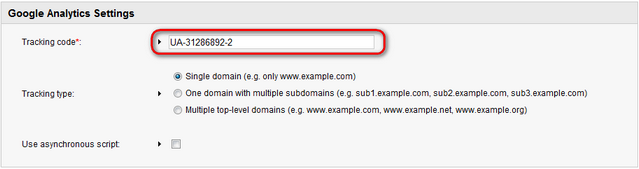
Under Tracking code, enter the code that you received on the Google analytics website earlier. Leave the rest of the options unchanged and click OK to save the changes. You can find more information on the properties of the Google analytics web part in the Google analytics properties documentation.
|
Please note
By turning on the Use asynchronous script option, you can have the web part use a different version of the tracking script. The script loads sooner upon a visit to the website. This makes it more likely the visit gets counted into the statistics even when the visitor leaves the page before it is fully loaded.
|
You should now see the Google analytics web part added to the web part zone.

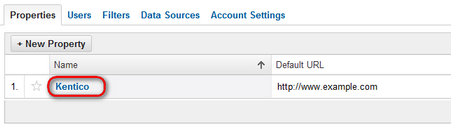
Now on the Google analytics website, navigate to Admin -> Account administration -> Account name -> Property name.
Couple of minutes after placing the web part into Kentico CMS, you should see the Tracking Status change.
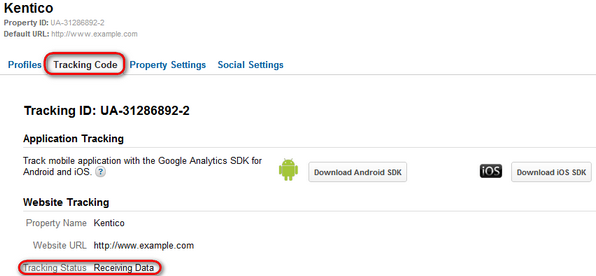
The possible tracking statuses that you may see on the page are:
•Receiving Data - the tracking code has been detected on the home page of your website, and Google analytics is aggregating the data to populate into your reports.
•Tracking Not Installed or Not Verified - the tracking code has not been detected on the homepage of your website.
•Tracking Installed - the tracking code is working properly and data is being populated into your reports.
Leave up to 24 hours for Google analytics to aggregate the website's data and for the status to change from Receiving data to Tracking installed.
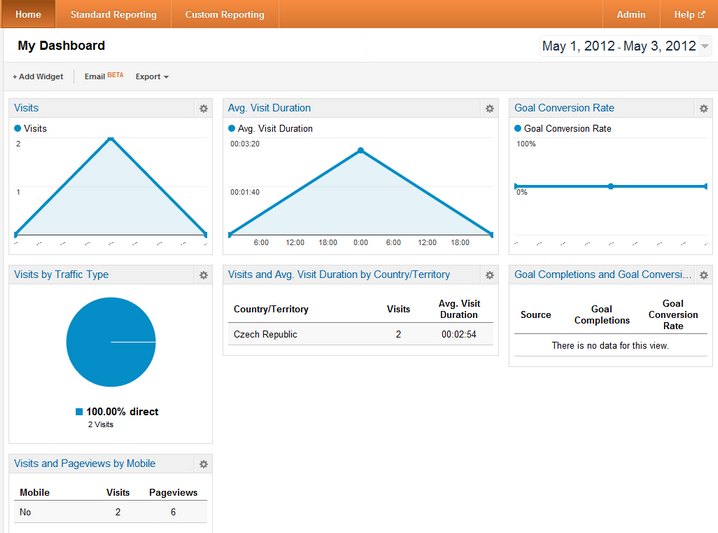
Once Google analytics tracking is working correctly, you will be able to see reports of your website's visits and other statistics on the Google analytics website. Refer to the Google analytics Help website for more information on the various types of reports and ways to correctly customize them.
|
Please note
It may take up to 24 hours for any new data, e.g., visits to your website, to be visible in the Google analytics reports.
|
