|
|

Precompilation (Publish function) |

|

|

|

|
|
Precompilation (Publish function) |
|
|

|
|
|
|
Precompilation (Publish function) |
|
|
|
|
|
Precompilation (Publish function) |
|
|
|
|
|
|
||
When deploying a website, you have the option of precompiling the web project before you place it on a server. This compiles the source code into assemblies, which provides several advantages:
•Faster initial response times - resources do not need to be compiled dynamically when they are requested for the first time.
•Source code protection - you can create a compiled version of the website without any accessible source code.
•Efficient deployment - using the Publish function, you can compile and deploy the website at the same time.
|
Limitations of precompiled websites
Only use precompilation to deploy completed websites. Precompiled instances of Kentico CMS have limited website development features.
You cannot edit, create or import virtual objects that contain ASP.NET markup and require compilation:
•Page layouts (ASCX type) •Transformations (ASCX type)
If you wish to import physical files that require compilation (such as cs, vb, aspx, ascx), you need to run the import process on the original project, and then create the precompiled site again.
|
1. Rename the Microsoft.Web.Services3.dll.rename file in the ~\Bin directory to Microsoft.Web.Services3.dll.
oThis allows you to use content staging on the precompiled site.
2. Go to Site Manager -> Administration -> System -> Virtual objects and click Store all virtual objects in file system.
oThis saves all virtual objects into the web project as physical files, so they can be included in the precompilation.
oThe system cannot load virtual objects from the database in a precompiled environment (the Virtual path provider is not available).
3. Right-click your web site project in the Solution Explorer in Visual Studio and select Publish Web Site.
oThis function is not present in the Express versions of Visual Studio, but you can use the command line ASP.NET Compilation Tool.
oThe following dialog box opens:
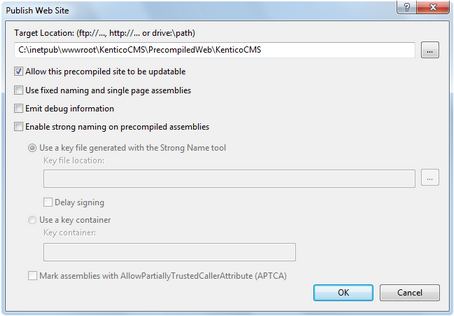
4. Enter a path outside of your current web project where the precompiled version will be placed.
5. Choose between two compilation modes using the Allow this precompiled site to be updatable checkbox:
•checked - compiles the code behind of all web forms and controls, but stores the markup files (.aspx, .ascx) in their original code form.
•unchecked - the compilation also includes markup files. The website contains only empty "stub" .aspx/.ascx files without any code.
We generally recommend using non-updatable sites for optimal performance.
6. Click OK.
Once the process is complete, you can deploy the precompiled site to your server.
|
Moving the database
You may need to copy the database to the server using the standard backup/restore procedure, since the compiled website cannot be used to install an SQL Server database. Other options are:
•Install a non-compiled website on the server first, go through the setup wizard and then replace the non-compiled files with compiled ones, while keeping the web.config file as is. •Install a Kentico CMS website locally and run the database setup against the remote SQL Server on the live server.
|
|
Testing the website before compilation
To check if your website runs without using the Virtual path provider (to simulate a precompiled environment), you can disable the provider by adding the following key into the appSettings section of your web.config file:
If your application runs correctly with the virtual path provider disabled, you should be able to run it after the precompilation. |
Related topics:
•Additional configuration tasks -> Configuration for Medium Trust environment
•Installation procedure -> Deployment to the live server
•Additional configuration tasks -> Installation on shared hosting server


