Overview |

|

|

|

|
|
Overview |

|

|

|

|
|
|
||
CSS stylesheets allow you to modify the appearance and design of your website. You can use standard CSS styles with Kentico CMS just like you normally would during website development.
Every website has a default CSS stylesheet. To assign it, edit (![]() ) a site in Site Manager -> Sites and select an option from the Site CSS stylesheet field.
) a site in Site Manager -> Sites and select an option from the Site CSS stylesheet field.
Individual pages can either use the default website stylesheet or override it with their own stylesheet. The stylesheet used by a specific page can be configured in CMS Desk -> Content -> Properties -> General, through the CSS stylesheet selector. The stylesheet assigned to a page is automatically requested when the given page is displayed.
CSS styles may also be defined for various types of components that can be placed on pages. Please see the CSS for page components topic for further information.
You can check individual pages to detect if the styles they use are valid against the CSS 2.1 standard. For more information, see Content management -> Validators -> CSS validator.
|
Tip
You can create stylesheets using the LESS dynamic language. LESS syntax allows you to write stylesheets that are shorter and easier to maintain.
Download the free LESS stylesheets module from the Kentico Marketplace.
|
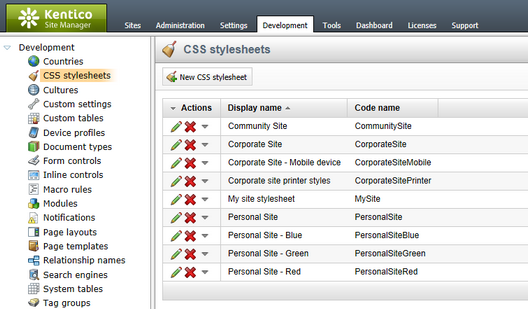
You can create and manage CSS stylesheets in Site Manager -> Development -> CSS stylesheets.
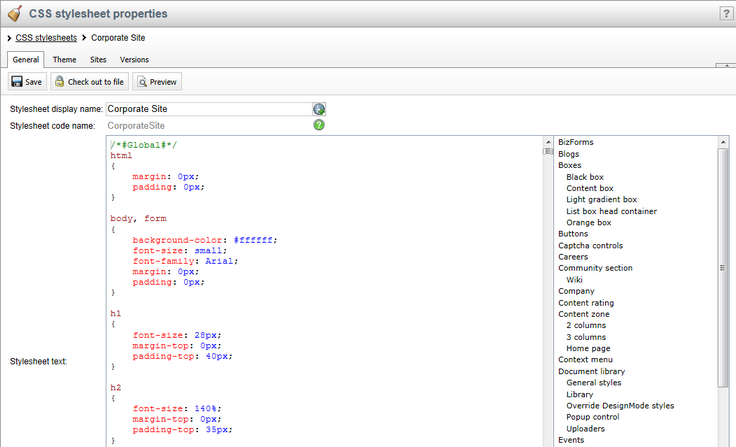
When editing (![]() ) a stylesheet, the following property fields are available on the General tab:
) a stylesheet, the following property fields are available on the General tab:
•Stylesheet display name - name of the stylesheet displayed in the administration interface.
•Stylesheet code name - a unique name used to identify the stylesheet in code and URLs.
•Stylesheet text - here you can enter the definitions of the classes that should be included in the stylesheet (using standard CSS code). This field uses the code editor to make working with the code more user‑friendly. You can click the ![]() Preview button in the tab's header to edit the stylesheet's code side‑by‑side with a preview of how it affects the design of the website's pages. Please see the Design preview topic for additional details about the preview mode.
Preview button in the tab's header to edit the stylesheet's code side‑by‑side with a preview of how it affects the design of the website's pages. Please see the Design preview topic for additional details about the preview mode.
The Theme tab allows the management of files used by the edited stylesheet, such as external stylesheets, images or skin files. More information about associated files can be found in the App themes topic.
A stylesheet must also be assigned to particular websites on the Sites tab.
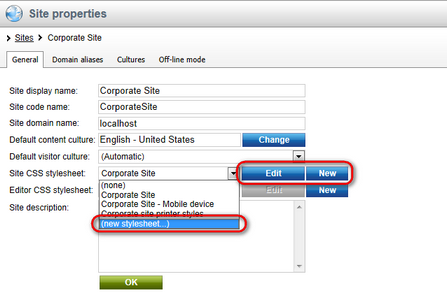
Stylesheets can also be created or edited directly in Site Manager -> Sites -> edit (![]() ) a site. New stylesheets can be created by clicking the New button or by selecting (new stylesheet...) from the Site CSS stylesheet drop-down list. If an existing stylesheet is selected from this drop-down list, you can edit its code by clicking the Edit button.
) a site. New stylesheets can be created by clicking the New button or by selecting (new stylesheet...) from the Site CSS stylesheet drop-down list. If an existing stylesheet is selected from this drop-down list, you can edit its code by clicking the Edit button.
The same options as described above are also available in CMS Desk -> Edit -> Properties -> General. Here again, you can create a new stylesheet using the New button or by selecting (new stylesheet...) from the drop-down list, or edit the code of a selected stylesheet by clicking the Edit button.
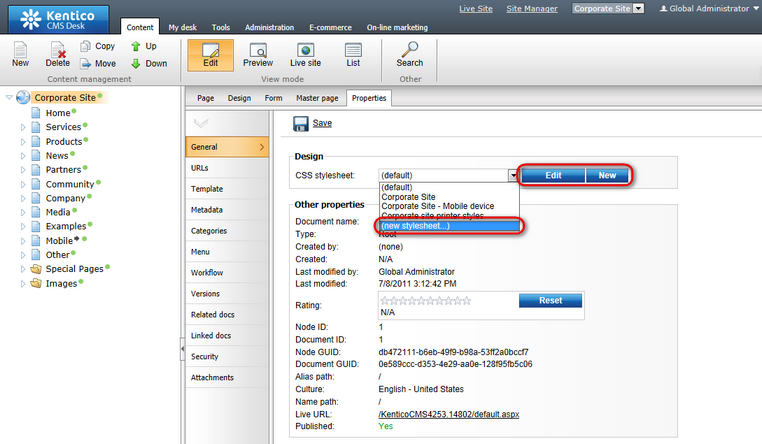
|
Stylesheet URL
You can view the code of any stylesheet using a URL in the following format:
<domain>/CMSPages/GetCSS.aspx?stylesheetname=<stylesheet code name>
The GetCSS.aspx system page retrieves unmodified, user‑friendly stylesheet code even if Minification of stylesheet resources is enabled. |
Pages automatically have CSS classes assigned to their <body> element according to the characteristics of their language (its text direction and specific culture) and depending on the browser in which they are currently viewed. For example:
<body class="LTR IE IE9 ENUS">
As you can see, four types of classes are added:
•Text direction - the LTR class is assigned for left‑to‑right languages and RTL for right‑to‑left.
•Browser type - this class is added according to the browser in which the page is currently opened. The following classes are used:
Browser |
Class name(s) |
Internet Explorer |
IE |
Firefox |
Gecko |
Google Chrome |
Chrome, Safari |
Safari |
Safari |
Opera |
Opera |
•Browser version - the class name is the same as for the browser type, but with the number of the browser's major version appended, e.g. IE9, Gecko5 etc.
•Culture - the name of the class is added based on the culture code of the page's content (without the hyphen), for example ENUS for pages using the en-US culture.
This feature allows you to style page elements differently according to the browsing environment of the current visitor. You can define styles for any combination of the classes mentioned above.
For example, you can add the following into a website's stylesheet:
[CSS]
.IE8 .MyFont |
Now elements styled using the MyFont class will have a different font size when viewed in the Internet Explorer 8 or Opera (all versions) browsers.
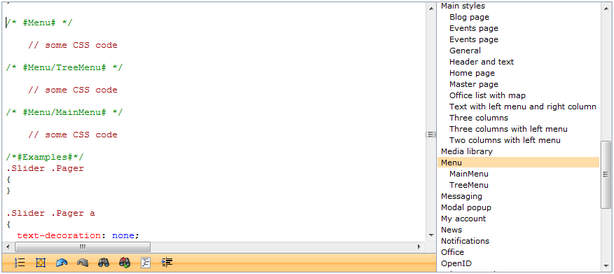
You can use comments in format /* #BLOCKNAME# */ to make navigation in the CSS code of long stylesheets easier. This creates a code block within the stylesheet and adds a bookmark to the list on the right side of the code editor. Blocks may be organized into a hierarchy of sub‑blocks by separating the names of individual levels using a slash, such as for example /* #BLOCKNAME/SUBBLOCK# */.
Example:
[CSS]
/* #Menu# */
// some CSS code
/* #Menu/TreeMenu# */
// some CSS code
/* #Menu/MainMenu# */
// some CSS code |
The outlined structure will look like this:
