|
|

Managing accounts |

|

|

|

|
|
Managing accounts |
|
|

|
|
|
|
Managing accounts |
|
|
|
|
|
Managing accounts |
|
|
|
|
|
|
||
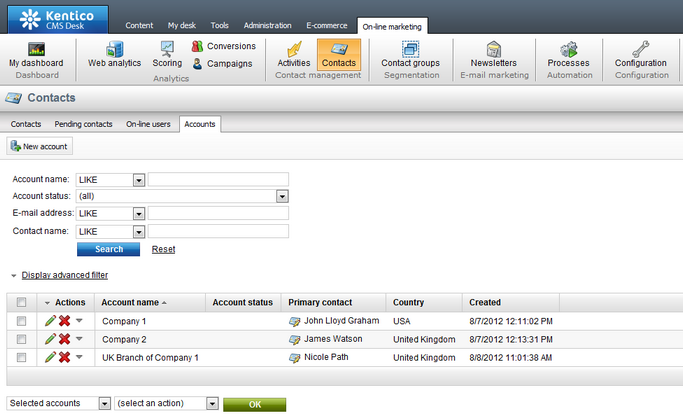
In this topic you will learn how to manage accounts. Accounts can be managed in:
•CMS Desk -> On-line marketing -> Contacts -> Accounts
•Site Manager -> Tools -> Contact management -> Accounts
Here you can see a list of accounts available on the current site and you can also create new accounts by clicking ![]() New account. Please note that you can always create site-specific accounts and, if the use of global accounts is allowed, also accounts shared across more websites.
New account. Please note that you can always create site-specific accounts and, if the use of global accounts is allowed, also accounts shared across more websites.
You may need to display only accounts matching certain search criteria (e.g. account name, account status, e-mail etc.). To do so, choose either the simplified or advanced filter, enter the required values and click Search.
Individual accounts can be Edited (![]() ) or Deleted (
) or Deleted (![]() ) and you can also perform
) and you can also perform ![]() Other actions such as
Other actions such as ![]() Export,
Export, ![]() Backup or
Backup or ![]() Restore. The displayed list can be sorted by account name, account status, primary contact and country.
Restore. The displayed list can be sorted by account name, account status, primary contact and country.
Using the pair of drop‑down lists below the list, you can perform certain contact management tasks with multiple accounts at once, specifically adding accounts to a contact group, deleting and merging accounts or changing the account status. To do this, choose either Selected contacts or All contacts from the first drop-down list, the required action from the second one and click OK.
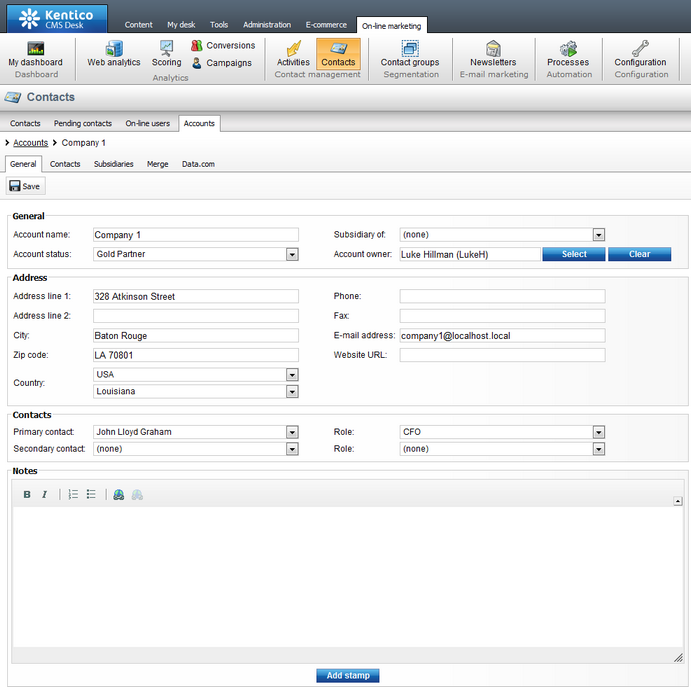
When you edit an account, the following tabs are available to you:
On this tab you can edit properties of a selected account. When you have modified the values, click ![]() Save to save the account.
Save to save the account.
General
•Account name - the name of the account. Accounts usually represent companies or other commercial or non-commercial bodies.
•Account status - allows to select an account status. If defined, the account can be labeled with an account status, e.g. a V.I.P. account.
•Subsidiary of - allows to select an account, i.e. company or other commercial or non-commercial body, of which the current account is a subsidiary.
•Account owner - allows to define an account owner, i.e. user responsible for management of the current account.
Address
•Address line 1 - the first line of the account's address.
•Address line 2 - the second line of the account's address.
•City - allows to define the city where the account has its address.
•Zip code - allows to define the zip code of the area where the account has its address.
•Country - allows to define the country where the account has its address.
•Phone - the phone number of the account.
•Fax - the fax number of the account.
•E-mail - the e-mail address of the account.
•Website URL - the website URL of the account.
Contacts
•Primary contact - the most important contact assigned to the current account; e.g. a company's CEO. Please note that you can select a primary contact only if at least one contact is assigned to the current account.
•Role - if defined, allows to assign the primary contact with a contact role, e.g. CEO.
•Secondary contact - the second most important contact assigned to the current account; e.g. a company's CFO. Please note that you can select a secondary contact only if at least one contact is assigned to the current account.
•Role - if defined, allows to assign the secondary contact with a contact role, e.g. CFO.
Notes - you can leave account notes either as plain text or as text with basic formatting, and you can also add your stamp by clicking the Add stamp button.
Please note that if you are viewing properties of a merged account, ![]() Split from parent is available on the page, enabling you to split the current account from the parent one.
Split from parent is available on the page, enabling you to split the current account from the parent one.
On this tab you can enter values into the custom fields defined for accounts in Site manager -> Development -> System tables -> Edit (![]() ) Contact management - Account on the Fields tab. When you have entered the values, click
) Contact management - Account on the Fields tab. When you have entered the values, click ![]() Save to confirm the changes.
Save to confirm the changes.
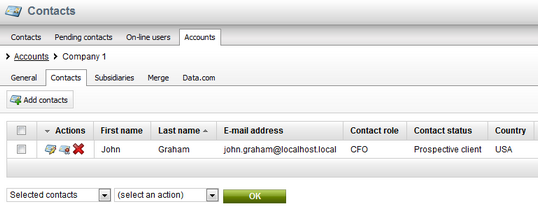
On this tab you can see a list of contacts assigned to the current account and you can also add contacts by clicking ![]() Add contacts. If you decide to do so, the Select contact dialog opens, enabling you to assign selected contacts to the current account; optionally also with a selected role (if defined). Please note that if you edit a global account, only global contacts are offered. Similarly, if you edit a site account, only current site contacts are offered.
Add contacts. If you decide to do so, the Select contact dialog opens, enabling you to assign selected contacts to the current account; optionally also with a selected role (if defined). Please note that if you edit a global account, only global contacts are offered. Similarly, if you edit a site account, only current site contacts are offered.
You can View contact details (![]() ) of individual contacts and you can also Select contact role (
) of individual contacts and you can also Select contact role (![]() ) or Remove (
) or Remove (![]() ) a contact. The displayed list can be sorted by contact first name, last name, e-mail, contact role, contact status and country.
) a contact. The displayed list can be sorted by contact first name, last name, e-mail, contact role, contact status and country.
Using the pair of drop‑down lists below the list, you can perform certain management tasks with multiple contacts at once, specifically Selecting contact role or Removing contacts. To do this, choose either Selected contacts or All contacts from the first drop-down list, the required action from the second one and click OK.
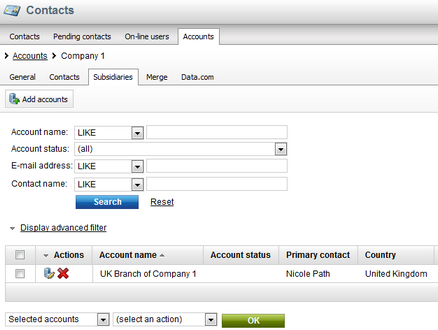
On this tab you can see a list of accounts which are subsidiaries of the current account. You can also add accounts to be recognized as subsidiaries of the current account by clicking ![]() Add accounts. If you decide to do so, the Select account dialog opens, enabling you to assign these accounts. Please note that if you edit a global account, only global accounts are offered; similarly, if you edit a site account, only current site accounts are offered.
Add accounts. If you decide to do so, the Select account dialog opens, enabling you to assign these accounts. Please note that if you edit a global account, only global accounts are offered; similarly, if you edit a site account, only current site accounts are offered.
You can View details (![]() ) of individual accounts or Remove (
) of individual accounts or Remove (![]() ) them. The displayed list can be sorted by account name, account status, primary contact and country.
) them. The displayed list can be sorted by account name, account status, primary contact and country.
Using the pair of drop‑down lists below the list, you can perform the Remove action for multiple accounts at once. To do this, choose either Selected accounts or All accounts from the first drop-down list, the action from the second one and click OK.
On this tab you can merge other accounts with the currently edited account so that only the currently edited account remains. This is useful in cases when you come to the conclusion that multiple accounts actually represent a single real‑world organization. On the tab, you can also view a list of accounts that have been merged with it and split them back into separate accounts if needed. Detailed information on merging in Kentico CMS can be found in the Merging contacts and accounts chapter.