|
|

Creating a new project |

|

|

|

|
|
Creating a new project |
|
|

|
|
|
|
Creating a new project |
|
|
|
|
|
Creating a new project |
|
|
|
|
|
|
||
The example in this topic demonstrates how projects can be created and configured under a department. The procedure for doing the same under a workgroup is nearly identical and any differences will be mentioned. Please be aware that this example is from the point of view of a user with full project management permissions and all of the described actions may not be available for other users.
1. Access the portal and sign in as Brad Summers (user name BradS with a blank password). Navigate to the Departments section and click on the IT department, which will bring you to its sub‑section of the portal.
2. Select the Projects section of the department from the menu. It contains a list of all projects that belong to the department and key information about them. The action buttons to the left of each project can be used to Edit (![]() ) or Delete (
) or Delete (![]() ) it.
) it.
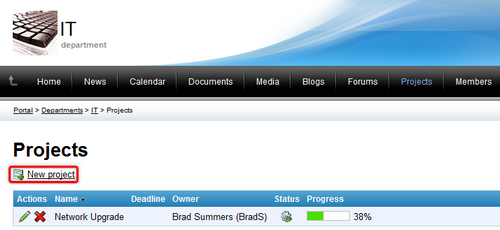
Click the ![]() New project link.
New project link.
3. A dialog will appear where you can define the following properties of the new project:
•Display name - name of the project.
•Project goal - text description of the purpose of the project.
•Start date - specifies the date and time when work on the project should start. Clicking the Now link enters the current time into the field. Alternatively, the Choose date/time (![]() ) button may be used to select a specific date and time from a calendar.
) button may be used to select a specific date and time from a calendar.
•Deadline - specifies the date and time before which the project should be complete.
•Owner - allows the selection of the user who will be set as the project owner using the Select button. Projects that belong under workgroups may only select from users who are members of the given workgroup. The owner is usually the user who ensures that the project is completed successfully and automatically has full permissions for this project. By default, the user who created the project is entered.
•Status - allows one of the predefined project statuses to be selected. Statuses are used to indicate which life cycle step the project is currently in.
•Allow task ordering - if checked, the order of tasks that belong under the project can be changed using arrow buttons.
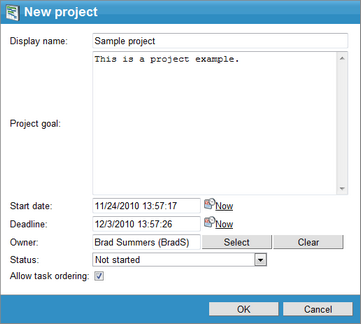
Click OK to create the project.
4. The editing interface of the newly created project will now be displayed and the details of the current project can be viewed. These include the properties described above and the Progress of the project, which is automatically calculated as the average progress of all tasks under the project.
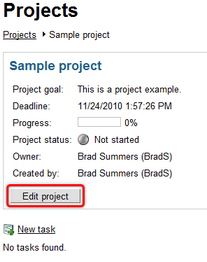
Click the Edit project button to bring up the dialog used to modify the configuration of existing projects.
5. The General tab allows editing of the same properties that were entered when the project was created.
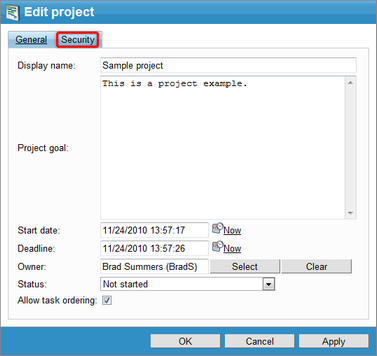
Switch to the Security tab.
6. Here, the displayed permission matrix can be set to determine what type of users are allowed perform actions related to the project and its tasks.
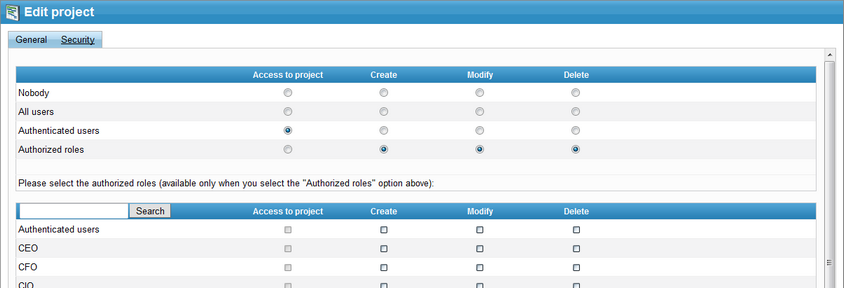
The following permissions are available:
•Access to project - users with this permission are allowed to view and access the project.
•Create - users with this permission are allowed to create new tasks under the project.
•Modify - users with this permission are allowed to modify the tasks under the project.
•Delete - users with this permission are allowed to delete tasks under the project.
These permissions can be assigned to:
•Nobody - nobody can perform the action.
•All users - all users can perform the action.
•Authenticated users - only signed‑in users can perform the action, i.e. anonymous public users cannot perform it.
•Group members - only members of the workgroup that the project belongs to can perform the action. This option is only available for projects under workgroups.
•Authorized roles - only users that are assigned to the roles selected below can perform the action. For workgroup projects, only the roles defined for the given workgroup may be selected.
|
Project security exceptions
1. The user who is set as the owner of a project automatically has full permissions for that project.
2. A task can be modified by users that it is assigned to or owned by regardless of the security settings of the project that the task belongs under.
3. Users who can manage a workgroup have full permissions for all projects under the given workgroup.
4. The permissions set for individual projects may not be applied if the entire Projects section of the department or workgroup that contains the given project is configured to have different security settings by the portal administrators. |
Click OK to close the dialog and save any changes.
7. The lower part of the project editing interface is taken up by a list of tasks that belong under the current project. To learn about using tasks, please continue in the Managing tasks topic.
