|
Changing the themes |

|

|

|

|
The portal comes with three default themes - Blue, Green and Red, as described in Intranet User's Guide -> Other features -> Available themes. These themes can be applied separately to the global section of the portal and to particular departments and workgroups. While the global section themes and departments documents themes can only be changed by the system administrators via the system administration interface, the themes of workgroups documents can be changed by both the system administrators and workgroup administrators. As the global administrator, you can thus not only add your custom color themes, but also change the themes on all the three different levels:
1. Globally for the whole site
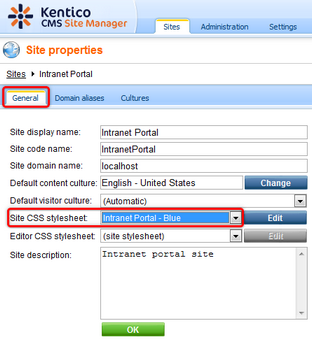
If you need to change the theme for the whole site, log on to Site Manager -> Sites and choose to Edit (![]() ) your intranet site. On the General tab of the Site properties page, choose the required theme from the Site CSS stylesheet drop-down list and click OK. If you now go back to CMS Desk or live site, all portal pages inheriting their theme from the portal global settings will have the color you have just chosen. Please note that if you choose (none) from the Site CSS stylesheet drop-down list, your portal pages will lack a theme unless you choose one as described below.
) your intranet site. On the General tab of the Site properties page, choose the required theme from the Site CSS stylesheet drop-down list and click OK. If you now go back to CMS Desk or live site, all portal pages inheriting their theme from the portal global settings will have the color you have just chosen. Please note that if you choose (none) from the Site CSS stylesheet drop-down list, your portal pages will lack a theme unless you choose one as described below.
2. Globally for the root in the content tree
Another way to globally change the theme of the Intranet Portal is to choose one for its root. Log on to CMS Desk and choose the root from the content tree. Now select the theme that you would like to use on the Properties tab in General -> CSS stylesheet . Please note that selecting (default) from the CSS stylesheet drop-down list will result in applying the theme set in step 1. To save the theme for the portal root, click ![]() Save. From now on, this theme will be used for all portal pages inheriting from the root or from a parent inheriting directly or indirectly from the root.
Save. From now on, this theme will be used for all portal pages inheriting from the root or from a parent inheriting directly or indirectly from the root.

3. Separately for different pages
On the Intranet Portal, you can also set a theme for a particular page. Log on to CMS Desk, choose the page from the content tree and select the theme that you would like to use on the Properties tab in General -> CSS stylesheet. Please note that selecting (default) from the CSS stylesheet drop-down list will result in applying the theme set in step 1. To save the theme for the given page, click ![]() Save.
Save.
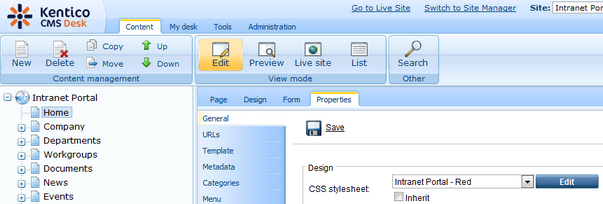
Please note that if you set the Inherit option value to true, the CSS stylesheet drop-down list will become inactive and the page will be inheriting its theme from the parent.

If you need to change the theme of a department, log on to CMS Desk and from the content tree, choose the department root document whose theme you want to change. You can perform the task either the same way as described above, i.e. on the Properties tab in General -> CSS stylesheet, with the possibility to inherit the theme from the parent by checking the Inherit check box.
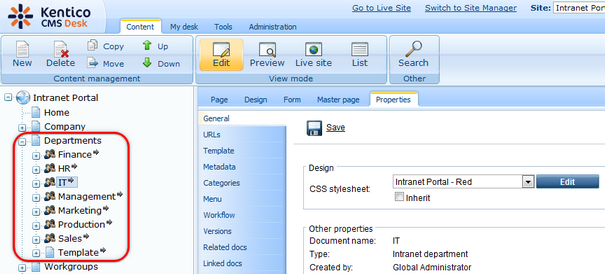
Or you can change the department root document theme using the Used stylesheet drop-down list on the Form tab. However, it is not possible to set inheritance from here.
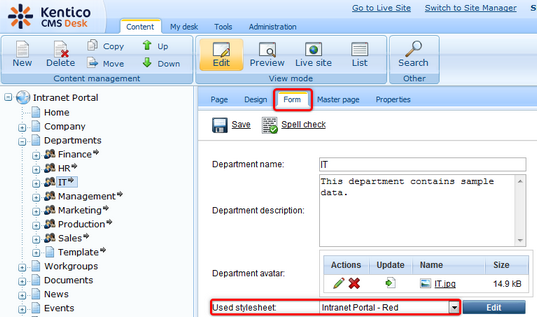
In either case, clicking ![]() Save will result in changing the theme of the given department root document including all department pages inheriting directly or indirectly from this department root document. Please note that choosing the department document theme on both the Form tab and Properties tab has the same effect and the value chosen on the one tab is automatically set on the other.
Save will result in changing the theme of the given department root document including all department pages inheriting directly or indirectly from this department root document. Please note that choosing the department document theme on both the Form tab and Properties tab has the same effect and the value chosen on the one tab is automatically set on the other.
If you need to change the theme of a workgroup, log on to CMS Desk and from the content tree, choose the workgroup root document whose theme you want to change. You can perform the task either the same way as described above, i.e. on the Properties tab in General -> CSS stylesheet, with the possibility to inherit the theme from the parent by checking the Inherit check box.
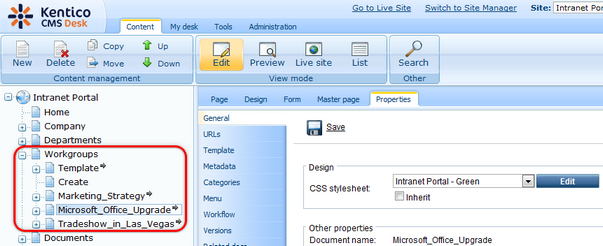
Or you can change the workgroup root document theme in Tools -> Groups -> Edit (![]() ) <group> -> General using the Theme drop-down list. However, you will not be able to set inheritance from here.
) <group> -> General using the Theme drop-down list. However, you will not be able to set inheritance from here.
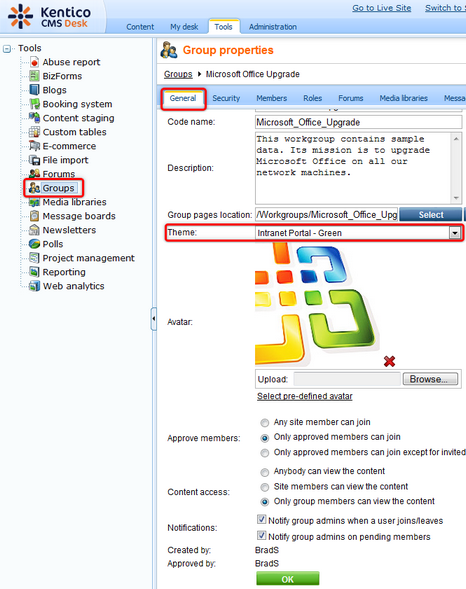
When you have the value entered, click ![]() Save on the Properties tab or click OK on the General tab. This will result in changing the theme of the given workgroup root document including all workgroup pages inheriting directly or indirectly from this workgroup root document. Please note that choosing the workgroup document theme on both the General tab and Properties tab has the same effect and the value chosen on the one tab is automatically set on the other. What is more, workgroup administrators can change the workgroup document theme also on the live site, as described in Intranet User's Guide -> Workgroups.
Save on the Properties tab or click OK on the General tab. This will result in changing the theme of the given workgroup root document including all workgroup pages inheriting directly or indirectly from this workgroup root document. Please note that choosing the workgroup document theme on both the General tab and Properties tab has the same effect and the value chosen on the one tab is automatically set on the other. What is more, workgroup administrators can change the workgroup document theme also on the live site, as described in Intranet User's Guide -> Workgroups.
|
Please note
If you choose any value other than (none) or (default) from the Site CSS stylesheet, CSS stylesheet and Used stylesheet drop-down lists, the stylesheet Edit button will be active enabling you to edit the code of the particular CSS style.
|
Creating your custom color theme
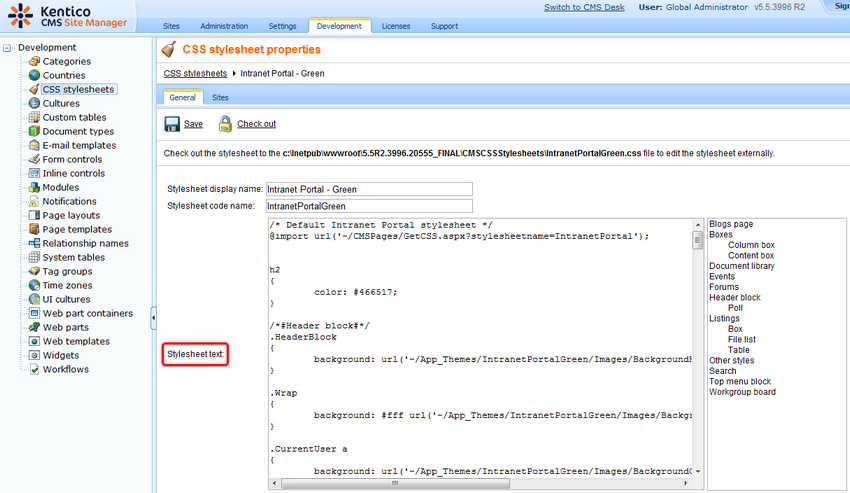
1. If you need to create your own color theme, log on to Site Manager, go to Development -> CSS stylesheets and choose to Edit (![]() ) either the Intranet Portal - Green or Intranet Portal - Red theme. On the <CSS stylesheet> -> General tab, copy the content of the Stylesheet text field to clipboard.
) either the Intranet Portal - Green or Intranet Portal - Red theme. On the <CSS stylesheet> -> General tab, copy the content of the Stylesheet text field to clipboard.
Please note that the Intranet Portal - Blue theme is the portal default theme, which is used as the basis of the Intranet Portal - Green and Intranet Portal - Red themes, defining only color differences. The steps described in this section thus concern only the creation of a new theme color variant. However, if you would like to create a new theme from scratch, you can use also the Intranet Portal - Blue theme as the basis or you can start with a blank one, writing all the CSS stylesheet code yourself.
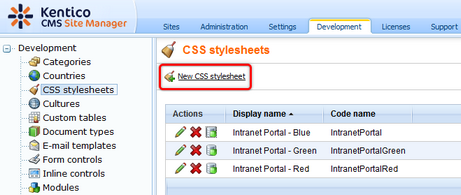
2. In Site Manager -> Development -> CSS stylesheets, click the ![]() New CSS stylesheet link.
New CSS stylesheet link.
3. This displays the dialog used for the creation of a new CSS stylesheet.
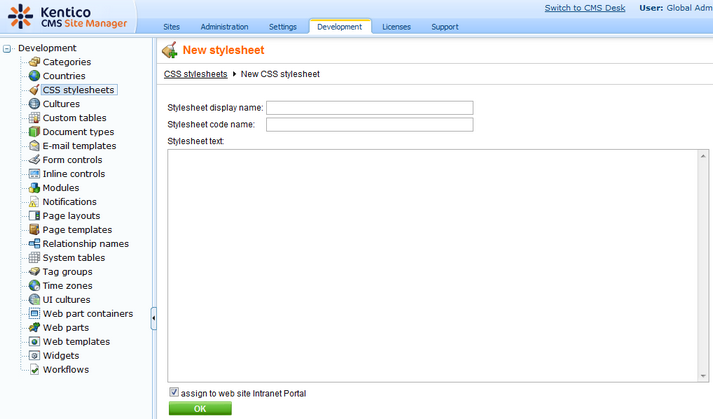
The following fields are available to define the CSS stylesheet:
| • | Stylesheet display name - name of the stylesheet displayed in the user interface; a required field. |
| • | Stylesheet code name - name of the stylesheet used in website code; a required field. |
| • | Stylesheet text - standard CSS stylesheet code; a required field. |
| • | assign to web site Intranet Portal - indicates if the CSS stylesheet will be assigned to the Intranet Portal web site; an optional field. |
Now copy the content of the clipboard to the Stylesheet text field. Modify the style code as needed, fill in the remaining two required fields and make sure that the assign to web site Intranet Portal option is set to true. If you have all values entered, click OK to save the new CSS stylesheet. Please note that you can optionally assign the CSS stylesheet to a web site from the <CSS stylesheet> -> Sites tab using the Add sites button.
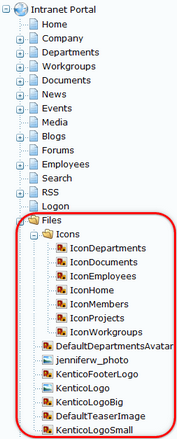
4. You may also want to modify some of the auxiliary image files related to the CSS style defining your custom color theme. You can either upload new image files with the same names or you can modify the existing files using the built-in Image editor as described in more details in the Handling images chapter in the Content management -> File management section of the Developer's Guide. Please note that image files on the Intranet Portal are placed in the Files folder.
For a detailed description of how to deal with CSS styles on the Intranet Portal, please refer to the CSS stylesheets and design chapter in the Development section of the Developer's Guide.
Page url: http://devnet.kentico.com/docs/5_5r2/intranetadminguide/index.html?changing_the_themes.htm