|
|

Search page |

|

|

|

|
|
Search page |
|
|

|
|
|
|
Search page |
|
|
|
|
|
Search page |
|
|
|
|
|
|
||
Kentico CMS allows users to perform index-based searches through all document content in the Kentico CMS repository, as well as other types of data. This topic describes how to add a basic search page to your website.
Before you can use the search, you need to add a smart search index covering the website's documents.
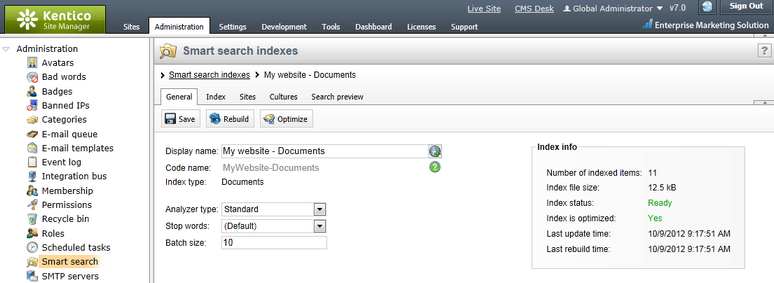
1. Go to Site Manager -> Administration -> Smart search.
2. Click ![]() New index.
New index.
3. Fill in the following details for the search index:
•Display name: My website - Documents
•Index type: Documents
•Analyzer type: Standard
•Stop words: Default
4. Click ![]() Save. The index's editing interface opens.
Save. The index's editing interface opens.
5. Open the Index tab and click ![]() Add allowed content.
Add allowed content.
6. Type /% into the Path field and click ![]() Save. This ensures that the index includes all documents on the website.
Save. This ensures that the index includes all documents on the website.
7. Switch to the Sites tab and assign the index to My website.
8. Switch to the Cultures tab and choose the default culture of your site (typically English - United States).
9. Open the General tab and click ![]() Rebuild.
Rebuild.
Once the system rebuilds the index, you can start using it on the website. The Index info box on the right side of the tab displays the current status of the index and other relevant information.
|
Searching through uploaded text files
You can also configure the CMS to search the text inside uploaded files, such as PDF, DOC or XLS documents. For additional details, see the following chapter in the Kentico CMS Developer's Guide: Installation and deployment -> Additional configuration tasks -> Configuration of full-text search in files
You do not need to configure this option now, since we will only use the basic document search in this tutorial.
|
1. Edit your web project in Visual Studio, right-click the CMSTemplates/MySite folder in the Solution Explorer and click Add new item.
2. Create a Web Form named SearchPage.aspx and check the Select master page box.
3. Click Add and choose the MyMaster.master page from the CMSTemplates/MySite folder.
4. Add the following directive to the beginning of the page code:
<%@ Register src="~/CMSWebParts/SmartSearch/SearchDialogWithResults.ascx" tagname="SearchDialogWithResults" tagprefix="cms" %> |
This registers the Smart search dialog with results web part as a user control for use on the ASPX template.
5. Copy the following code inside the <asp:content> element of the page:
<h1>Search</h1> |
This adds a heading and the user control (web part) that provides search functionality and displays the results. The control uses the My website - Documents search index created in the previous section, which is assigned through the Indexes property (identified by the index code name).
6. Switch to the code behind of the search page (SearchPage.aspx.cs) and add a reference to the CMS.UIControls namespace:
[C#]
using CMS.UIControls; |
[VB.NET]
Imports CMS.UIControls |
7. Change the class definition so that it inherits from the TemplatePage class:
[C#]
public partial class CMSTemplates_MySite_SearchPage : TemplatePage |
[VB.NET]
Partial Class CMSTemplates_MySite_SearchPage Inherits TemplatePage |
8. Save the search page files.
Registering the page template
The source files of the search page are ready. Now you need to register the page template in Kentico CMS.
1. Go to Site Manager -> Development -> Page templates.
2. Select the My website category and click ![]() New template.
New template.
3. Type Search page into the Template display name field and click ![]() Save.
Save.
4. Set the following values on the General tab:
•Template type: ASPX page
•File name: ~/CMSTemplates/MySite/SearchPage.aspx
5. Click ![]() Save.
Save.
6. Switch to the Sites tab and assign the page template to My website.
1. Go to CMS Desk -> Content. Select the root of the content tree (My website) and click New.
2. Choose the Page (menu item) document type.
3. Type in Search as the Page name and choose the Use existing page template option. Select the My website category and the Search page template.
4. Click ![]() Save to create the page.
Save to create the page.
5. Click the Down (![]() ) arrow on the main toolbar to move the Search page to the end of the document list.
) arrow on the main toolbar to move the Search page to the end of the document list.

To try out the search functionality, view the /Search page in Live site mode. Type PC into the Search for box and click Search.
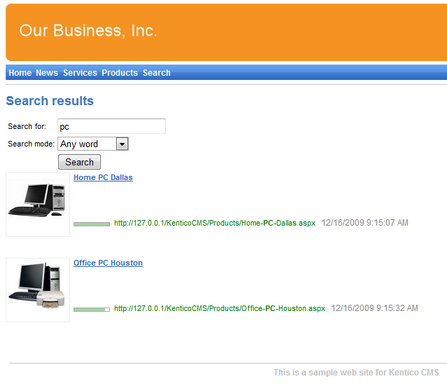
When you click a search result, the system redirects you to the corresponding page.
|
Modifying the search results format
If you prefer a different design of the search results, you can modify the format by editing the SmartSearchResults (or SmartSearchResultsWithImages) transformation in Site Manager -> Development -> Document types -> Root -> Transformations.
|

