|
|

Separating the contact management database |

|

|

|

|
|
Separating the contact management database |
|
|

|
|
|
|
Separating the contact management database |
|
|
|
|
|
Separating the contact management database |
|
|
|
|
|
|
||
This topic demonstrates how to perform the separation of the system's contact management data into a different database. It is strongly recommended to backup your database before starting this process. Additionally, the database will be unavailable while the actual separation is being carried out, so it should be done at a time when no visitors or editors are accessing the websites in the system.
|
Database separation on Windows Azure
If your application runs on Windows Azure, you must manually perform some parts of the procedure that would normally be automatic:
•Create a new database before you launch the separation. The process cannot automatically create the separated database. •Move data to the separated database. The process does not move the data, it only creates the database structure. •Delete the separated tables from the original database.
|
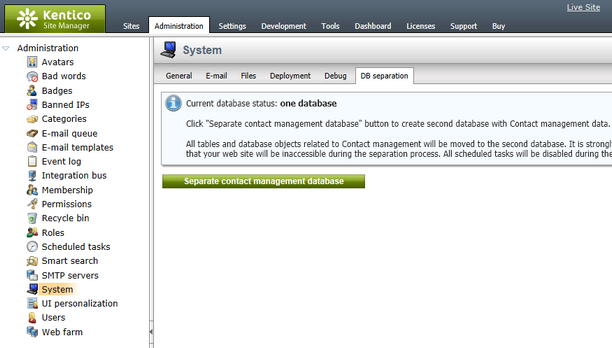
1. Log in to Site Manager and go to Administration -> System. Select the DB separation tab and click the Separate contact management database button. This starts the database separation wizard.
2. In the first step of the wizard, specify the SQL server to which you wish to transfer the contact management database and enter the credentials used to connect to it. The server can be identified through its name or IP address. It is possible to use a different server than the one containing the main database. The separated database may be hosted on all server types supported by Kentico CMS, i.e. Microsoft SQL Server 2005 or 2008 (including the free Express Edition).
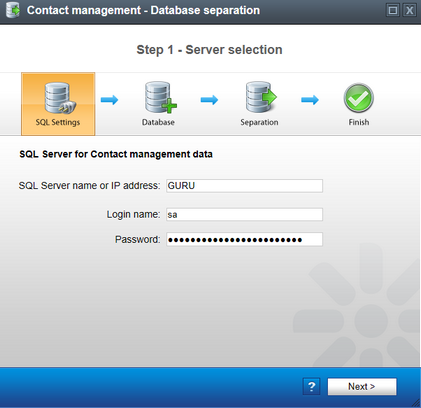
Continue by clicking the Next button.
3. In the next step, choose to either create a new database for the contact management DB objects and data, or import them into an existing one on the server specified in the previous step. In both cases, you need to enter the name of the database into the appropriate field. When using an existing database, make sure it does not contain any of the tables that are included in the separation.
Before continuing, it is necessary to prevent all Scheduled tasks in the system from running, because the database will be unavailable during the separation process. You can stop all tasks by clicking the Disable tasks button (in case there are any enabled). If a task is currently being executed when the button is clicked, the disabling action waits until it is finished. The tasks will automatically be enabled again when the separation is completed.
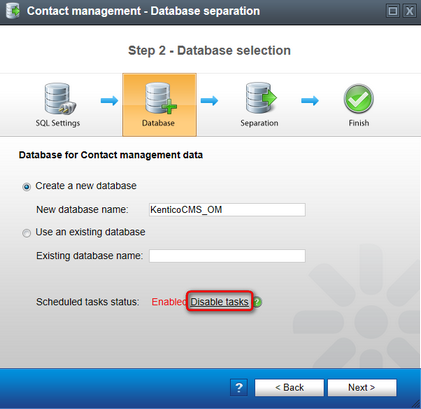
Once the target database is specified and the scheduled tasks are disabled, click Next to begin the separation.
4. A log is displayed while the database operations are being performed. During this stage, all websites in the system are temporarily switched to Off-line mode. Any regular visitors who arrive at this time will see a message informing that the site is down due to maintenance. For global administrators, the current state of the separation wizard is shown.
5. When the process is completed, all contact management data is transferred to the new database. If you view your application's web.config file, you can notice that an additional connection string for the new contact management database is now present in the <connectionStrings> section:
<add name="CMSOMConnectionString" connectionString="..." /> |
6. By clicking the Finish button in the final step of the wizard, you confirm that the separation was successful and that the data (including the database table structure and other related objects) can be deleted from the main database. The system brings all websites back on-line and enables the inactive scheduled tasks.
If your application is running on multiple servers in a Web farm environment, you need to manually copy the CMSOMConnectionstring key into the web.config files of all other servers, otherwise they will not be functional. |
If your application is running in a medium trust environment, the system cannot enable the scheduled tasks and return the off-line sites back on-line. To manually perform these tasks:
1. Go to Site Manager -> Settings -> System and enable the Scheduled tasks enabled setting. 2. In Site Manager -> Sites, edit your websites on the Off-line mode tab. 3. Click Bring the site on-line. Repeat the same for each site. |
The new database status is reflected on the General tab of the Site Manager -> Administration -> System page in the Database information section.
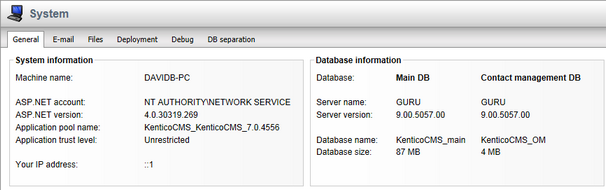
All functionality of the website and administration interface remains the same as before the separation.
