|
|

Using widgets |

|

|

|

|
|
Using widgets |
|
|

|
|
|
|
Using widgets |
|
|
|
|
|
Using widgets |
|
|
|
|
|
|
||
Users can perform widget-related actions depending on their role on the website:
•Site developers and administrators - can determine which zones are widget zones (and their type) and which ones are standard (static) web part zones, and also define the default content of these zones. These tasks can be done in CMS Desk -> Content -> Design. They can also manage widgets in the administration interface in Site Manager -> Development -> Widgets. This includes developing new widgets, determining where and by whom they can be used and selecting the properties which should be personalizable (editable by users).
•Page editors - can define the content of Editor widget zones created on page templates by the site developers/administrators. This is accessible through CMS Desk -> Content -> Edit -> Page.
•Group administrators - can define the design of Group administrator widget zones on group page templates. Group administrators can add or remove widgets and set their properties just like page editors. This customization can be done on the live site.
•Website users - authenticated users of the website can customize the content of widget zones on personalizable pages on the live site. They can add or remove widgets and configure the widget properties. Only pages with templates that contain User widget zones can be personalized in this way.
Site developers, administrators and page editors can also use inline widgets. Please refer to the Inline widgets chapter for more details.
Another place where users can customize page content using widgets is on the dashboards located in the administration interface of Kentico CMS. Dashboard pages are based on special types of page templates and their widget functionality is very similar to that of User widget zones. More detailed information about widgets on dashboards can be found in the Modules -> Dashboards -> Managing dashboard content topic.
The site developers make the decisions regarding the layout of page templates. This also includes the decision whether a zone will be defined as a web part zone (static) or widget zone (customizable).
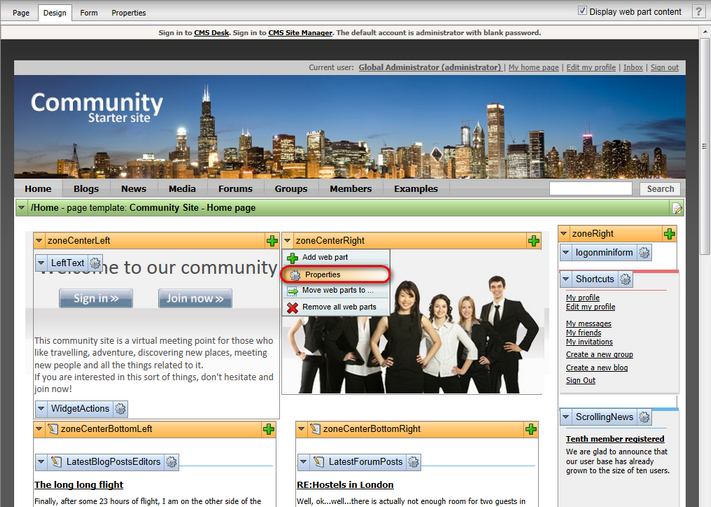
To change a web part zone into a widget zone, go to CMS Desk -> Content -> Design, expand the menu of the selected web part zone (![]() ) and click on the
) and click on the ![]() Properties item.
Properties item.
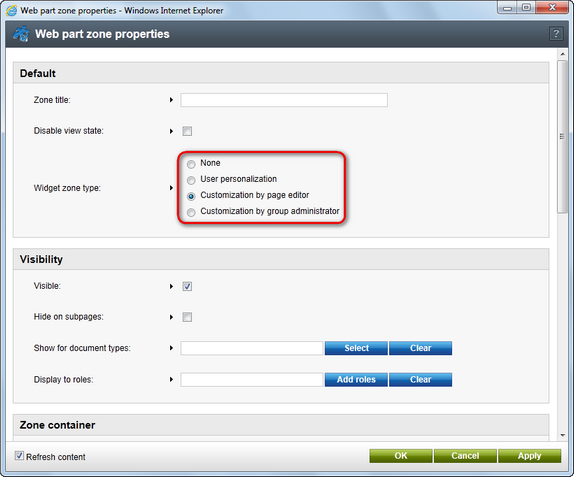
Using the Web zone part properties dialog you can define the Widget zone type property. The following options are available:
•None - a standard web part zone is used.
•User personalization - the zone will be a widget zone and website users will be able to personalize it on the live site. The zone will be marked with the User zone (![]() ) icon.
) icon.
•Customization by page editor - the zone will be a widget zone and website editors will be able to customize it. The zone will be marked with the Editor zone (![]() ) icon.
) icon.
•Customization by group administrator - the zone will be a widget zone and group administrators of the group that owns the page will be able to customize it. The zone will be marked with the Group administrator zone (![]() ) icon.
) icon.
Please bear in mind that changing the widget zone type removes all current web parts or default widgets placed in that zone.
Having defined the zone as a widget type zone, you can now add widgets. Simply click on the Add widget (![]() ) button on the right side of the zone.
) button on the right side of the zone.
![]()
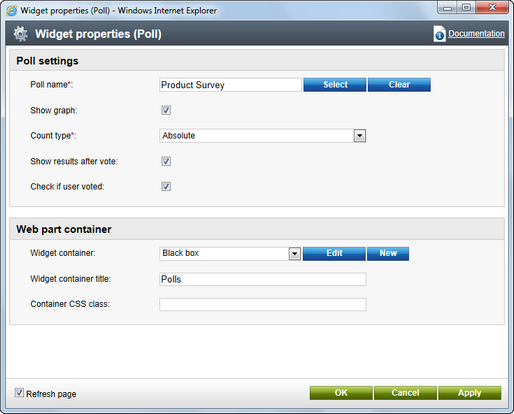
You can select any widget available for the given type of widget zone (User, Editor, Group administrator).
A Widget properties dialog opens (unless the given widget is configured to skip it), where you can change any properties available for customization. Click OK to add the widget.
This way, developers can define the default content of widget zones. It is up to the users to personalize these zones further as described in the remaining sections of this topic.
As a page editor, you can add, modify or delete any widget placed in editor type widget zones. This can be used to allow editors to quickly customize pages beyond simply entering content into static page templates.
To add a widget, just click on the Add widget (![]() ) button in the top left corner of an editor widget zone.
) button in the top left corner of an editor widget zone.
You can modify the properties of any widget placed in an editor zone by clicking the Configure widget (![]() ) button. You can also delete widgets using the Delete widget (
) button. You can also delete widgets using the Delete widget (![]() ) button. To move widgets between zones, hover over Drag widget (
) button. To move widgets between zones, hover over Drag widget (![]() ) and drag the widget to the desired place.
) and drag the widget to the desired place.
Group administrators (members of the group who are assigned to a group role that can manage the group) have basically the same options as page editors. They can personalize those pages that belong to their group that contain group administrator widget zones by adding, deleting and configuring widgets in these zones. This is done on the live site, as group administrators won't necessarily have access to the CMS Desk -> Edit interface. Other website users who have access to the group pages will be able to see the widgets, but won't be able to manage them.
For specific information about groups, please see the Modules -> Groups chapter of this guide.
|
Note
Group ownership of a document can be configured in CMS Desk -> Edit -> Properties through the Owned by group field.
|
Authenticated website users can manipulate user widget zones on the live site and thus personalize their pages. A common use is placing user widget zones onto the home page, so that users can create their own personalized version of it.
In order to add a widget to a user widget zone on the live site, click on the Add widget (![]() ) button in the top left corner of the zone.
) button in the top left corner of the zone.
Any widget can be configured by clicking on the Configure widget (![]() ) button. You can also delete widgets using the Delete widget (
) button. You can also delete widgets using the Delete widget (![]() ) button. To move widgets between zones or to different positions, click anywhere on the header of the given widget and drag it to the desired location. Any widget can be minimized using the Minimize (
) button. To move widgets between zones or to different positions, click anywhere on the header of the given widget and drag it to the desired location. Any widget can be minimized using the Minimize (![]() ) button, or restored using the Maximize (
) button, or restored using the Maximize (![]() ) button.
) button.
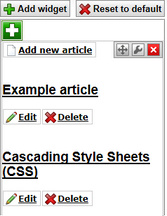
Widget actions web part
You can place the Widget actions web part onto pages containing widget zones to allow users to:
•Add widgets
•Reset all widget zones to their default content
![]()
The web part only works with the type of widget zone specified in its Widget zone type property. When a user clicks the Add widget button, the web part places the widget into the zone specified by the Widget zone property. Users can drag the widget into another zone if the default placement is not suitable.
|
Tip
When creating pages with editor widget zones, you can enable the Use main menu property of the Widget actions web part. This causes the web part to display the action buttons on the main edit menu of the Page tab in CMS Desk, instead of in the page content.
|
For security reasons, the system does not resolve macro expressions entered by users into the properties of widget instances. However, you can pre-set macros as the default values of widget properties:
1. Go to Site Manager -> Development -> Widgets.
2. Select the given widget in the tree catalog and open the Properties tab.
3. Enter the required macro expression into the Default value field of the appropriate property.
4. Disable the Display attribute in the editing form option for the property.
5. Click ![]() Save.
Save.
When the website renders a page containing the widget, the system resolves the macro and dynamically inserts the return value into the property.

