Multiple document aliases |

|

|

|

|
|
Multiple document aliases |

|

|

|

|
|
|
||
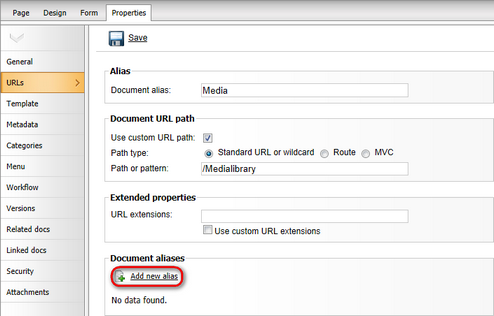
In Kentico CMS, it is possible to have an unlimited number of different URLs leading to one document. These can be set in CMS Desk, on the Properties -> URLs tab of each document:
•Document alias - this is the unique name of the document in the given section of the website. Aliases are used to form the alias path of each document, which contains all parent documents up to the root of the site's content tree. The alias path of a document is then used to generate its default URL. For example, if Media is the alias of a document, then its URL would be: <site domain>/<parent document alias path>/Media.aspx
•Document URL path - the fields in this section may be used to specify an alternate URL for the document, regardless of its position in the website hierarchy. For example, if you have the Standard URL or wildcard Path type selected and enter /Medialibrary, the URL of the document would be the following:
<domain>/Medialibrary.aspx
Further URLs can be added to a document through document aliases. Aliases do not change how the main URL of a document is generated, they only make it possible to access the given document through other URLs. Document aliases may be created in the following way:
1. Sign in to CMS Desk, select the appropriate document from the content tree and switch to its Properties -> URLs tab.
2. Click ![]() Add new alias in the Document aliases section.
Add new alias in the Document aliases section.

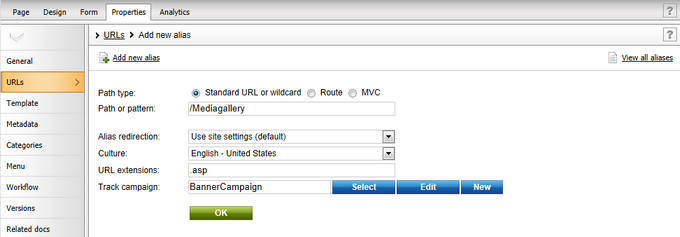
3. It is possible to fill in the following properties for each alias:
•Path type - you can choose several different URL types for the alias path. The selection made here determines how the value of the Path or pattern field will be processed. The following options are available:
•Standard URL or wildcard - the alias URL will be handled by the standard Kentico CMS rewriting engine. Wildcard URLs can be used here, as described in Wildcard URLs.
•Route - the alias URL will be processed as an ASP.NET Route pattern.
•MVC - requests to the alias URL are handled as requests for an MVC page. See the MVC development model chapter for more information.
•Path or pattern - enter a URL path for the document alias according to the selected Path type. For example, if you enter /Mediagallery as the value, the document will be accessible under the following URL: <domain>/Mediagallery.aspx
•Default controller (MVC only) - the name of the MVC controller containing the action that should be performed when the alias URL is accessed, without the Controller part at the end. For example, if the class is called NewsMVCController, enter NewsMVC. The system first searches for the specified class in the CMS.Controllers.<current site code name> namespace. If it is not found there, the CMS.Controllers.Global namespace is searched.
•Default action (MVC only) - specifies the action defined within the controller that should be performed when the alias URL is accessed.
•Alias redirection - determines how the URL should be handled (redirected) when the document is accessed through this alias (for SEO purposes). The following options are available:
•Use site settings (default) - with this option, the redirection behavior will follow the Redirect document aliases to main URL setting specified for the website in Site Manager -> Settings -> URLs and SEO.
•Redirect to main URL - if selected, the alias URL will always be redirected to the main URL of the document, i.e. its alias path or custom URL path (if specified).
•Do not redirect - if selected, the alias URL will not be redirected when accessed. This option is recommended if the URL of the alias contains a wildcard.
•Culture - sets which culture version of the document should be displayed when the page is accessed through the URL of this alias.
•URL extensions - additional supported extensions of the URL. For these to work, you will have to configure the system as described in Custom URL extensions and extensionless URLs. This field is optional.
•Track campaign - visitors who access the document through this alias will be assigned to the selected web analytics Campaign and tracked accordingly. For example, a special alias may be created for a document and its URL can then be used by links contained in marketing materials such as banners, e‑mails etc. This way, the system will monitor how many page views the website receives as a result of the campaign and track the activity of the visitors who arrive as a result. This field is optional.

Click OK to create the alias.
4. Now if you switch back to the Properties -> URLs tab of the document, you should see the newly created alias present in the list in the Document aliases section, as depicted in the screenshot below. Like this, you can add an unlimited number of aliases.

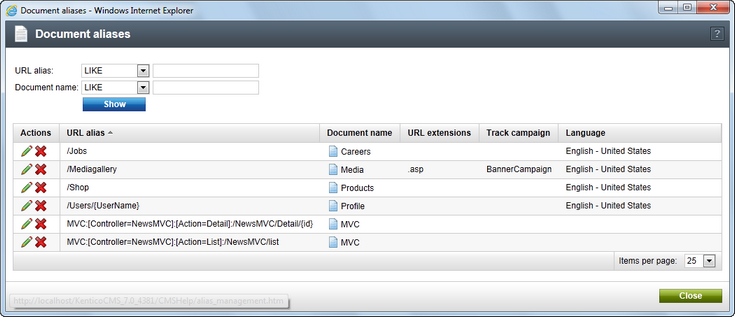
5. If you edit (![]() ) any alias, you can use the
) any alias, you can use the ![]() View all aliases link at the top right of the page to access a list of all aliases defined on the website (for all documents). The information provided can help you avoid URL collisions when creating new aliases. The Edit (
View all aliases link at the top right of the page to access a list of all aliases defined on the website (for all documents). The information provided can help you avoid URL collisions when creating new aliases. The Edit (![]() ) and Delete (
) and Delete (![]() ) actions are also available here, and through them you can easily manage all aliases and their properties from a single location.
) actions are also available here, and through them you can easily manage all aliases and their properties from a single location.
