Logging actions as conversions |

|

|

|

|
|
Logging actions as conversions |

|

|

|

|
|
|
||
This topic describes the possible options that may be used to ensure that the system logs specific events as conversions. When assigning a conversion through the user interface, two types of fields are provided.

The first is a standard conversion selector. You can either enter the code name of a conversion into the text box or click the Select button to choose from a list of conversions defined for the current site. If you enter a name that does not match any conversion in the system, a conversion with this name will automatically be added. The New and Edit buttons allow you to create a new conversion or modify the properties of the selected one directly from the given part of the user interface.
The second field is optional and provides a way to set a number that will be recorded along with the conversion when the tracked action is performed. This may be used to indicate the relative importance of the conversion, the profit generated by a single conversion hit or similar. The values are cumulative, i.e. when a conversion hit is logged, the specified value will be added to the total sum previously recorded for the conversion. You may insert a Macro expression into this field to dynamically retrieve a value from the current site context. For examples of conversion value macros, please see the sections below dedicated to individual types of actions.
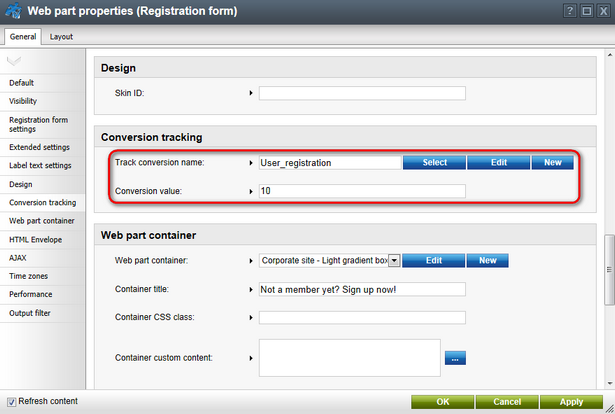
Many of the default Kentico CMS Web parts and Widgets that allow users to perform important actions come with built‑in support for conversion tracking. To configure a specific web part or widget instance to log actions as conversions, open its properties dialog and enter the appropriate values into the Track conversion name and Conversion value properties.

Below you can find a list of all types of actions that can be tracked as conversions through web parts:
Action |
Web part(s) |
User registration |
In this case, the conversion will be logged when a visitor successfully completes their registration using the given web part. There are multiple web parts that allow users to register on the website:
•Facebook Connect logon and Facebook Connect required data •LinkedIn logon and LinkedIn required data •Windows LiveID and LiveID required data •OpenID logon and OpenID required data
|
Newsletter subscription |
Newsletter subscriptions may be tracked as conversions through the Newsletter subscription or Custom subscription form web part. This can also be done for the widget based on the web part. |
Shopping cart actions |
The Shopping cart web part may be used to track two types of events:
•Registration - occurs when a customer registers on the website through the shopping cart. •Order - logged when a customer successfully completes an order.
You can assign conversions to these actions for specific instances of the shopping cart web part through the corresponding conversion name properties. The conversion values of these events can be configured for the entire website via the e-commerce website settings described in a dedicated section below. |
Filling in an on‑line form |
A conversion can be logged when a user submits a form displayed by the On‑line form web part. |
Voting in a poll |
The Poll web part may be used to log a conversion whenever a user votes in the displayed poll. |
|
Entering conversion value macros into web part properties
The Conversion value properties of web parts only support numeric (decimal) values, so it is not possible to specify a macro expression directly. However, you can enter macros via the Edit value dialog that can be opened by clicking the
In the case of widgets, macros entered by users into properties are not resolved at all. If necessary, macro expressions can be pre-set as the default values of widget properties by administrators. This can be done by editing the given widget in Site Manager -> Development -> Widgets on the Properties tab. |
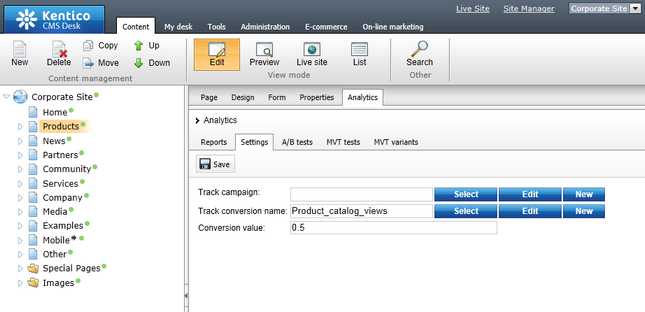
You can also use conversions to keep track of the amount of hits received by individual pages. To configure this behavior for a page, go to CMS Desk -> Content -> Edit, select the document representing the given page from the content tree and switch to its Analytics -> Settings tab. To assign a conversion and associated value, fill in the Track conversion name and Conversion value fields as described above.

The specified conversion will be logged every time the given page is requested by the website's users.
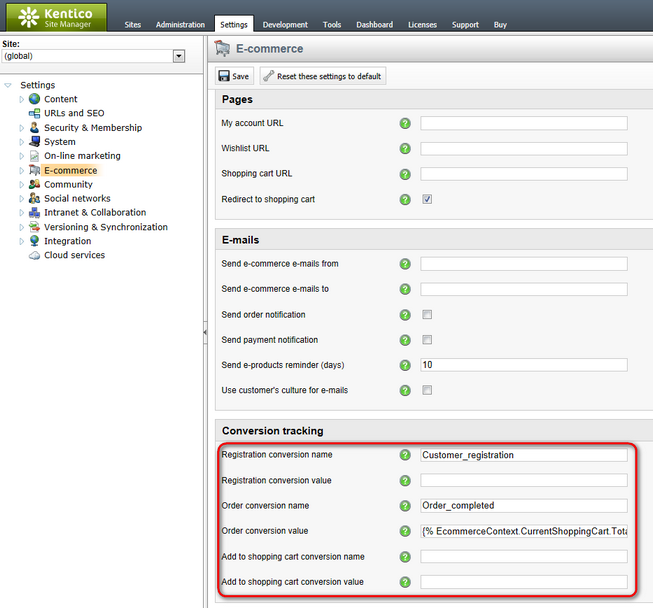
Conversions may be configured for e-commerce actions that occur on the entire website using the settings in Site Manager -> Settings -> E-commerce. There are three types of events that can be tracked:
•Registration - occurs when a customer registers on the website through the checkout process.
•Order - logged when a customer successfully places a product order.
•Add to shopping cart - occurs when a user adds a product to a shopping cart on the website.
You can assign a different conversion and value to each of these actions through the appropriate conversion name and conversion value settings. The registration and order conversion name settings can be overridden for individual instances of the shopping cart web part through their corresponding properties.
If you wish to log the conversion value dynamically based on item prices, you may use macro expressions, for example:
Order conversion value: {% EcommerceContext.CurrentShoppingCart.TotalPrice %}
This macro is resolved into the total price of all items contained in the order, including tax and shipping. With this configuration, each Order conversion will automatically store the price of the given order as its value.
Add to shopping cart conversion value: {% ShoppingCartItem.UnitTotalPrice %}
With this macro as the conversion value, the Add to shopping cart conversion will log the price (including tax) of the specific product that was added to the shopping cart.

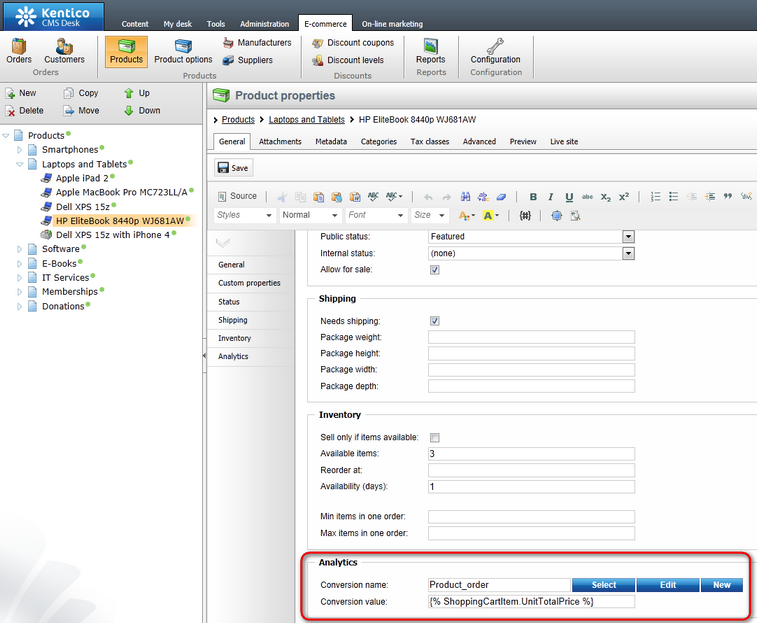
The settings described above allow you to track entire orders, but in some cases you may wish to log a separate conversion hit every time a product of a specific type is purchased. This can be done by navigating to the product list in CMS Desk -> E-commerce -> Products and selecting the particular product (or when editing a product document in the main content tree on the Form tab).

Here you can assign a conversion through the Conversion name property at the bottom of the product's editing page.
The Conversion value field can be used to specify an appropriate value that will be recorded for each conversion hit. In addition to numeric values, you may enter macro expressions here, for example: {% ShoppingCartItem.UnitTotalPrice %}. This macro allows the conversion to log the price of the given product as its value. The advantage of a macro is that it retrieves the price dynamically, including tax and any potential discounts applied by the given customer.
Please note that these properties are not available for global products, since each site has its own separate set of conversions.
You can also use the same approach to configure different conversion settings for individual product options (via E-commerce -> Product options -> edit Category -> Options).
If you need to track some other type of action that is not included among the options listed above, you can write your own custom code and use the API to log conversions. This allows you to monitor any type of activity performed by users on your website and view the results using the various conversion reports available in the web analytics interface.
To log a conversion via the API, you can use code similar to the following:
[C#]
using CMS.WebAnalytics; |
There are several possible ways to include this type of code in your website's functionality. When tracking activity on a specific page, you may use a custom user control or web part to ensure that the code is executed as required. If you wish to log actions that may occur anywhere on the website, you may utilize global event handlers.
As shown above, conversions can be logged using the HitLogProvider class from the CMS.WebAnalytics namespace, specifically the following method:
LogConversions(string siteName, string culture, string objectName, int objectId, int count, double value)
•siteName - sets the code name of the site for which the conversion should be logged.
•culture - sets the culture code under which the conversion should be logged.
•objectName - used to specify the code name of the conversion that should be logged.
•objectId - used to specify the ID of the conversion. This parameter may be set to 0 if a valid code name is passed via the objectName.
•count - sets the amount of conversion hits that should logged. This parameter is optional and the default value (1) is used if it is not specified.
•value - specifies the value that will be logged for the conversion.
In addition to logging a general conversion, this method checks if the current user has passed through a page with a running A/B or Multivariate test, or has arrived on the website through a Campaign. If this is the case, then the conversion is also automatically logged within the appropriate context and included in the statistics of the given test or campaign.