|
|

Example: Unsorted attachments |

|

|

|

|
|
Example: Unsorted attachments |
|
|

|
|
|
|
Example: Unsorted attachments |
|
|
|
|
|
Example: Unsorted attachments |
|
|
|
|
|
|
||
In the following example, you will learn how to add attachments to a document via the Properties -> Attachments tab and display them on the live site. We will use the Events section of the sample Corporate Site. First, we will upload the attachments to some of the events in the section. Then we will add the Attachments image gallery web part to the Events page, which will display the attachments for each displayed event.
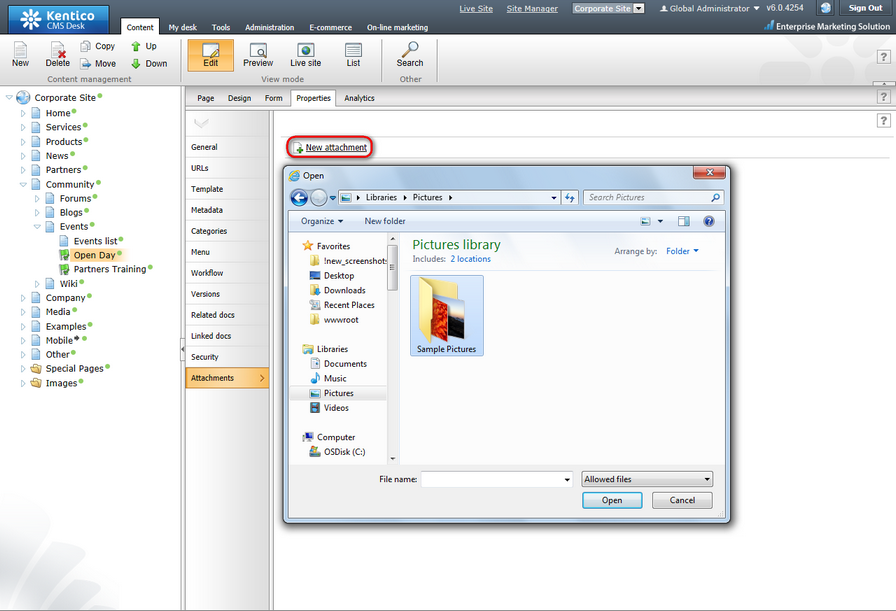
1. Adding attachments to a document this way is quite simple. First, you need to select a document from the content tree and switch to its Properties -> Attachments tab.
2. On the tab, click the New attachment (![]() ). The familiar Choose file dialog will be displayed. Choose any file from your local drive and click the Open button.
). The familiar Choose file dialog will be displayed. Choose any file from your local drive and click the Open button.
Please note: The mouse pointer doesn't change when you hover the New attachment (![]() ). This is by design and you needn't be worried about it.
). This is by design and you needn't be worried about it.
3. Repeat the same procedure so that you have a few files attached to at least one document. Preferably, include some images among them. The document's attachments tab should look similarly to the screenshot below after the attachments' upload. Note that if you hover an image in the list, its thumbnail is displayed as in the screenshot.
In the list of attachments, you can do several things with each attachment:
•Delete (![]() ) - removes the attachment from the document.
) - removes the attachment from the document.
•Move up (![]() ) and Move down (
) and Move down (![]() ) - re-orders the attachments. The order is stored in the AttachmentOrder property of each attachment. You can enter AttachmentOrder into the ORDER BY expression property of a displaying web part to have the attachments ordered accordingly.
) - re-orders the attachments. The order is stored in the AttachmentOrder property of each attachment. You can enter AttachmentOrder into the ORDER BY expression property of a displaying web part to have the attachments ordered accordingly.
|
Please note
The order of attachments is not versioned with documents' workflow. This means that if you change the order of attachments in one version of a document, the order is changed in all other versions too.
|
•Edit (![]() ) - if the attachment is an image, clicking the icon opens it in the built-in image editor. If the attachment is not an image, the metadata editor is opened after clicking the icon.
) - if the attachment is an image, clicking the icon opens it in the built-in image editor. If the attachment is not an image, the metadata editor is opened after clicking the icon.
•Edit in client application (![]() ) - is displayed only when WebDAV integration is enabled and only next to file types supported by WebDAV. Clicking the icon opens the document for editing in an external application installed on the client computer (the application must support WebDAV for this to work). Saving the document in the client application updates the attachment with the new version automatically.
) - is displayed only when WebDAV integration is enabled and only next to file types supported by WebDAV. Clicking the icon opens the document for editing in an external application installed on the client computer (the application must support WebDAV for this to work). Saving the document in the client application updates the attachment with the new version automatically.
•Update (![]() ) - enables you to replace the original attachment with a new one.
) - enables you to replace the original attachment with a new one.
•After clicking an attachment's name, the attachment is opened.

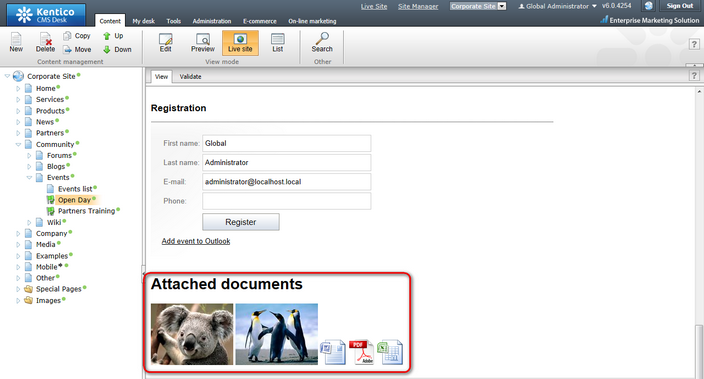
4. Now that we have the attachments uploaded, we can display them on the live site. The events are displayed by a repeater on the Events page, so we will have to add the Document attachments web part to this page.
Select the Events page from the content tree and switch to the Design tab. Click the Add web part (![]() ) icon of the Main zone web part zone and choose the Attachments -> Attachments image gallery web part. You do not need to set any web part properties in order for the web part to display the attachments. However, you can add some heading via the Content before property:
) icon of the Main zone web part zone and choose the Attachments -> Attachments image gallery web part. You do not need to set any web part properties in order for the web part to display the attachments. However, you can add some heading via the Content before property:
•Content before: <h1>Attached documents</h1>
Click OK. If you switch to the live site now, you should see its attachments' thumbnails as in the screenshot below.