|
|

Introduction to workflow designer |

|

|

|

|
|
Introduction to workflow designer |
|
|

|
|
|
|
Introduction to workflow designer |
|
|
|
|
|
Introduction to workflow designer |
|
|
|
|
|
|
||
This topic describes the workflow designer, which is a tool for creating complex workflow processes.
You can find the workflow designer on the Steps tab when editing an advanced workflow. It consists of a toolbar and a grid. By placing workflow steps from the toolbar on the grid and connecting them, you form a graph that represents the workflow process.
The following image shows a basic workflow process consisting of the Edit, Published and Archived steps, as it appears in the workflow designer. The steps are connected with transition lines. The direction in which the arrows point is the direction in which a document will be moved through the steps.

If your graph doesn't fit into the designer area, you can click and drag an unoccupied area of the grid to move it and expose additional free space.
In advanced workflow, you can use the following types of steps:
•Standard step allows approving or rejecting a document.
•Condition allows splitting the workflow process into two branches, according to whether the condition is met or not.
•Multi-choice step allows splitting the workflow process into multiple branches. You can define a number of conditions, one of which will determine the branch the process will automatically continue in. If more than one condition is met, users will be able to choose.
•First-win step allows defining a number of conditions, where the first condition that is met determines the branch the process will automatically continue in.
•User choice allows defining branches of the process, where the user will chose the branch the process will continue in.
•Wait allows to define a time period after which a document will be automatically moved to the next step.
•Published step puts a document's latest version up to the live site.
•Archived step makes a document inaccessible from the live site.
You can also embed actions that will be automatically performed when a document reaches an action step:
•Copy document - copies a specified document to another location.
•Delete document - deletes a specified document.
•Import translation - imports translations of the document that are ready.
•Link document - creates a linked document.
•Move document - moves a specified document to another location.
•Publish to Facebook - automatically sends a predefined post on Facebook.
•Publish to Twitter - automatically sends a predefined post on Twitter.
•Send for translation - submits a document for translation using the specified translation service.
•Send e-mails - sends e-mails based on a specified e-mail template.
•Send notification e-mails - sends e-mails according to the e-mail settings defined for the step that immediately follows.
•Set document property - assigns a specified value to a document's property.
•Synchronize document - synchronizes a specified document to all enabled staging servers.
You can also script your own actions.
The red points are source points. You can drag a source point with your mouse and drop it on another step to create a connection between the two steps.
Some steps can have more than a single source point, as you can see in the following image.
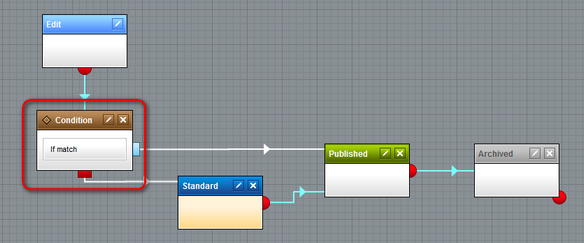
The highlighted step is an if/else condition, which allows you to create branches of the process. Therefore, it has two source points. The blue point is used when the specified condition is met. The red point indicates where the process should continue if the condition is not met. Steps that offer multiple conditions have multiple blue source points, one for each condition.
To learn how to connect steps together, refer to the Connecting steps topic.