|
|

Using a custom analyzer |

|

|

|

|
|
Using a custom analyzer |
|
|

|
|
|
|
Using a custom analyzer |
|
|
|
|
|
Using a custom analyzer |
|
|
|
|
|
|
||
In case the selection of built‑in indexing analyzers is insufficient, a custom‑written or third‑party analyzer may be specified for a search index. This gives you the option of performing tokenization according to your particular requirements.
A custom analyzer may be used with any type of smart search index, but its code files must first be created and added to your web project. The class defining a custom analyzer must inherit from the Lucene.Net.Analysis.Analyzer class.
The following example demonstrates how a custom analyzer can be assigned to a smart search index. This sample analyzer divides text into tokens only at space characters and is purely for demonstrative purposes.
1. Copy the CustomSearchAnalyzer project from your Kentico CMS installation directory (typically C:\Program Files\KenticoCMS\<version>\CodeSamples\CustomSearchAnalyzer) to some development folder (not under the web project).
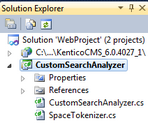
2. Open your CMS web project using the WebProject.sln file (WebApp.sln if you installed the project as a web application). Click File -> Add -> Existing Project and select the CustomSearchAnalyzer.csproj file in the folder where you copied the CustomSearchAnalyzer project. Your Solution Explorer window should now look like this:
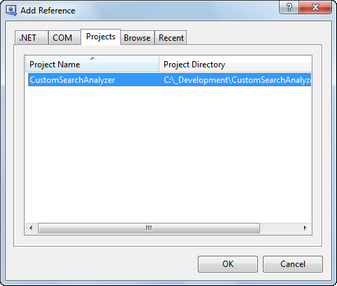
3. Right‑click the CMS website object (or the CMSApp project if your installation is a web application) and choose Add Reference. Switch to the Projects tab, select the CustomSearchAnalyzer project and click OK to add the project reference.
4. Right‑click your solution and select Rebuild Solution.
5. Open Kentico CMS, go to Site Manager -> Administration -> Smart Search and click ![]() New Index. Fill in the following properties:
New Index. Fill in the following properties:
•Display name: Space analyzer document index
•Code name: SpaceAnalyzerDocumentIndex
•Analyzer type: Custom
•Assembly name: CMS.CustomSearchAnalyzer
•Class name: CMS.CustomSearchAnalyzer.CustomSearchAnalyzer
•Index type: Documents
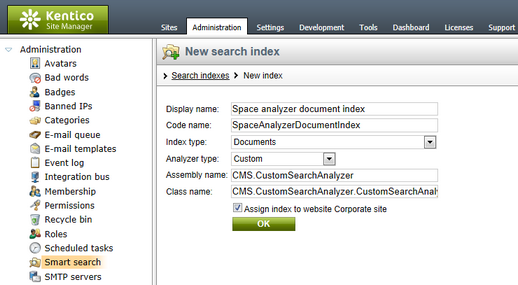
This defines the new index and specifies the assembly and class names where the custom analyzer is implemented in the CustomSearchAnalyzer project that you added to your solution. Click OK.
6. Next, switch to the Index tab, click ![]() Add allowed content, enter /% into the Path field to index all documents and click OK. Switch over to the Cultures tab and add the culture(s) used by your website.
Add allowed content, enter /% into the Path field to index all documents and click OK. Switch over to the Cultures tab and add the culture(s) used by your website.
7. Finally, go to the General tab and ![]() Rebuild the index. Once complete, the index should be functional. If you wish, you can test the index and its analyzer by switching to the Search preview tab and trying to search for words from the content of the website's documents.
Rebuild the index. Once complete, the index should be functional. If you wish, you can test the index and its analyzer by switching to the Search preview tab and trying to search for words from the content of the website's documents.
|
Defining custom analyzers in App_Code
If you do not wish to add a new project to the application, you may alternatively create the required classes under the App_Code folder, and register the custom analyzer class using the same approach described in step 3 of the Defining custom index content topic. In this case, the Assembly and Class name set for the analyzer will have to be changed accordingly. |
