|
|

Defining custom index content |

|

|

|

|
|
Defining custom index content |
|
|

|
|
|
|
Defining custom index content |
|
|
|
|
|
Defining custom index content |
|
|
|
|
|
|
||
Custom indexes are implemented by writing code, so the content indexed by them is not directly defined on the Index tab. All that needs to be done in the administration interface is specify the names of the assembly and class that contain the custom index code.
Each custom index must be defined by a class that implements the CMS.Siteprovider.ICustomSearchIndex interface.
To integrate this type of class into the application, you can add a new assembly (Class library) to your project and include it there. When using this approach, it is necessary to add the appropriate references to both the new assembly and the main CMS project. You can find a sample search index in the CustomSearchIndex project located in your Kentico CMS installation directory (typically C:\Program Files\KenticoCMS\<version>\CodeSamples\CustomSearchIndex).
Alternatively, you can define the custom index in App_Code without the need to compile an assembly, as described below.
The following example shows how you can create a custom index that searches the content of text files:
1. Open your web project, expand the App_Code folder (or Old_App_Code if you installed Kentico CMS as a web application), navigate to the Samples\Classes folder and edit the MyIndex.cs file. This file already contains a sample class that follows the basic structure required for a custom search index:
[C#]
using CMS.EventLog; |
Add any of the references listed above that are not already included in the file's code.
2. The most important part of an index's code that must always be included is its Rebuild method. It is used to fill the index with data, which determines what kind of searches will be possible. The method is called when the index is created and on each subsequent rebuild.
Place the following code into the method:
[C#]
/// <summary> // Gets an info object of the index settings. |
The exact code used to build a search index depends on its specific purpose, but the sample above shows the general principles that apply to all indexes. You will first need to create an IndexWriter object, then define appropriate search Documents (Lucene.Net.Documents.Document objects) and their fields. Once the documents are added to the index writer, you can optimize and close it.
The SearchIndexInfo parameter of the method can be used to access the data fields of the corresponding search index object. As you can see in the code above, the content of the Index data field is loaded and used to define the path to the searched text files. When writing your own custom indexes, you can use this field as a string parameter for any required purpose. This way, you can easily modify the behaviour of the index directly from the administration interface without having to edit its code.
Save the changes made to the MyIndex.cs file.
3. Next, it is necessary to ensure that the MyIndex class is loaded when the corresponding search index is created or rebuilt. Expand the Samples\Modules folder and open the SampleClassLoaderModule.cs file, which demonstrates how this can be done. You do not have to make any modifications for the purposes of this example, since the sample class loader handles the Custom.MyIndex class by default.
An object of the appropriate class is assigned by the ClassHelper_OnGetCustomClass event handler:
[C#]
/// <summary> case "Custom.MyIndex": |
In the case of search indexes, the value of the ClassName property of the handler's ClassEventArgs parameter will match the Class name specified for the given index on its Index tab (Custom.MyTask in this example). When this value is identified, an instance of the appropriate class is created and passed on.
4. Build the project if you installed it as a web application.
5. Now you need to create a folder for the text files that this index will search. This example will use C:\SearchExample. Either create or copy some existing text file into this folder.
6. Open Kentico CMS, go to Site Manager -> Administration -> Smart Search and click ![]() New Index. Fill in the following properties:
New Index. Fill in the following properties:
•Display name: Text file index
•Code name: TextFileIndex
•Index type: Custom Index
Click OK.
7. Now switch to the Index tab and enter the following:
•Assembly name: App_Code
•Class name: Custom.MyIndex
•Index data: C:\SearchExample\
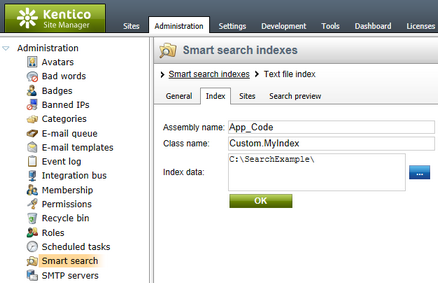
These are the names of the assembly and class where the custom index is implemented. Click OK.
8. Finally, go to the General tab and ![]() Rebuild the index. The index should now be fully functional. If you wish, you can test the index by switching to the Search preview tab and trying to search for any words from the text files you created in the SearchExample folder.
Rebuild the index. The index should now be fully functional. If you wish, you can test the index by switching to the Search preview tab and trying to search for any words from the text files you created in the SearchExample folder.