Page layouts |

|

|

|

|
|
Page layouts |

|

|

|

|
|
|
||
A page layout consists of the HTML layout of the page template and web part zones that specify regions where web parts can be placed. You will use page layouts to define the layout and design of your site.
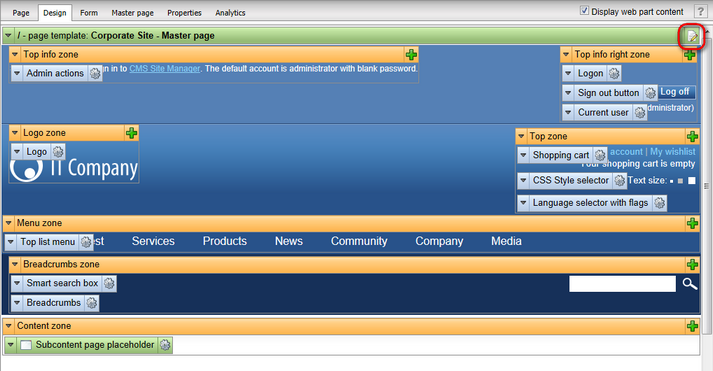
The easiest way to edit a page layout is to switch to the Design tab of a page and click the Edit layout (![]() ) button at the top-right:
) button at the top-right:


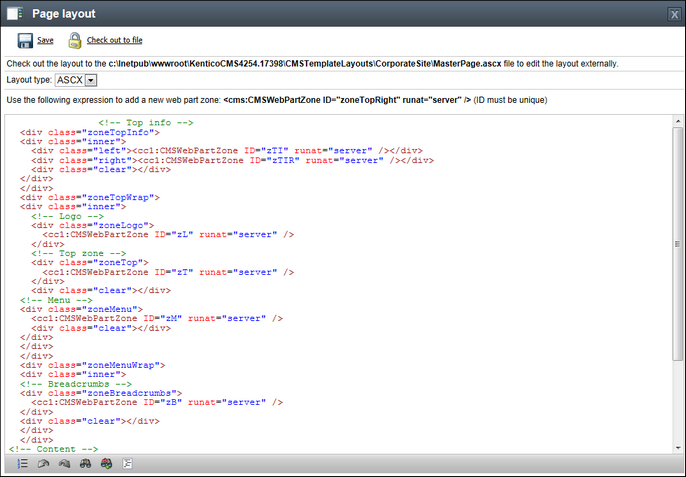
There are two possible ways that the layout's code can be processed, depending on the selected Layout type:
•ASCX - with this option, the code of the layout will support ASCX markup, i.e. the same syntax that you would use to edit a standard web form or user control, including inline code and embedded controls.
•HTML - if this option is selected, the layout code will be processed as basic HTML. This means that ASCX markup, such as controls or inline code, will not work when the layout is rendered.
Please note that for security reasons, the code of ASCX type layouts may only be edited by users who have the Edit ASCX code permission for the Design module. This permission can only be assigned by global administrators.
Since HTML layouts will only process basic HTML syntax, they cannot be used to compromise the security of the website. If you wish to insert dynamic values into HTML layouts, you can do so by entering Kentico CMS Macro expressions or methods. An advantage of HTML layouts is that they do not need to be compiled, which means they can be used and modified even if the Virtual path provider is not available, such as in a precompiled or medium trust environment.
Web part zones can be inserted into the layout through the following tags/expressions:
ASCX
<cms:CMSWebPartZone ID="zoneTop" runat="server" /> |
HTML
{^WebPartZone|(id)zoneTop^} |
The ID value must be unique for each web part zone within the given layout.
As you can see, the layout format is composed of standard HTML elements, which means you have full control over how the page will be rendered. You can choose between a table or CSS‑based layout.
|
Editing the layout in your favorite editor
In some cases, editing complex code in a web editor may not be very comfortable. You can use the Check out to file button to save the layout code to the disk and open it in your favorite editor.
Please note: The file is saved on the disk where the web application is running. |
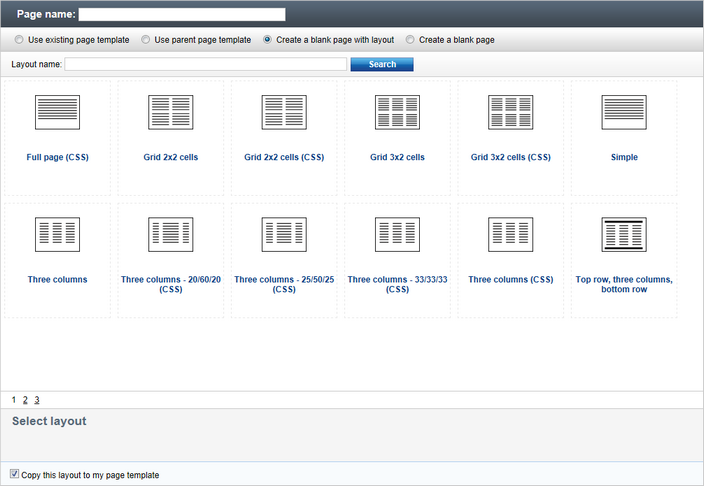
When you are creating a new blank page and select the Create a blank page with layout option, you can choose from a number of pre-defined page layouts:

The Copy this layout to my page template option allows you to decide whether you will be using the layout as shared or if you want to create an ad-hoc copy of the layout, specific for your page template only. If you leave the option disabled and make changes to the layout code, the changes will affect all pages that use the shared page layout. Therefore, it is better to leave the option enabled in most cases.
You can manage the pre-defined page layouts in Site Manager -> Development -> Page layouts. You can configure the following properties:
Layout display name |
Name of the layout which will be displayed in the page layout list. |
Layout code name |
A unique name that will be used to identify the page layout (e.g. in code). |
Layout description |
Can be used to enter an optional text description for the page layout. |
Page layout thumbnail |
Upload field for the layout preview image (available only when editing an existing layout). This image is used in the page layout selection dialog shown when creating a new blank page as seen in the image above. |
Layout type |
Allows you to choose from two possible types of layout code:
•ASCX •HTML
Please see the text above to learn about the differences between these two layout types. |
Layout code |
This is where you can enter the actual code that will be used for the custom page layout. The format used when the code is processed depends on the selected Layout type. |
CSS styles |
This field becomes available if you click the Add CSS styles link below the layout's code editor.
Here you can define any CSS classes used within the code of the layout. Once the page layout is assigned to a page template, the specified styles will be loaded on all pages that use the given template. Please note that this requires the Allow CSS from components setting to be enabled in Site Manager -> Settings -> System -> Performance.
If the entered styles require any additional files (such as images), you can add them on the Theme tab of the layout's editing interface.
For more information about CSS styles of page components, please see the Development -> CSS stylesheets and design -> CSS for page components topic in the Developer's Guide. |
The following sample page layout code uses a table to define a two-column layout:
<table> <tr> <td> <cc1:CMSWebPartZone ID="zoneLeft" runat="server" /> </td> <td> <cc1:CMSWebPartZone ID="zoneRight" runat="server" /> </td> </tr> </table> |
The following layout code defines the same two-column layout, but using DIV elements and CSS styles:
<div style="width: 50%;"> <div style="width: 80%; float: left;"> <cc1:CMSWebPartZone ID="zoneLeft" runat="server" /> </div> <div style="width: 50%; float: right;"> <cc1:CMSWebPartZone ID="zoneRight" runat="server" /> </div> </div> |
It is also possible to define the layout of a page template by adding web parts of a special type designed for this purpose. This approach allows you to place web part zones onto a page template without the need to write or edit the page layout code.
Simply add a layout web part to a page containing a single zone and then you can configure the required layout via the web part's properties dialog or even directly on the Design tab. To learn more, please read the Development -> Web parts -> Layout web parts chapter of this guide.