Permissions overview |

|

|

|

|
|
Permissions overview |

|

|

|

|
|
|
||
Permissions provide a way how you can control access to particular sections of the Kentico CMS administration interface (modules), documents in the content tree and custom tables.
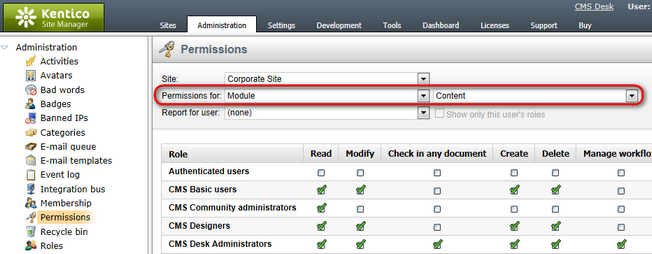
In addition to global roles defined for all sites in the system, every website has its own set of roles. Permissions are assigned to these roles, which means that every website can use a different configuration of role permissions as necessary. Permissions for roles can be configured in the Administration -> Permissions section of both CMS Desk and Site Manager. The difference between the two locations is that in CMS Desk, permissions can only be configured for roles belonging under the currently edited website, while in Site Manager, you can configure permissions for all sites in the system or for global roles by selecting a site from the Site drop-down.
Based on the selection made by the first Permission for drop-down list, you can choose from the following three types of permissions:
•Modules - permissions for specified actions in Kentico CMS modules. You can find details on particular permissions in documentation of respective modules.
•Document types - permissions applied to all documents of a particular type. These permissions represent one level of the three-level document permissions hierarchy, as described in the Document permissions topic.
•Custom tables - permissions for the custom tables module, see Modules -> Custom tables -> Security for more info.
Then you need to select the appropriate module, document type or custom table from the second drop-down list and grant the permissions to roles using the check-boxes:
•![]() - the permission is granted to the role.
- the permission is granted to the role.
•![]() - the permission is not granted to the role.
- the permission is not granted to the role.

When performing this task in CMS Desk -> Administration -> Permissions while you are not a global administrator, you may come across the following grayed-out check boxes:
•![]() - the permission is granted to the role, and only a global administrator can change it.
- the permission is granted to the role, and only a global administrator can change it.
•![]() - the permission is not granted to the role, and only a global administrator can change it.
- the permission is not granted to the role, and only a global administrator can change it.
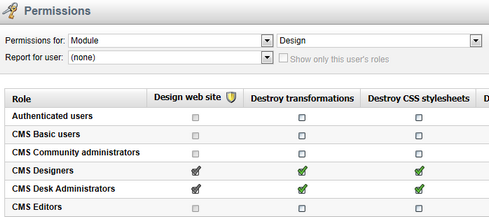
These grayed-out check-boxes are also accompanied by the ![]() icon in the header row of the table, indicating that the permission can only be granted to roles by the global administrator, as can be seen in the screenshot below.
icon in the header row of the table, indicating that the permission can only be granted to roles by the global administrator, as can be seen in the screenshot below.

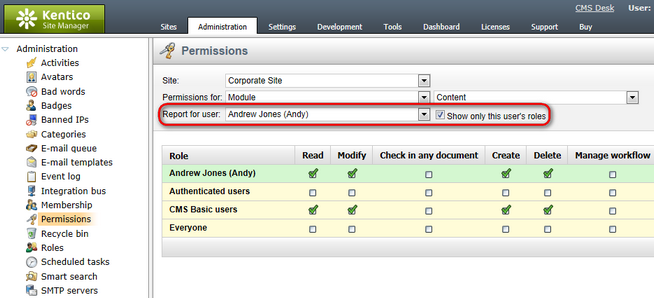
As permissions are assigned to roles, not directly to users, it is possible to display a permission report for each website user. This can be achieved by selecting the user from the Report for user drop-down list. After doing so, a sum of all permissions granted to the user's roles is displayed in the first line, highlighted in green color. Roles where the selected user is a member will be highlighted in yellow color. If you enable the Show only this user's roles check-box, only the yellow roles will be displayed in the matrix.

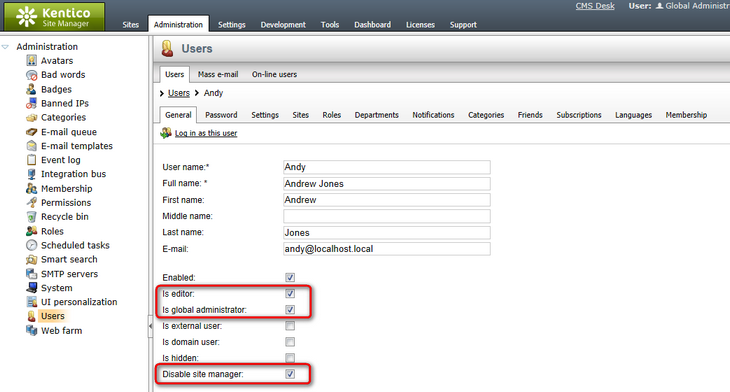
When editing (![]() ) a user in Administration -> Users, you can enable the following two options. These options have impact on permission checking and provide an extra security layer:
) a user in Administration -> Users, you can enable the following two options. These options have impact on permission checking and provide an extra security layer:
•Is global administrator - the user is authorized to perform all operations and their access cannot be denied by permissions or otherwise limited. Global administrators are the only users who can use the Site Manager interface.
•Is editor - the user can access the CMS Desk interface. This attribute doesn’t implicate any particular permissions - it only differentiates site editors from “registered users” who only access the live website and its secured areas. The user can access CMS Desk for all sites to which they are assigned on the Sites tab.
•Disable site manager - this option is only available for users who are designated as global administrators. If enabled, the user will have unrestricted access to all actions in CMS Desk like all global administrators, but will be unable to use the Site Manager interface. This combination of options can be used to authorize users as administrators for specific sites without having to worry about setting individual permissions. Administrators cannot change the value of this property for their own account.
