|
Overview |

|

|

|

|
|
Overview |
|
|
|
|
The Scheduler allows you to define when specified scheduled tasks should be executed. This is useful when you want some functionality to be performed automatically at a specific time or regularly over a certain time period.
In addition to other functions within the system, the scheduler is used to execute tasks for the following modules:
How it works
Individual tasks have a specified time interval that determines when they should be considered as ready to be executed. The exact time when tasks are actually executed depends on the settings of the scheduler.
By default, the scheduler performs a check at the end of standard page requests and runs the tasks that are ready to be executed. This means that tasks are executed only when user activity on your website is generating requests.
Alternatively, the scheduler can be configured to process tasks regularly according to an automatic internal timer, regardless of website activity. This can be done by adding the CMSUseAutomaticScheduler key into the /configuration/appSettings section of your web.config file, as shown below:
<add key="CMSUseAutomaticScheduler" value="true" /> |
The Scheduler interval setting found at CMS Site Manager -> Settings -> System determines how often the scheduler checks if there are any tasks ready to be executed. This setting can be useful even if tasks are checked based on page requests, since it sets the minimum interval between checks (e.g. to save resources on sites with high traffic). On the other hand, it is not recommended to set the value too high, since some parts of the system that utilize scheduled tasks work best when executed fairly often.
Additional low-level scheduler settings can be done by adding the keys listed in the Scheduler settings section of Appendix C - Web.config parameters.
|
Scheduling reliability
Since the scheduling process runs within the ASP.NET process, tasks will not be executed if your website is not running. This happens when the process is recycled without being started again (after a long period of website inactivity).
If you want to run the scheduling reliably, it's necessary to ensure that your website is always running. You can do that by using some utility or an external service that requests the home page of your website on a regular basis. |
Scheduled task administration
You can configure scheduled tasks in Site Manager -> Administration -> Scheduled tasks.
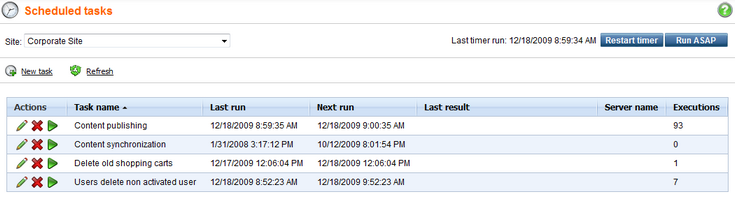
The Site drop-down list is used for selecting a site. After a site is selected, a list of tasks scheduled for the given site will be displayed in the table below. Tasks that are not site-specific can only be viewed when (Global) is selected. The tasks of the current site can also be edited in CMS Desk -> Administration -> Scheduled tasks.
Next to the site selection drop-down list, you can find the following two buttons:
| • | Restart timer - restarts the internal scheduling timer. This button is only available when the scheduler is configured to use the internal timer as described in the section above. |
| • | Run ASAP - immediately executes all tasks that are ready to be executed. |
The ![]() New task link allows you to schedule new custom tasks. The process of creating a scheduled task is covered in more detail in the Scheduling a custom code topic. The
New task link allows you to schedule new custom tasks. The process of creating a scheduled task is covered in more detail in the Scheduling a custom code topic. The ![]() Refresh action updates the information displayed below in the list of tasks.
Refresh action updates the information displayed below in the list of tasks.
The three action icons on the left of each task serve the following purpose:
| • |
| • |
| • |
The Scheduler internals and API sub-chapter provides information about the database tables and classes used by the module and examples of how scheduled tasks can be managed using the API.
Page url: http://devnet.kentico.com/docs/5_5r2/devguide/index.html?scheduler_overview.htm


