|
Scheduling a custom code |

|

|

|

|
|
Scheduling a custom code |
|
|
|
|
The process of scheduling a custom task includes two steps: writing code to perform the required action and creating the scheduled task.
Writing task code
Task code must be placed into a specific class method.
1. Create a new assembly (Class Library) as a part of your solution and a new class inside this library. The following example uses assembly name CMS.CustomTasks and class ShoppingCartCleaner, however, you will need to use your own names.
2. References to the following dlls must be added to the newly created project. They can be found by using the Browse tab, located in the Bin folder of your CMS web project:
CMS.Scheduler.dll CMS.Staging.dll CMS.DataEngine.dll CMS.SettingsProvider.dll |
If your code uses any other dlls, references to them must be added here as well.
3. Add a reference to the new project to the Bin folder of your main CMS web project. It can be found under the Projects tab.
4. Define the Execute(TaskInfo task) method under the newly created class, which will be performed when the task is executed:
[C#]
... using CMS.Scheduler;
namespace CMS.CustomTasks { /// <summary> /// Provides an ITask interface to delete old shopping carts. /// </summary> public class ShoppingCartCleaner : ITask { public string Execute(TaskInfo task) { try {
// The task code comes here
return null; } catch (Exception ex) { return (ex.Message); } } } } |
5. Build the new project.
Creating a new task
1. Go to Site Manager -> Administration -> Scheduled tasks.
2. Select the site the task should be scheduled for.
3. Click ![]() New task.
New task.
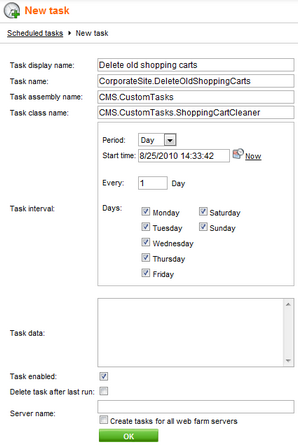
4. Specify the task properties:
Task display name |
Name used for the scheduled task shown in the administration interface. |
Task name |
Scheduled task name used in code. |
Task assembly name |
Name of the assembly. This example uses CMS.CustomTasks. |
Task class name |
Name of the class. This example uses CMS.CustomTasks.ShoppingCartCleaner. |
Task interval |
Sets the time interval between two executions of the task. This does not ensure that the task will be executed at the exact time, only that it will be considered ready to be executed. The precise execution time depends on the general settings of the scheduler. |
Task data |
Data which should be provided to the assembly. This field can be accessed from the code of the task, so it can be used as a parameter to easily modify the task without having to edit its implementation. |
Task enabled |
Indicates if the task is enabled. |
Delete task after last run |
Indicates if the task should be deleted after its final run (applicable if the task is set to run only once). |
Server name |
Name of the server where the task is run. |
Create tasks for all web farm servers |
If checked, tasks will be created for all web farm servers and the Server name field will be grayed out. |
5. Click OK.
6. The task is now scheduled.
Page url: http://devnet.kentico.com/docs/5_5r2/devguide/index.html?scheduling_a_custom_code.htm

