|
|

Managing workgroup media libraries |

|

|

|

|
|
Managing workgroup media libraries |
|
|

|
|
|
|
Managing workgroup media libraries |
|
|
|
|
|
Managing workgroup media libraries |
|
|
|
|
|
|
||
By default, each newly created workgroup contains one pre-defined media library with default settings. On the Media libraries tab of the management interface, the workgroup's media libraries can be managed. The libraries listed here can be viewed in the Media section of the workgroup.

Existing media libraries in the list may be Edited (![]() ) or Deleted (
) or Deleted (![]() ) and new libraries can be created by clicking the
) and new libraries can be created by clicking the ![]() New media library link above the list. The following properties may be entered when adding a library:
New media library link above the list. The following properties may be entered when adding a library:
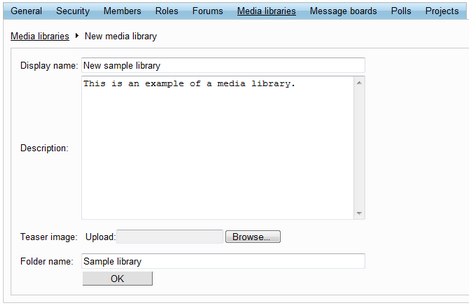
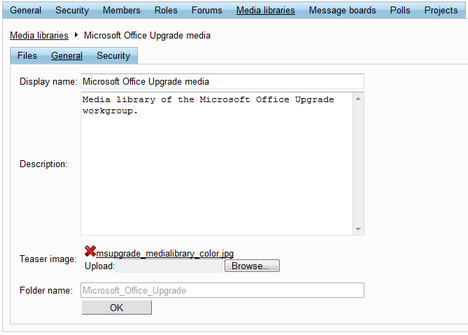
•Display name - contains the name of the library.
•Description - contains text describing the library.
•Teaser image - may be used to set an image to serve as the visual representation of the library. The image can be uploaded from a local disk using the Browse... button. This image is visible on the Media section of the workgroup.
•Folder name - the name of the folder that is used to store the library's media files.
When editing a media library, the interface is divided into three tabs as described below:
This tab is used to define the folder and file content of the edited media library.
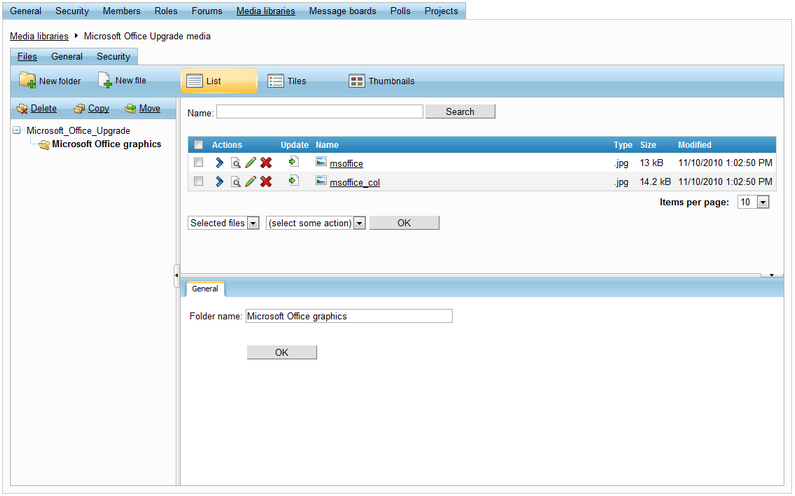
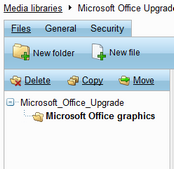
It is recommended to use sub‑folders to organize files into logical categories. The left section of the tab displays the folder structure of the media library in a tree and allows folders to be managed using the following action buttons:
•![]() New folder - opens a dialog that allows a new folder to be created under the currently selected folder.
New folder - opens a dialog that allows a new folder to be created under the currently selected folder.
•![]() Delete - removes the currently selected folder.
Delete - removes the currently selected folder.
•![]() Copy - creates a copy of the selected folder and its content at a specified location within the file structure of the library.
Copy - creates a copy of the selected folder and its content at a specified location within the file structure of the library.
•![]() Move - allows the selected folder to be moved to a different location within the file structure.
Move - allows the selected folder to be moved to a different location within the file structure.
When a folder is selected from the tree, the files that it contains are displayed on the right side of the page. The List, Tiles and Thumbnails buttons at the top may be used to change the view mode used for the file list. If there are many files in the folder, it may be necessary to filter them by entering the requested file name into the Name field clicking the Search button.
A new file can be uploaded to the selected folder by clicking the ![]() New file button above the folder tree. This opens a standard dialog that allows a file to be selected from a local disk. Only certain types of files can be uploaded into the libraries, based on configuration performed by the system administrator.
New file button above the folder tree. This opens a standard dialog that allows a file to be selected from a local disk. Only certain types of files can be uploaded into the libraries, based on configuration performed by the system administrator.
The following actions can be performed by clicking the icons next to individual files:
•![]() Select - selects the given file and opens its editing interface in the bottom section of the page.
Select - selects the given file and opens its editing interface in the bottom section of the page.
•![]() View - downloads the file and opens it in the default application for the file type.
View - downloads the file and opens it in the default application for the file type.
•![]() Edit - this icon is only available for image files and when clicked, the given image gets opened in the built‑in image editor. The image editor is described below.
Edit - this icon is only available for image files and when clicked, the given image gets opened in the built‑in image editor. The image editor is described below.
•![]() Delete - removes the given file from the media library.
Delete - removes the given file from the media library.
•![]() Update - replaces the given file with a different file selected from a local disk. The original file is removed from the library.
Update - replaces the given file with a different file selected from a local disk. The original file is removed from the library.
Certain actions may also be applied to multiple files at once by using the checkboxes on the left to mark the desired files, selecting an action from the drop down-list below the displayed files and clicking OK. The following actions can be performed like this:
•Copy - creates copies of the selected files and allows them to be placed into a different folder.
•Move - allows the selected files to be moved from the current folder into a different one.
•Delete - removes all selected files from the media library.
•Import - registers the selected files in the database of the Intranet portal. This action is only necessary if files are uploaded to the media library externally without the use of the portal interface.
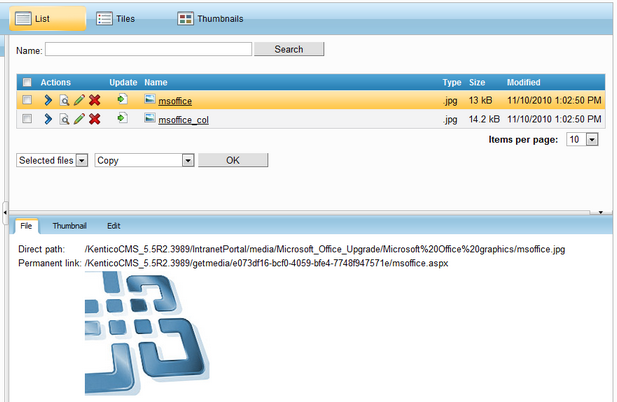
When a specific file is selected, its properties may be changed using the three tabs in the bottom section of the page. The File tab provides links to the selected file and displays how it will appear in the library. Audio and video files may be played here. The Thumbnail tab allows an image to be uploaded, which will represent the selected file in the media library. Thumbnails are typically set for non‑image files only, since images can serve as their own visual representation. The Edit tab may be used to change the name of the file, alter the title displayed to users when they view the file in the library and add a text description.
|
Supported media file types
The following file types are supported and can be played or displayed within a media library:
•Images: bmp, gif, png, wmf, jpg, jpeg, tiff, tif •Audio: wav, wma, mp2, mp3, mid, midi, mpga •Video: avi, mp4, mpg, mpeg, wmv, qt, mov, rm •Flash: swf
All other file types will be recognized as documents, which means that they cannot be displayed or played, but they may still be stored in the library and downloaded by users.
|
When Editing (![]() ) an image file, the current appearance of the image can be viewed on the right and various editing actions are available via the menu on the left. Individual menu tabs are described below.
) an image file, the current appearance of the image can be viewed on the right and various editing actions are available via the menu on the left. Individual menu tabs are described below.
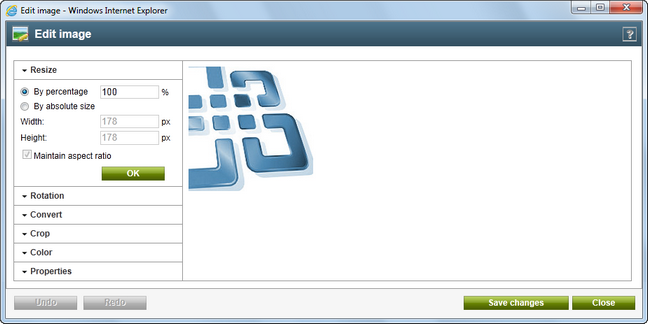
•Resize - allows the size of the image to be changed, either relatively or to an absolute size in pixels.
•Rotation - allows the image to be rotated.
•Convert - allows the file type of the image to be changed.
•Trim - allows the size of the image to be reduced to a specific size by removing its borders.
•Color - allows the image to be converted into grayscale. If this is performed, the image becomes black and white. Every color in the image is converted into a certain shade of gray.
•Properties - displays information about the image file and allows its name to be changed.
On this tab, the basic properties of the media library can be set. These are the same as those available when creating a new library as described above.
On this tab, the displayed matrix may be used to set permissions for the edited media library. Because adding of files into media libraries is only possible via the system's administration interface, only the following two permissions affect the media libraries displayed in the Media section of the workgroup:
•Create file - users with this permission may upload files to the media library. However, default Intranet portal workgroups do not allow files to be uploaded on their Media section, so this permission has no effect unless the section is customized by portal administrators.
•See library content - users with this permission are allowed to access and view the content of the media library.
These permissions can be assigned to the following types of users:
•Nobody - the action cannot be performed by anyone.
•All users - anybody can perform the action.
•Authenticated users - only registered and signed‑in users of the portal can perform the action.
•Group members - only members of the workgroup that contains the media library can perform the action.
•Authorized roles - only members of the workgroup that are assigned to the workgroup roles selected in the section below can perform the action.
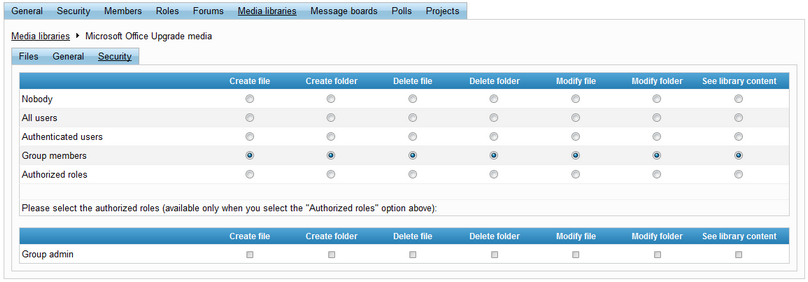
Administrators of the workgroup automatically have full media library permissions.
