|
|

Subscriber management |

|

|

|

|
|
Subscriber management |
|
|

|
|
|
|
Subscriber management |
|
|
|
|
|
Subscriber management |
|
|
|
|
|
|
||
You can manage subscribers at CMS Desk -> Tools -> Newsletters -> Subscribers.
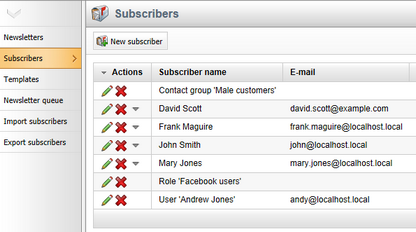
On this page, you can see a list of all subscribers belonging to the website's newsletters. You can filter these according to their name or e-mail by entering the desired value into the appropriate filter field and clicking the Show button.
By clicking the Delete (![]() ) action icon next to a subscriber record, you can remove the subscriber from the list and consequently from all newsletters to which they are subscribed.
) action icon next to a subscriber record, you can remove the subscriber from the list and consequently from all newsletters to which they are subscribed.
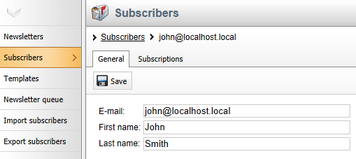
Through the Edit (![]() ) icon, you can modify a subscriber's details and manage their newsletter subscriptions. On the General tab, you have the same options as when creating a new subscriber.
) icon, you can modify a subscriber's details and manage their newsletter subscriptions. On the General tab, you have the same options as when creating a new subscriber.
|
Customizing subscriber fields
If you wish to store additional data for newsletter subscribers, you can add your own custom fields. To do this, go to Site Manager -> Development -> System tables and edit the Newsletter - Subscriber table. Then you can define any required fields on the Fields tab.
Please note that the default fields must remain unchanged to ensure that the module continues to work correctly.
The values of custom fields may be entered manually on the General tab, filled in by users who subscribe through an appropriately configured Custom subscription form web part, or populated via the API. |
On the Subscriptions tab, you can see a list of newsletters to which the edited subscriber is subscribed. Additional ones can be added by using the ![]() Add newsletters button. Individual newsletter subscriptions may be managed via the following actions:
Add newsletters button. Individual newsletter subscriptions may be managed via the following actions:
•![]() Remove - unsubscribes the subscriber from the selected newsletter.
Remove - unsubscribes the subscriber from the selected newsletter.
•![]() Approve - manually approves the subscription to the selected newsletter, causing issues to be sent.
Approve - manually approves the subscription to the selected newsletter, causing issues to be sent.
•![]() Reject - rejected subscriptions remain in the list, but issues of the selected newsletter are not sent. Users who subscribe to newsletters with double opt‑in enabled are rejected by default until they confirm their subscription.
Reject - rejected subscriptions remain in the list, but issues of the selected newsletter are not sent. Users who subscribe to newsletters with double opt‑in enabled are rejected by default until they confirm their subscription.
To apply these actions to multiple newsletters, mark them using the boxes on the left choose an action from the drop-down list below and click OK.
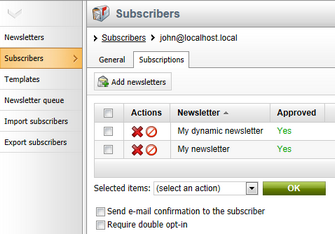
If you check the Send e-mail confirmation to the subscriber box before performing an action, a notification e-mail will be sent to the edited subscriber, informing about the changes in their subscription. If you check the Require double opt-in box before adding newsletters, subscriptions to newsletters that have double opt‑in enabled will be inactive (rejected) until the user confirms them or the Approve (![]() ) action is manually selected in the list of newsletters.
) action is manually selected in the list of newsletters.
Alternatively, subscribers of individual newsletters can be managed by selecting Newsletters in the left menu and editing (![]() ) the given newsletter on the Subscribers tab. Here you can find a list similar to the one on the main Subscribers tab, but it only contains subscribers of the current newsletter. If necessary, subscribers in the list can be filtered by their e-mail, name or approval status. Subscribers can be added by using the following buttons:
) the given newsletter on the Subscribers tab. Here you can find a list similar to the one on the main Subscribers tab, but it only contains subscribers of the current newsletter. If necessary, subscribers in the list can be filtered by their e-mail, name or approval status. Subscribers can be added by using the following buttons:
•![]() Add subscribers - allows selection from a list of all subscribers in the system.
Add subscribers - allows selection from a list of all subscribers in the system.
•![]() Add users - allows selection from the registered users of the current site.
Add users - allows selection from the registered users of the current site.
•![]() Add roles - allows selection from the roles of the current site (newsletter issues will be sent to all members of the selected roles).
Add roles - allows selection from the roles of the current site (newsletter issues will be sent to all members of the selected roles).
•![]() Add contact group - allows selection from all on‑line marketing contact groups defined for the current site (all contacts that belong to the selected groups will be added as subscribers).
Add contact group - allows selection from all on‑line marketing contact groups defined for the current site (all contacts that belong to the selected groups will be added as subscribers).
Individual subscriptions can be managed via the following actions:
•![]() Remove - unsubscribes the address, user, role or contact group from the edited newsletter.
Remove - unsubscribes the address, user, role or contact group from the edited newsletter.
•![]() Approve - manually approves the given subscription, causing it to receive newsletter issues.
Approve - manually approves the given subscription, causing it to receive newsletter issues.
•![]() Reject - rejected subscriptions remain in the list, but they do not receive newsletter issues. Users who subscribe to newsletters with double opt-in enabled are rejected by default until they confirm their subscription.
Reject - rejected subscriptions remain in the list, but they do not receive newsletter issues. Users who subscribe to newsletters with double opt-in enabled are rejected by default until they confirm their subscription.
To apply these actions to multiple subscriptions, mark them using the boxes on the left choose an action from the drop-down list below and click OK.
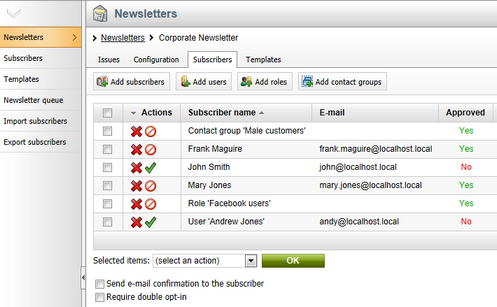
If you check the Send e-mail confirmation to the subscriber box before performing an action, a notification e-mail will be sent to the affected users, informing them about the changes in their subscriptions. If you check the Require double opt-in box (only available if the newsletter has double opt-in enabled), added subscriptions will be inactive (rejected) until the users confirm them or the Approve (![]() ) action is manually selected in the list of subscriptions.
) action is manually selected in the list of subscriptions.
|
Duplicate subscriber addresses
Even though all regular newsletter subscribers need to have a unique e-mail address, it is still possible to have a single address subscribed to a newsletter multiple times through users, roles or contact groups.
In these cases, the duplicate addresses are filtered out from the newsletter queue, so that each e‑mail address only receives the newsletter's issues once. |
If you need to add or modify a large amount of subscribers, the Import subscribers tab described in the Subscriber import and export topic provides an easier way.

