|
|

Registering custom classes in App_Code |

|

|

|

|
|
Registering custom classes in App_Code |
|
|

|
|
|
|
Registering custom classes in App_Code |
|
|
|
|
|
Registering custom classes in App_Code |
|
|
|
|
|
|
||
By preparing custom classes that inherit from an appropriate base class, you can extend the functionality of Kentico CMS. This approach allows you to implement the following types of objects:
•smart search custom indexes and analyzers
If you create the custom classes in your project's App_Code folder (or Old_App_Code on web application installations), you do not need to integrate a new assembly into the web project. Code in the App_Code folder is compiled dynamically and automatically referenced in all other parts of the application.
To ensure that the system can load custom classes placed in App_Code, you need to write code that registers each class.
1. Extend the CMSModuleLoader partial class. You can either extend an existing definition of the class, or create a new source file with the following code.
[C#]
using System; |
2. Create a new class inside the CMSModuleLoader that inherits from CMSLoaderAttribute.
[C#]
private class ClassLoader : CMSLoaderAttribute |
3. Add the attribute defined by the internal class before the definition of the CMSModuleLoader partial class.
[C#]
public partial class CMSModuleLoader |
4. Override the Init method inside the attribute class, and assign a handler to the ClassHelper.OnGetCustomClass event.
[C#]
public override void Init() |
5. Define the handler method for the OnGetCustomClass event as follows:
[C#]
private static void GetCustomClassEventHandler(object sender, ClassEventArgs e) |
To load your App_Code class into the system, create a new instance and assign it to the Object property of the event handler's ClassEventArgs parameter (e). The switch structure allows you to use the handler to load any number of custom classes based on the specified class name.
Overall code example:
[C#]
using System; |
Once you have registered your custom classes, you can use them as the source for objects in the system. When assigning App_Code classes to objects in the editing interface, fill in the following values:
•Assembly name: App_Code
•Class name: must match the name that identifies the corresponding custom class in the switch statement of your OnGetCustomClass handler method. When the OnGetCustomClass event is triggered, the value of the Class name field is passed on through the ClassName property of the ClassEventArgs parameter.
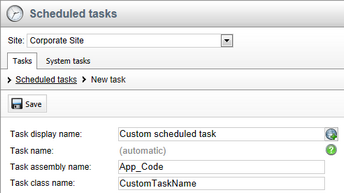
Assigning a custom App_Code class to a new scheduled task