|
|

Displaying a form on the live site |

|

|

|

|
|
Displaying a form on the live site |
|
|

|
|
|
|
Displaying a form on the live site |
|
|
|
|
|
Displaying a form on the live site |
|
|
|
|
|
|
||
In the Creating a new form topic, you have learned how to create a new form via the module's user interface. This topic will give you an overview of how you can add the form to the live site.
Content editors can add a form to any page with editable text regions. It can be done either using the Insert Form (![]() ) button on the WYSIWYG editor toolbar. A form can also be added directly into text by typing a macro in the following format: %%control:BizFormControl?BizFormCodeName%%. The BizFormCodeName part of the macro needs to be replaced with the code name of the particular form.
) button on the WYSIWYG editor toolbar. A form can also be added directly into text by typing a macro in the following format: %%control:BizFormControl?BizFormCodeName%%. The BizFormCodeName part of the macro needs to be replaced with the code name of the particular form.
Website designers or developers can add a form to any web part or widget zone by adding the On-line form web part or widget. In this case, code name of the form needs to be entered in the Form name property of the web part or widget.
The examples below explain both options of adding forms to your live site pages.
In this example, we will add the Event registration form, created in the Creating a new form topic, to a page using the Insert Form (![]() ) button on the WYSIWYG editor toolbar. Any other form can be added to a page exactly the same way.
) button on the WYSIWYG editor toolbar. Any other form can be added to a page exactly the same way.
1. Go to CMS Desk -> Content and select some page with editable regions (the Editable text web part). View the page in Edit mode on the Page tab.
2. Click the Insert Form (![]() ) button on the WYSIWYG editor toolbar, which will create an On-line form inline widget.
) button on the WYSIWYG editor toolbar, which will create an On-line form inline widget.

3. The configuration dialog of the widget will be opened. Click the Select button next to the Form name field and choose the Event registration form.
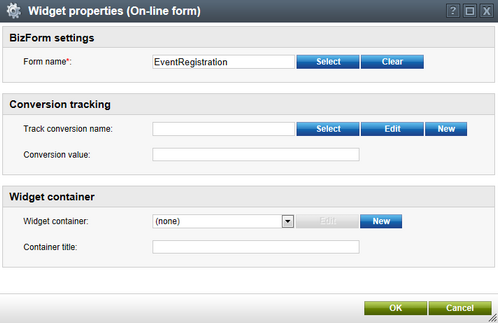
Click OK.
A placeholder image will be pasted into the text. The properties of the On-line form inline widget can be edited at any time by double clicking this image.
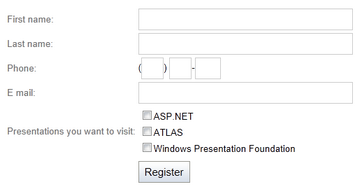
4. Click Save and switch to the Live site mode. You will see the form on the page.
5. Try entering some values and submitting the filled-in form. After doing that, you may proceed to the Managing form data topic, where management of submitted data is explained.
This example demonstrates how to add the Event registration form, created in the Creating a new form topic, to a page using the On-line form web part. Any other form can be added to a page exactly the same way. The same applies to using the On-line form widget - the only difference is that the widget can only be added to a widget zone, not a web part zone.
1. Go to CMS Desk -> Content and select ant page with a web part zone. View the page in the Edit -> Design mode.
2. Click the Add web part (![]() ) button at the top-right corner of the zone and choose the Forms -> On-line form web part. Click OK.
) button at the top-right corner of the zone and choose the Forms -> On-line form web part. Click OK.
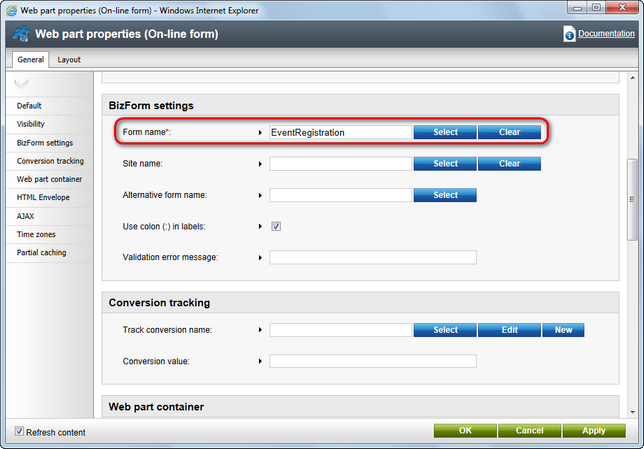
3. In the web part properties dialog, you only need to enter EventRegistration (the code name of the form) into the Form name property and click OK.
4. Click Save and switch to the Live site mode. You will see the form on the page.
5. Try entering some values and submitting the filled-in form. After doing that, you may proceed to the Managing form data topic, where management of submitted data is explained.