|
|

Files administration UI |

|

|

|

|
|
Files administration UI |
|
|

|
|
|
|
Files administration UI |
|
|
|
|
|
Files administration UI |
|
|
|
|
|
|
||
A user interface for global-level administration of files stored by the CMS is located on the Files tab in Site Manager -> Administration -> System. This part of the user interface is divided into three tabs described in the following text.
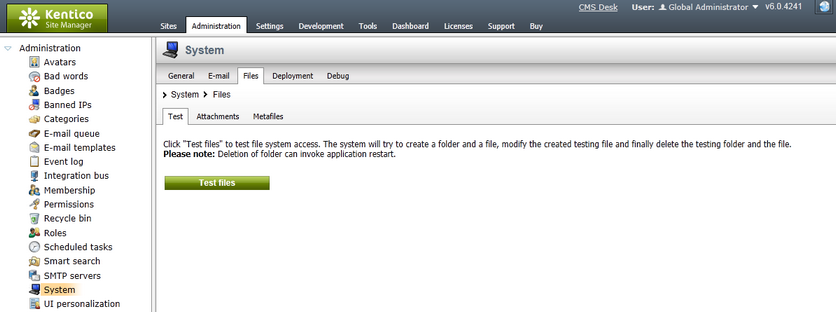
On the Test tab, you can perform a test that verifies that Kentico CMS has access to the file system. The test consists of creation of a folder and a file, modification of the created file and deletion of the folder and the file. To perform the test, just click the Test files button.
If the test detects that Kentico CMS is not able to access the file system, you can find a solution to this problem in the Installation and deployment -> Troubleshooting installation issues -> Disk permissions problems chapter of this guide.
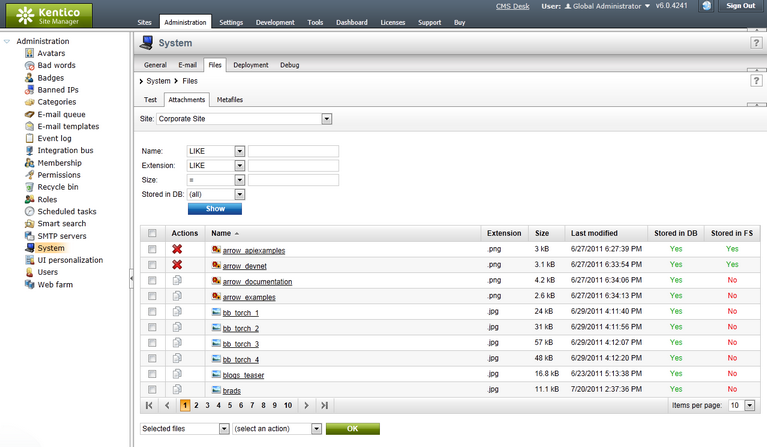
On the Attachments tab, you can find a list of document attachments stored by the CMS. Based on selection in the Site drop-down list, you can either select a site and view all document attachments on the site, or choose (all) to view all document attachments on all websites in the system.
If there are more than 25 document attachments (or a different number set by means of the CMSDefaultListingFilterLimit web.config key), a filter is displayed above the grid. Using the filter, you can filter displayed attachments by their name, extension, size or depending on if they are stored in the database.
In the Actions column in the grid, action icons are displayed depending on the Store files in file system and Store files in database settings in Site Manager -> Settings -> System -> Files. The displayed actions are the following:
•![]() Copy to database - copies the attachment to the database. This action is only displayed if the attachment is stored only in the file system while settings are configured for files to be stored both in the file system and in the database.
Copy to database - copies the attachment to the database. This action is only displayed if the attachment is stored only in the file system while settings are configured for files to be stored both in the file system and in the database.
•![]() Delete from database - deletes the attachment from the database. This action is only displayed if the attachment is stored both in the file system and in the database while settings are configured for files to be stored only in the file system or to be stored both in the file system and in the database.
Delete from database - deletes the attachment from the database. This action is only displayed if the attachment is stored both in the file system and in the database while settings are configured for files to be stored only in the file system or to be stored both in the file system and in the database.
•![]() Copy to file system - copies the attachment to the file system. This action is only displayed if the attachment is stored only in the database while settings are configured for files to be stored only in the file system or both in the file system and in the database.
Copy to file system - copies the attachment to the file system. This action is only displayed if the attachment is stored only in the database while settings are configured for files to be stored only in the file system or both in the file system and in the database.
•![]() Delete from file system - deletes the attachment from the file system. This action is only displayed if the attachment is stored both in the file system and in the database while settings are configured for files to be stored only in the database.
Delete from file system - deletes the attachment from the file system. This action is only displayed if the attachment is stored both in the file system and in the database while settings are configured for files to be stored only in the database.
Using the two drop-down lists below the grid, you can perform the above listed actions for multiple attachments at once. In the first drop-down list, you can choose from the following:
•Selected files - performs the action for files selected using the check-boxes (![]() ) in the grid.
) in the grid.
•All files - performs the action for all listed files.
Then you can choose the required action from the second drop-down list and click OK to perform it. The same actions as listed above are offered in the drop-down list, while the conditions described above need to be met for the actions to be offered.
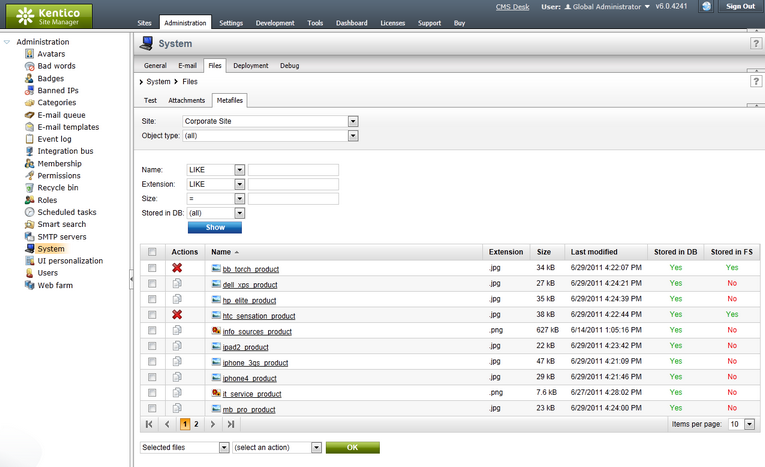
On the Metafiles tab, you can find a list of metafiles stored by the CMS. Based on selection in the Site drop-down list, you can select:
•(all) - displays all metafiles stored by the system.
•(global) - displays metafiles of global, i.e. not site-related objects.
•<website> - displays metafiles of site-related objects belonging to the selected site.
Using the Object type drop-down list, you can further limit which metafiles will be displayed. By selecting (all), you get all metafiles that match the selection in the drop-down list above. The other options in the drop-down are particular object types, while choosing one displays only metafiles of these objects that match the selection in the drop-down list above.
If there are more than 25 metafiles (or a different number set by means of the CMSDefaultListingFilterLimit web.config key), a filter is displayed above the grid. Using the filter, you can filter displayed metafiles by their name, extension, size or depending on if they are stored in the database.
In the Actions column in the grid, action icons are displayed depending on the Store files in file system and Store files in database settings in Site Manager -> Settings -> System -> Files. The displayed actions are the following:
•![]() Copy to database - copies the metafile to the database. This action is only displayed if the metafile is stored only in the file system while settings are configured for files to be stored both in the file system and in the database.
Copy to database - copies the metafile to the database. This action is only displayed if the metafile is stored only in the file system while settings are configured for files to be stored both in the file system and in the database.
•![]() Delete from database - deletes the metafile from the database. This action is only displayed if the metafile is stored both in the file system and in the database while settings are configured for files to be stored only in the file system or to be stored both in the file system and in the database.
Delete from database - deletes the metafile from the database. This action is only displayed if the metafile is stored both in the file system and in the database while settings are configured for files to be stored only in the file system or to be stored both in the file system and in the database.
•![]() Copy to file system - copies the metafile to the file system. This action is only displayed if the metafile is stored only in the database while settings are configured for files to be stored only in the file system or both in the file system and in the database.
Copy to file system - copies the metafile to the file system. This action is only displayed if the metafile is stored only in the database while settings are configured for files to be stored only in the file system or both in the file system and in the database.
•![]() Delete from file system - deletes the metafile from the file system. This action is only displayed if the metafile is stored both in the file system and in the database while settings are configured for files to be stored only in the database.
Delete from file system - deletes the metafile from the file system. This action is only displayed if the metafile is stored both in the file system and in the database while settings are configured for files to be stored only in the database.
Using the two drop-down lists below the grid, you can perform the above listed actions for multiple metafiles at once. In the first drop-down list, you can choose from the following:
•Selected files - performs the action for files selected using the check-boxes (![]() ) in the grid.
) in the grid.
•All files - performs the action for all listed files.
Then you can choose the required action from the second drop-down list and click OK to perform it. The same actions as listed above are offered in the drop-down list, while the conditions described above need to be met for the actions to be offered.