|
|

Managing personalization variants |

|

|

|

|
|
Managing personalization variants |
|
|

|
|
|
|
Managing personalization variants |
|
|
|
|
|
Managing personalization variants |
|
|
|
|
|
|
||
Once content personalization is enabled, variants of objects can be created through the CMS Desk -> Content -> Edit interface, which you would normally use to define standard page content. There are three possible types of objects that you can personalize:
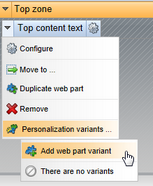
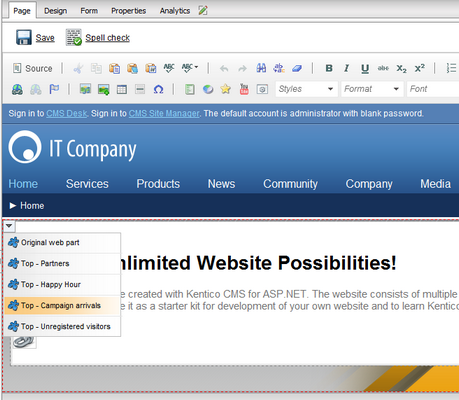
To add the first content personalization variant to a web part, open its context menu by right clicking its header (or through the ![]() icon), hover over the Personalization variants option and then select Add web part variant from the second level of the menu.
icon), hover over the Personalization variants option and then select Add web part variant from the second level of the menu.
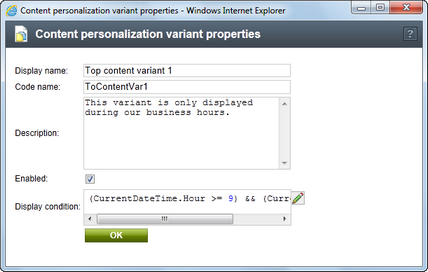
A dialog will be displayed where you can set the properties of the variant:
•Display name - this name will be displayed in lists of content personalization variants in the administration interface.
•Code name - sets a code name that serves as an identifier of the variant.
•Description - can be used to enter a text description for the variant. To make the variant easier to use and maintain, you can add an explanation about the scenario for which the variant is intended, describe the differences from the original object, etc.
•Enabled - indicates if the variant should be considered as a possible content option. When an object's variants are processed to determine which one should be displayed, disabled variants are skipped (even if the requirements set by their condition are met).
•Display condition - enter the condition that must be fulfilled in order for the variant to be displayed. Please see the Variant conditions topic, to learn more about these conditions and how they are processed.
When the values are confirmed, a standard web part configuration dialog will be displayed. The variant is simply another instance of the original web part. By default, it will have the same values in its properties as are set for the original, but you can change them as required.
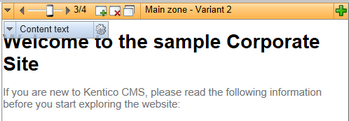
After the first variant is created, a slider will be added to the header of the given web part as shown below:
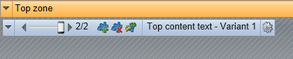
This slider can be used to switch between individual variants as needed (including the original). The content specified by the currently selected variant will be displayed on the Design and Page tabs, as well as in Preview mode. The conditions are only resolved on the actual live site. This means that you can easily check how the page will look with different active variants without having to fulfill the required conditions. Simply set the slider(s) to the appropriate variants.
If you wish to view the content of variants while cycling through the slider on the Design tab, make sure that the Display web part content checkbox on the right side of the Edit mode header is checked. To make orientation easier, it is recommended to assign an appropriate Web part title for each variant, so that you can identify which one you are working with straight from the header text.
The buttons on the right of the slider allow you to add new variants (![]() ), remove the currently selected one (
), remove the currently selected one (![]() ) or open a list of all variants defined for the given web part (
) or open a list of all variants defined for the given web part (![]() ). At any time, you can Configure (
). At any time, you can Configure (![]() ) the properties of the variant currently chosen on the slider.
) the properties of the variant currently chosen on the slider.
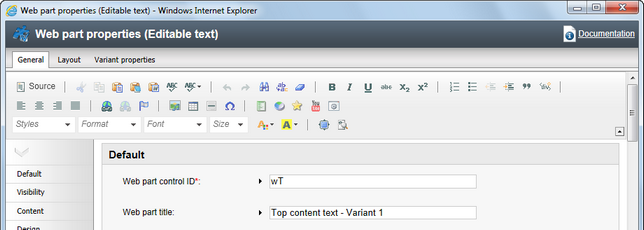
A variant can be edited just like any other web part. Notice that there is an additional tab available in the configuration dialog called Variant properties, which contains the same options that were offered when creating a new variant (as described above). It is also possible to specify a unique Web part layout for each variant. You only need to switch to the Layout tab, select or create the required layout and it will be applied to the currently edited variant.
If you need to enter content into a variant of a web part that provides an editable region (Editable text or Editable image), you can do so on the Page tab as usual. To quickly switch between different variants on this tab, hover over the given personalized section of the page and a menu icon (![]() ) will be displayed. If you expand the menu, a list of all available variants will be shown and you can select the one that you wish to edit or view.
) will be displayed. If you expand the menu, a list of all available variants will be shown and you can select the one that you wish to edit or view.
When one of the menu options is clicked, the page will be reloaded with the content of the chosen variant.
The variants of a personalized web part are stored on the given document's page template, so they will be present on all pages that use the same template. If you delete (![]() ) a web part, all of its variants will be removed along with it. These same principles also apply to web part zone variants.
) a web part, all of its variants will be removed along with it. These same principles also apply to web part zone variants.
If you wish to define personalized content that uses a completely different type of web part or multiple web part instances, you can add variants of an entire web part zone. This allows you to set the properties of the zone in a specific way for each variant, and more importantly add (or remove) any child web parts that you need. Each zone variant may contain any type or amount of web parts, regardless of what is placed inside other variants or the original zone.
Variants of zones can be created and managed on the Design tab in the same way as with web parts (the buttons on the slider use different icons for zones). The only difference is that you need to work with zone objects rather than specific web parts. When a new zone variant is added, the content of the original is automatically copied into it, so you do not have to rebuild the zone from scratch if you only need to make small modifications.
The zone variant currently selected on the slider may be edited by double clicking the header of the zone or through the ![]() Properties option in the zone's context menu. To add content into a variant, use the Add web part (
Properties option in the zone's context menu. To add content into a variant, use the Add web part (![]() ) button in the top‑right corner of the zone as usual. Most of the functionality described above for web part personalization is also available for zones.
) button in the top‑right corner of the zone as usual. Most of the functionality described above for web part personalization is also available for zones.
Creating variants for individual web parts inside a personalized zone is not supported. The same also applies in the opposite direction: it is not possible to personalize a zone that already contains personalized web parts. Moreover, personalization is only available for standard web part zones, and cannot be done for widget zones.
Content personalization can also be leveraged by editors, who do not have access to the Design tab, via widgets. If the feature is enabled, variants can be added and managed through buttons on the pop‑up menu of individual widgets on the Page tab. When at least one variant is created for a widget, a slider will become available just like for web parts or zones.
The following actions can be used:
•![]() Add new variant - creates a new variant for the given widget. When creating the first variant for a widget on a page that has a multivariate test defined, this action will open a menu where you can choose which type of variant should be created.
Add new variant - creates a new variant for the given widget. When creating the first variant for a widget on a page that has a multivariate test defined, this action will open a menu where you can choose which type of variant should be created.
•![]() Remove variant - removes the variant currently selected on the slider (not available for the original).
Remove variant - removes the variant currently selected on the slider (not available for the original).
•![]() Variant list - opens a dialog that contains a list of all variants defined for the widget and allows their management.
Variant list - opens a dialog that contains a list of all variants defined for the widget and allows their management.
Personalization of editor widgets works the same way as for web parts. Each variant is a widget of the same type as the original, but its properties may be configured differently. This functionality is only available for widgets placed into zones set for Customization by page editors and cannot be done for group administrator or user widgets.
Since editor widgets are categorized as page content, their variants are bound to the specific document and are not included on the page template. Like with web parts, removing a widget (![]() ) also deletes all of its variants. Please note that using the Reset to default action provided by a Widget actions web part will also cause all widget variants to be deleted from the page.
) also deletes all of its variants. Please note that using the Reset to default action provided by a Widget actions web part will also cause all widget variants to be deleted from the page.
|
Variant overview
You can access a list of all content personalization variants defined on a given document (page), by selecting it from the content tree in CMS Desk -> Content -> Edit and going to Properties -> Variants. The variants of all three object types are included here. |
|
Multivariate testing and Content personalization
Please note that it is not possible to create personalization variants of web parts, zones or widgets that are already included in a Multivariate test.
|

