|
|

Staging configuration |

|

|

|

|
|
Staging configuration |
|
|

|
|
|
|
Staging configuration |
|
|
|
|
|
Staging configuration |
|
|
|
|
|
|
||
Configuration of the Staging module consists of the following three parts:
1.Microsoft WSE configuration - renaming of a .dll library on all servers.
2.Source server configuration - configuration of the server from which changes will be transferred to the target servers.
3.Target server configuration - configuration of the server to which changes will be transferred from the source servers.
Apart from this configuration, you also need to ensure that all instances use the same settings (document types, templates, web parts …), code files and that both servers use the same version of Kentico CMS.
To enable content staging, you first need to open the bin folder under your web project and rename the Microsoft.Web.Services3.dll.rename file to Microsoft.Web.Services3.dll. This needs to be done on both source and target servers.
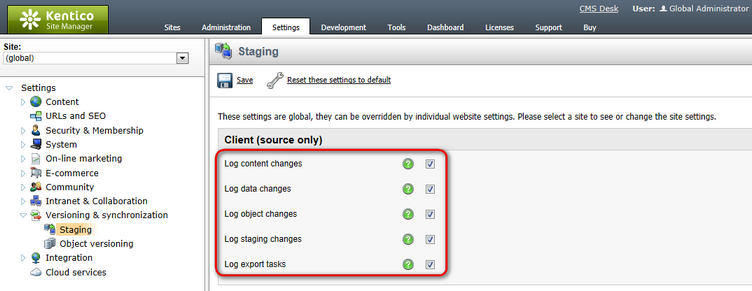
1. To configure a Kentico CMS instance as a source server, you first need to enable logging of content staging tasks using the following settings in Site Manager -> Settings -> Versioning & synchronization -> Staging.
•Log content changes - if enabled, synchronization tasks are automatically logged when content (a document) is modified.
•Log data changes - if enabled, synchronization tasks are automatically logged when custom tables data are modified.
•Log object changes - if enabled, synchronization tasks are automatically logged when an object is modified.
•Log staging changes - if enabled, synchronization tasks are logged for changes made by synchronization from another server to this server. See Bi-directional staging for more details.
•Log export tasks - if enabled, synchronization tasks are logged when an object is deleted (incremental update support).
With these settings enabled, all changes to the corresponding content are logged as content staging tasks. These tasks can then be transferred to the target servers and performed there to synchronize the content.
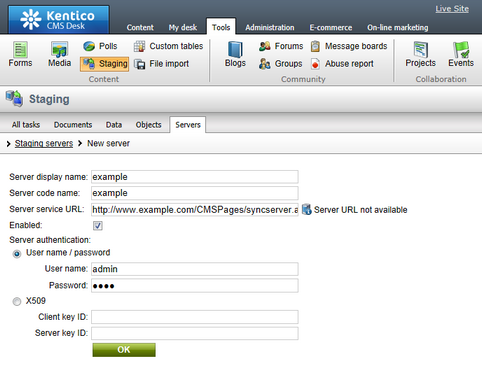
2. Then you need to specify the target server(s). Go to CMSDesk –> Tools –> Staging -> Servers.
This is where you can manage the list of target servers. To add a new server, click New server (![]() ), enter the server properties and save them:
), enter the server properties and save them:
•Server display name - server display name displayed to the users in the administration interface.
•Server code name - server name used in website code.
•Server URL - staging service URL that points to the content staging web service of the target server; the web service page is located at ~/CMSPages/syncserver.asmx, so the URL should look like this: http://www.example.com/CMSPages/syncserver.asmx; the Check Server availability button (![]() ) checks if the server with the entered URL is available and displays the result.
) checks if the server with the entered URL is available and displays the result.
•Enabled - if checked, the target server is enabled, it means that synchronization tasks are automatically generated for the server and that synchronization is enabled for this server; you can temporarily disable the server by un-checking the box, e.g. in case of server maintenance.
•Server authentication - server authentication settings; you should set the same parameters that are configured for your target server (described below); the default user name is admin and the default password is pass; if you want to use X509 authentication, please consult the Using X.509 authentication topic.
|
Please note
Tasks are logged only when there is at least one target server created and enabled. If there is no server created or if no server is running, no tasks are logged.
|
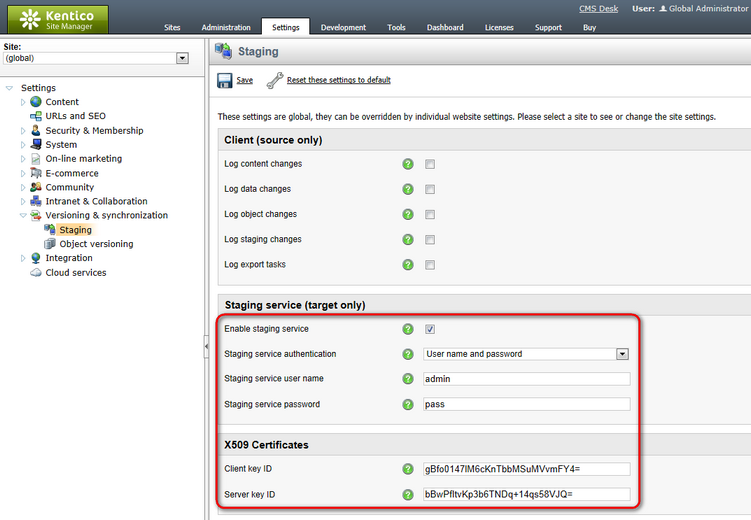
On the target server, the staging service is disabled by default. For it to work, you need to set the following values in Site Manager -> Settings -> Versioning & synchronization -> Staging:
•Enable staging service - if checked, the staging service is enabled for the given site;
•Staging service authentication - staging service authentication type; it is recommended that you choose USERNAME authentication to configure staging first, test synchronization and then optionally configure the site for X509 certificates
•USERNAME – username/password authentication (fast, recommended for the data without high security requirements)
•X509 – X509 certificate authentication (more secure, slower, requires certificates); more details can be found in the Using X.509 authentication topic
•Staging service username and password - username and password for the USERNAME authentication
•Server key ID and Client key ID - certificate keys for the X509 authentication