|
Departments overview |

|

|

|

|
The Departments section of the portal provides a separate website section for each company department. This section contains its own Home page, Project management, News, Document library, Forums, Blogs, etc. When viewing a department's section, the main menu serves for navigation within the department, not within the global section of the portal. It is recognizable by the Back to main portal button at the left edge of the menu, as well as by the breadcrumbs below it beginning with Portal > Departments > Department name. You can navigate back to the global section of the portal using these two controls.

A comprehensive overview of the section's functionality and features can be found in Intranet User's Guide -> Departments, so please refer to it if you are looking for further information on how the section can be used on the live site.
Departments structure in the content tree
Let's take a look at how the section is created within the system's administration interface. Log on to CMS Desk and navigate to the Content tab. If you expand the Departments node of the content tree, you should see the sub-nodes as in the screenshot below. As you can see, there is a number of pre-defined departments recognizable by the ![]() icon.
icon.
Below the pre-defined department, there is the Template document, which is a template used when adding new departments. If you expand the Template node, you should see its sub-pages as in the screenshot below. If you expand any of the pre-defined departments, you can see that they contain the same sub-pages as the Template document. These sub-pages represent particular sub-sections of each department's section. When a new department is created, the sub-pages from under the Template document are copied under the new department's parent document, as demonstrated in step 6 of the Adding new departments topic.
Location of the departments template may be customized. However, a correct location of the template must always be set in Site Manager -> Settings -> Intranet Portal -> Department template path in order for the creation of new departments to be possible.

Intranet department document type
Particular departments consist of the sub-pages mentioned above and their parent document. The parent document is of the Intranet department (IntranetPortal.Department) document type. By default, each newly created document of this type uses the Intranet Portal - Department master page page template. This is ensured by the configuration of the Template document, which also has this page template set.
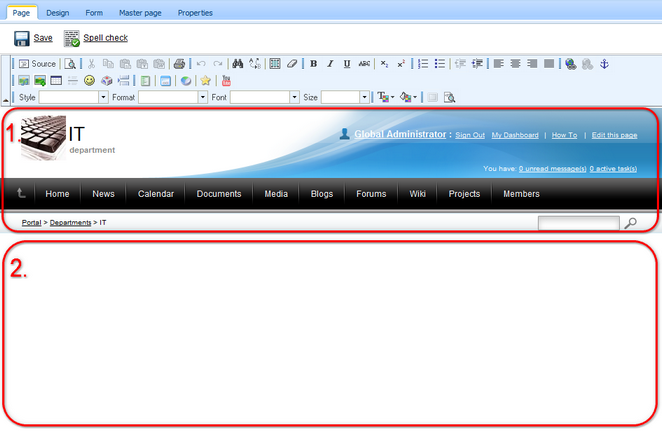
As obvious from the name of the page template, this document works as a master page for the department's section. The master page provides the common graphic elements in the header of each department's section and the dedicated navigation in the main menu (area 1 in the screenshot below). Particular sub-pages are displayed by the Page placeholder web part in the zoneContent web part zone on the master page (area 2 in the screenshot below).

Settings on the Form tab
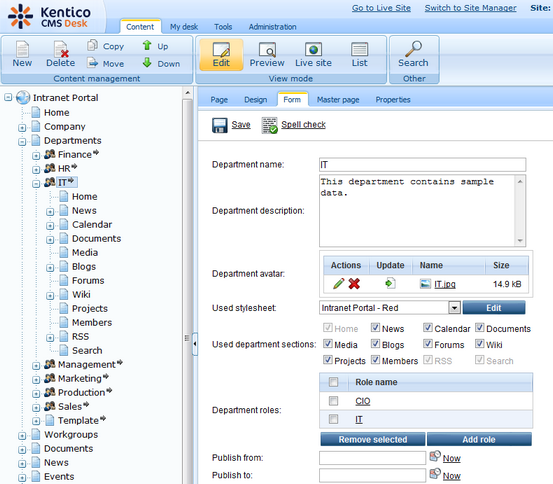
Essential settings of the department can be performed on the parent document's Form tab. The following fields can be configured:
| • | Department name - name of the department used in the administration interface and on the live site. |
| • | Department description - text describing the department. It is used as the department's description in the departments listing. |
| • | Department avatar - image used in departments listing and in the header of the department's website section. You can click the |
| • | Used stylesheet - theme used for the department's section. You may use one of the three pre-defined stylesheets, or even edit the selected one directly using the Edit button. |
| • | Used department sections - using these check-boxes, you can choose which sub-sections will be included in the department's website section. |
| • | Department roles - roles of department members. Members of the roles selected in this field will have access to the department's website section (see the Departments security topic for more details). |
| • | Publish from - date and time from when the department will be published on the live site. If you leave the field blank, it will be published immediately after its creation. |
| • | Publish to - date and time until when the department will be published on the live site. If you leave the field blank, it will be published until it is deleted. |
For sample values that can be entered in the fields, please see the pre-defined sample departments or refer to the Adding new departments topic.

Page url: http://devnet.kentico.com/docs/5_5r2/intranetadminguide/index.html?departments_overview.htm