|
Displaying related documents |

|

|

|

|
|
Displaying related documents |
|
|
|
|
If a Kentico CMS document is related to some other documents, these can be displayed using one of the following controls:
All of them have the following three properties that can be set in order to display related documents (besides other properties, such as Path, ClassNames, etc.):
Property Name |
Description |
Sample Value |
RelatedNodeIsOnTheLeftSide |
Indicates whether the related document is on the left or right side of the relationship. |
|
RelationshipName |
Code name of the relationship. |
"isrelatedto" |
RelationshipWithNodeGUID |
If set, only documents related to the document with the entered NodeGUID value will be selected.
Entering the "11111111-1111-1111-1111-111111111111" value will select documents related to the current document. |
"36f8c4bc-f702-4736-8a25-a82295668794" |
More information about related documents can be found at Developer's Guide -> Content management -> Document properties -> Related docs.
Example
The following example shows how to create an ASPX page template that displays news items related to the current page by using the CMSRepeater control:
1. Now open the Kentico CMS web project in Visual Studio and create a new Web form called RelationshipExample.aspx in the CMSTemplates/CorporateSiteAspx folder.
2. Switch to the Source view of the newly created web form and add the following line under the <%@ Page %> directive:
<%@ Register Assembly="CMS.Controls" Namespace="CMS.Controls" TagPrefix="cms" %> |
3. Switch to the code behind. You need to add a reference to the CMS.UIControls namespace:
[C#]
using CMS.UIControls; |
4. Modify the class from which the page is inherited. Change the following code:
[C#]
public partial class CMSTemplates_CorporateSiteAspx_RelationshipExample : System.Web.UI.Page |
to this:
[C#]
public partial class CMSTemplates_CorporateSiteAspx_RelationshipExample : TemplatePage |
Now the page can be correctly used as a page template in Kentico CMS.
Please keep in mind that the name of the class must be identical to the value of the Inherits attribute of the <%@ Page %> directive on the ASPX page. This is case sensitive.
5. Switch to its Design tab, drag and drop a CMSRepeater control from the toolbox onto the form and set its following properties:
| • | ClassNames: CMS.News |
| • | Path: /News/% |
| • | TransformationName: cms.news.preview |
| • | RelationshipName: isrelatedto |
| • | RelationShipWithNodeGUID: 11111111-1111-1111-1111-111111111111 |
This tells the control to read news documents, specifies the path to the News section of the sample Corporate Site, assigns the transformation that should be used to display the news documents and tells the control to display only documents that are in the isrelatedto relationship with the currently selected document.
The overall code of the CMSRepeater control will look like this:
<cms:CMSRepeater ID="CMSRepeater1" runat="server" ClassNames="CMS.News" Path="/News/%" TransformationName="cms.news.preview" RelationshipName="isrelatedto" RelationshipWithNodeGUID="11111111-1111-1111-1111-111111111111" > </cms:CMSRepeater> |
6. Save the changes to the web form.
7. Now open the sample Corporate Site ASPX, go to Site Manager -> Development -> Page templates, select the Corporate Site ASPX category and create a new template. Enter the following properties:
| • | Template display name: Related news |
| • | Template code name: RelatedNews |
Click OK. Press the Select button next to the File name field and choose the RelationshipExample.aspx web form from the CMSTemplates/CorporateSiteASPX folder.
Click Save.
8. Switch to the Sites tab, press Add sites and select Corporate Site ASPX.
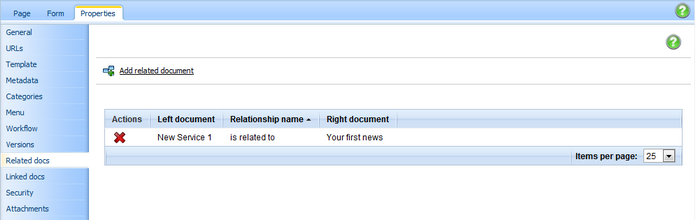
9. Switch to CMS Desk, select Services from the content tree and create a new Page (menu item) called under it, enter New Service 1 into the Page name field and select the Corporate Site ASPX -> Related news page template. Click Save. Now switch to Properties -> Related docs tab of the new page and add a related document by using ![]() Add related document, choose is related to as the Relationship name and select the News -> Your first news document as the Right-side document.
Add related document, choose is related to as the Relationship name and select the News -> Your first news document as the Right-side document.
10. Repeat step 9, but call the new page New Service 2 and select the News -> Your second news document as the Right-side document of the relationship.
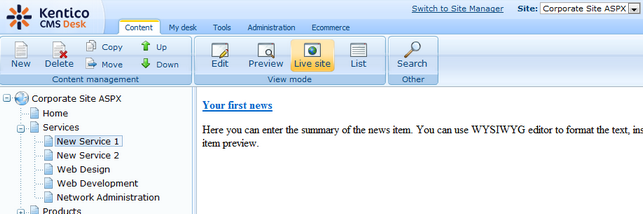
11. Now select the /Services/New Service 1 page from the content tree and switch to Live site mode. You will see that the CMSRepeater on the page template is displaying a preview of the news item related to this page:
If you select /Services/New Service 2 page, you will see the Your second news item displayed in the same fashion.
Using web parts to display related documents
When using the portal engine, related documents can also be displayed by the following web parts from the Listings and viewers category:
| • | Calendar |
| • | DataList |
| • | Grid |
| • | Related documents |
| • | Repeater |
| • | Universal document viewer |
| • | XSLT viewer |
This can be done by setting the properties in their Relationships property section as seen in the following image:

Example
The following example shows how to display news items related to a product by using the Repeater web part:
1. Open the sample Corporate Site, go to CMS Desk -> Content, select Products -> Laptops -> Acer Aspire 3105WLMi and switch to the Properties -> Related docs. Now add a related document by using ![]() Add related document, choose is related to as the Relationship name and select the News -> Your first news document as the Right-side document.
Add related document, choose is related to as the Relationship name and select the News -> Your first news document as the Right-side document.
2. Repeat step 1 for Products -> Laptops -> Asus F3U AP059C, but select the News -> Your second news document as the Right-side document.
3. Select Products from the content tree, switch to the Design tab and add (![]() ) a Listings and viewers -> Repeater web part to the zoneRight web part zone.
) a Listings and viewers -> Repeater web part to the zoneRight web part zone.
4. The Web part properties (Repeater) dialog will appear. Set the following properties:
| • | Content -> Path: /% (we want to display related news items from the whole website) |
| • | Content filter -> Document types: CMS.News |
| • | Transformations -> Transformation: CMS.News.Preview |
| • | Relationships -> Main document: Select Display documents related to the current document |
| • | Relationships -> Main document is on the left side: check the checkbox |
| • | Relationships -> Relationship name: is related to |
| • | HTML Envelope -> Content before: <h3>Related news:</h3> |
5. Now select /Products/Laptops/Acer Aspire 3105WLMi from the content tree and switch to Live site mode. You will see the news item that was added as a related document in step 1 displayed below the product using the CMS.News.Preview transformation:
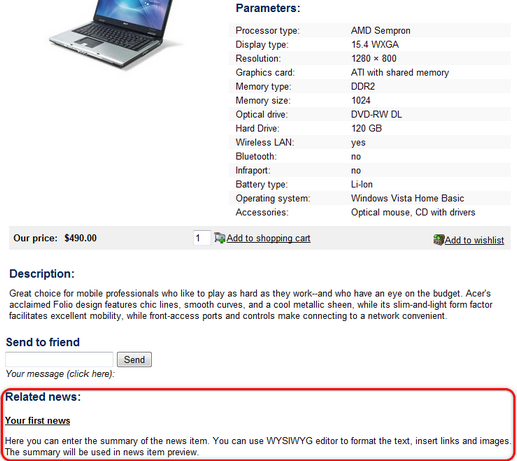
If you select /Products/Laptops/Asus F3U AP059C, you will see the Your second news item displayed in the same fashion.

