|
|

Creating new workgroups |

|

|

|

|
|
Creating new workgroups |
|
|

|
|
|
|
Creating new workgroups |
|
|
|
|
|
Creating new workgroups |
|
|
|
|
|
|
||
All authenticated users of the Intranet Portal website may create workgroups directly on the live site. This approach is how most workgroups are normally created, since it is easy to use and automatically performs many tasks that are necessary for the correct functioning of the new workgroup. The details of this process may be found in Intranet User's Guide -> Workgroups -> Creating a new workgroup.
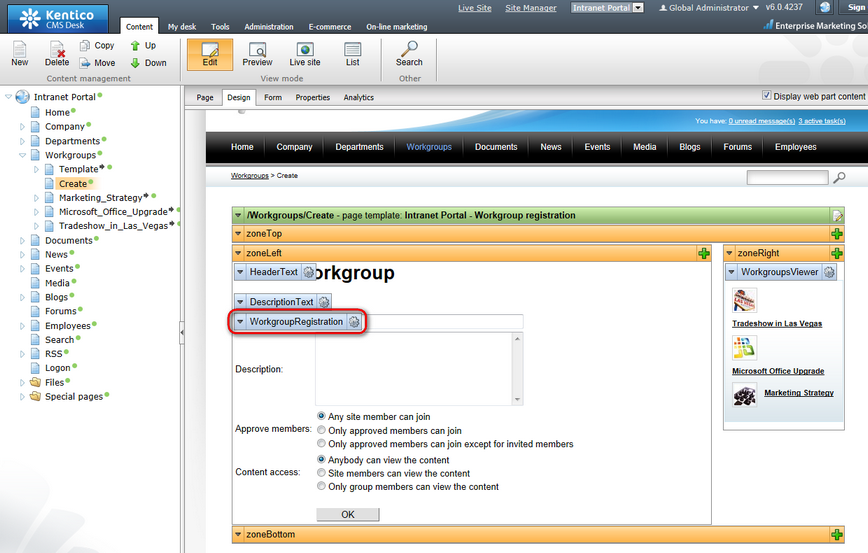
This feature is facilitated by the Group registration web part. It is possible to modify how workgroups are created by changing the properties of this web part. To do so, access CMS Desk -> Content, select the Workgroups -> Create document from the content tree, switch to the Design tab and Configure (![]() ) the web part (named WorkgroupRegistration by default).
) the web part (named WorkgroupRegistration by default).
Additional settings related to workgroups and their creation may be specified at Site Manager -> Settings -> Community as described in Developer's Guide -> Modules -> Groups -> Settings.
A new workgroup may also be defined manually in the administration interface, as is demonstrated in the following example:
|
Please note
This example is not a recommended way of creating workgroups. The following steps are all performed automatically when a workgroup is created via the Group registration web part, they only serve to help understand the process.
|
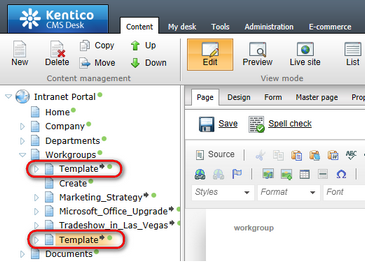
1. Log on to CMS Desk as a global administrator (username administrator with a blank password by default) and the Content tab will automatically be displayed. The first thing that needs to be done is create the documents that will form the section of the portal dedicated to the new workgroup. Expand the Workgroups node in the content tree, select the Template child node and create a copy of it under the same parent. This can be done either using the Copy button from the menu above the content tree or by holding down the Control key and dragging the given node to its target location in the tree. When copying, ensure that the Copy also all child documents box is checked.
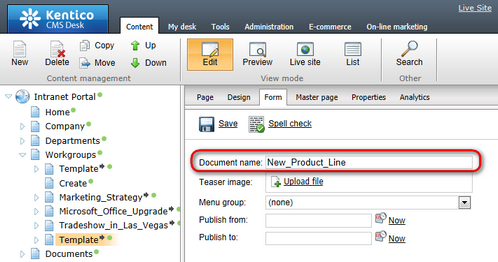
2. Select the new copy of the Template document and switch to the Form tab. Now change the Document name to the name that you wish to give to the new workgroup. This example uses New_Product_Line.
Click ![]() Save.
Save.
3. Switch to the Properties -> URLs tab and change the value of the Document alias property to New_Product_Line as well. The value of this property will be used in the URL of the workgroup's documents, so it cannot contain spaces or other forbidden characters. When a workgroup is created automatically, the name specified for the workgroup is used as the value of this property and any forbidden characters are converted to underscores.
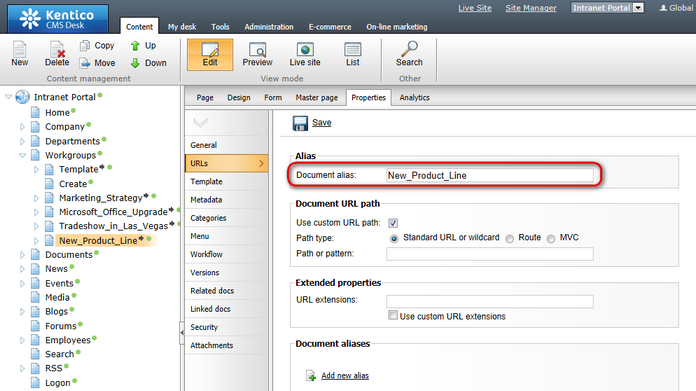
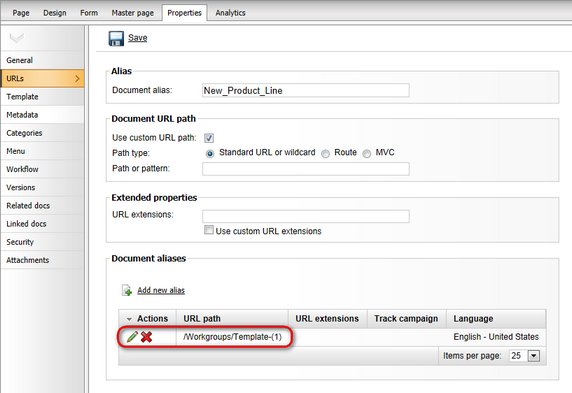
Click ![]() Save. With default Intranet Portal website settings, a document alias will automatically be created for the previous value of the Document alias property. Delete (
Save. With default Intranet Portal website settings, a document alias will automatically be created for the previous value of the Document alias property. Delete (![]() ) this alias, so that the documents of the workgroup cannot be accessed under the old URL.
) this alias, so that the documents of the workgroup cannot be accessed under the old URL.
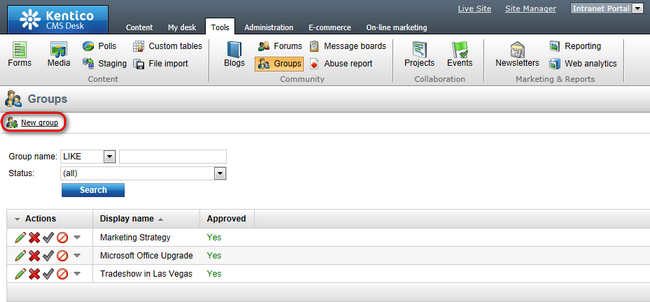
4. Now that the workgroup's documents are prepared, the workgroup object itself must be added to the system. Go to Tools -> Groups and click the ![]() New group link at the top of the page.
New group link at the top of the page.
The New group form will be displayed. Fill in the following fields:
•Display name - the name of the workgroup that will be displayed on the website and in the administration interface. This example uses New Product Line.
•Code name - a unique name used to identify the workgroup. The value of this field must be the same as that of the Document alias property set in step 3 to ensure that links to the workgroup function correctly. For the purposes of this example, the value must be New_Product_Line.
•Description - text describing the new workgroup.
•Group pages location - contains the alias path of the node that contains the workgroup's documents. Select the /Workgroups/New_Product_Line node for the purposes of this example.
•Avatar - allows the selection of the workgroup avatar image used for graphical representation.
•Approve members - this selection determines if users can join the workgroup with or without a workgroup administrator's approval. The Only approved members can join option requires all new members to be approved, while Only approved members can join except for invited members allows users who accept an invitation from a workgroup member to join without approval.
•Content access - this selection determines what type of users can view the content of the workgroup. Please keep in mind that if the Only group members can view the content option is selected, users cannot apply to join the workgroup and must be invited to become members.
•Notify group admins when a user joins/leaves - if checked, workgroup administrators will receive a notification e-mail when a user joins/leaves the workgroup.
•Notify group admins on pending members - if checked, workgroup administrators will receive a notification e-mail when a user requests to join the workgroup and approval is required.
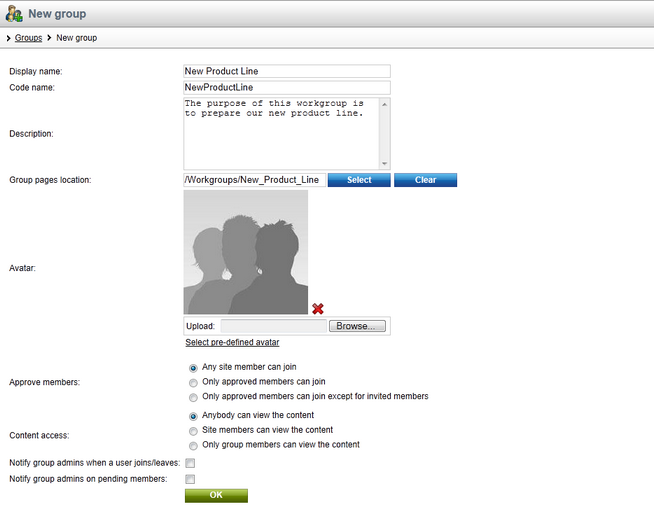
Click OK.
5. Now return to the Content tab, select the Workgroups/New_Product_Line document from the content tree and switch to its Properties -> General tab. Click the Change button next to the Owned by group property, choose the New Product Line workgroup in the displayed dialog and check the Inherit by child documents box.
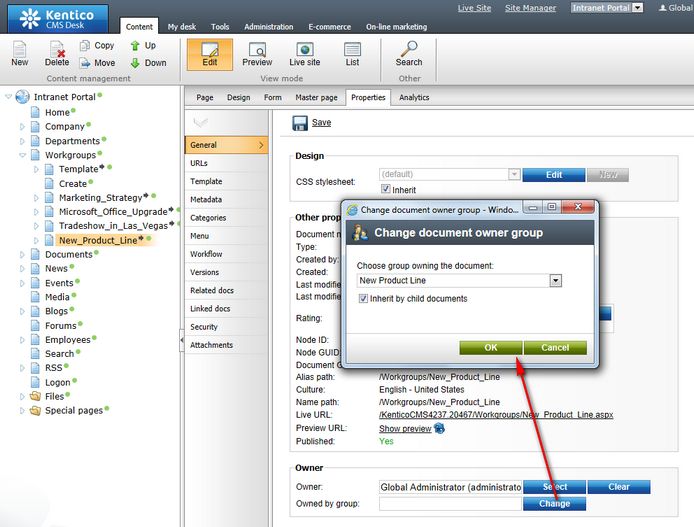
This assigns the given document and all documents under it to the workgroup object that was created in step 4, which ensures that the tools provided by these documents operate correctly within the context of the new workgroup.
6. When a default Intranet Portal workgroup is created automatically, several other associated objects are also added to the system. These include a forum group, forum and media library under the given workgroup, a tag group and a pair of search indexes for the content of the workgroup. The next steps describe how these objects can be defined manually.
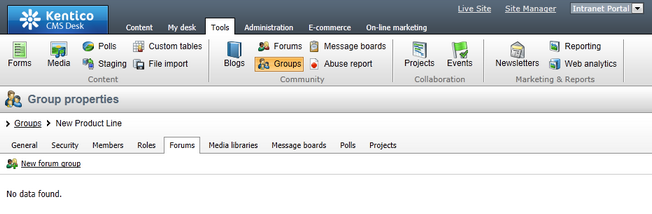
7. To add forums to a workgroup through the administration interface, go to Tools -> Groups, edit (![]() ) the New Product Line workgroup, open its Forums tab and click the
) the New Product Line workgroup, open its Forums tab and click the ![]() New forum group link. Forums are described in Developer's Guide -> Modules -> Forums, so please refer to this chapter if you are unfamiliar with the use of the forum management interface.
New forum group link. Forums are described in Developer's Guide -> Modules -> Forums, so please refer to this chapter if you are unfamiliar with the use of the forum management interface.
Fill in the displayed form according to the following information:
•Group display name - the name of the forum group that will be displayed on the website and in the administration interface. When a workgroup's initial forum group is created automatically, this name is in format <Display name of the edited workgroup> forums, for example New Product Line forums.
•Group code name - a unique name used to identify the forum group.
•Description - a text description for the forum group that will be displayed on the website.
•Forum group base URL - the URL of the document where the workgroup's forums are displayed. Default workgroups use the Forums child document, so enter ~/Workgroups/New_Product_Line/Forums.aspx for the purposes of this example.
•Forum group unsubscription URL - the URL of a page where users can unsubscribe from the forums under the given group. On the default Intranet Portal, this page may be found at ~/Special-Pages/Forum-Unsubscribe.aspx and the URL can be loaded from the value of the Site Manager -> Forums -> Forum unsubscription URL setting automatically by checking the Inherit from settings box.
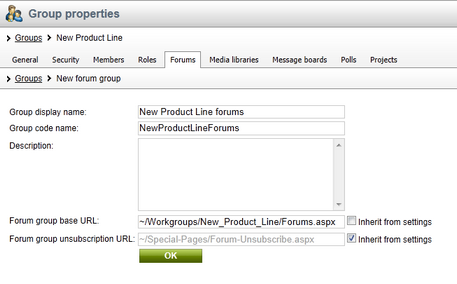
Click OK. The Forums tab of the new forum group will now be displayed. Click the ![]() Add forum link and enter the following details:
Add forum link and enter the following details:
•Forum display name - the name of the forum that will be displayed on the website and in the administration interface. When a workgroup's initial forum is created automatically, it is named General discussion.
•Forum code name - a unique name used to identify the forum. It must end with the following string: _group_<GUID of the edited workgroup>. This is necessary to ensure that the forum will be fully functional. A workgroup's GUID is a string of 32 characters generated when the workgroup is created and serves as a globally unique identifier. If necessary, the GUID of a workgroup may be found in the database, specifically the GroupGUID column of the Community_Group table.
•Description - a text description for the forum that will be displayed on the website.
•Forum base URL, Forum unsubscription URL - leave the Inherit from forum group boxes checked to use the same values as the parent forum group.
The remaining fields may be left unchanged for the purposes of this example.
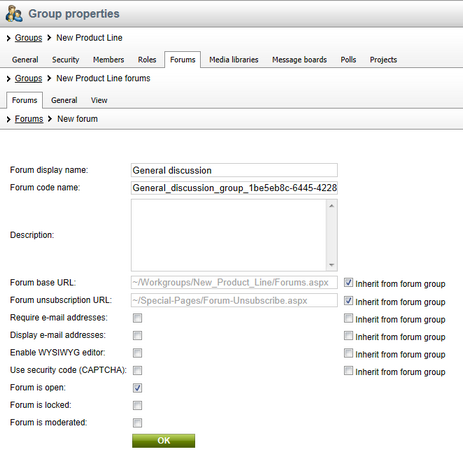
Click OK to create the new forum.
8. Media libraries can be created on the Media libraries tab of the same group editing interface. Information about managing media libraries may be found in Developer's Guide -> Modules -> Media libraries. There are no special requirements for defining media libraries under workgroups.

9. Now create the workgroup's tag group, which is intended for the tagging of blog posts under the workgroup's Blogs section. For more information about tags, please refer to Developer's Guide -> Modules -> Tags. Go to Site Manager -> Development -> Tag groups and click the ![]() New tag group link.
New tag group link.
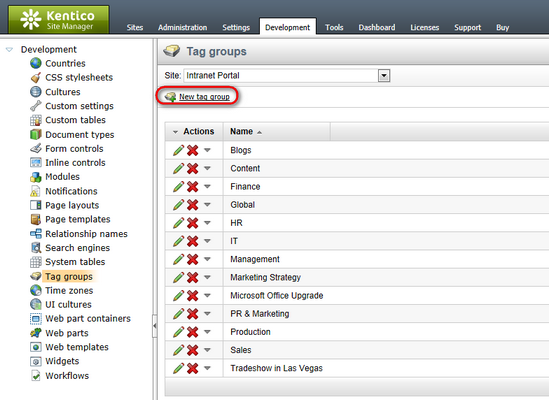
Fill in the New tag group form. By default, the display and code names of the tag group are the same as those of the new workgroup, so enter these values.
The tag group also needs to be assigned to the appropriate workgroup documents. Return to CMS Desk -> Content, select the Workgroups/New_Product_Line document from the content tree and switch to its Properties -> Metadata tab. Here, uncheck the Inherit box under the Page tag group drop‑down list and select the New Product Line tag group.
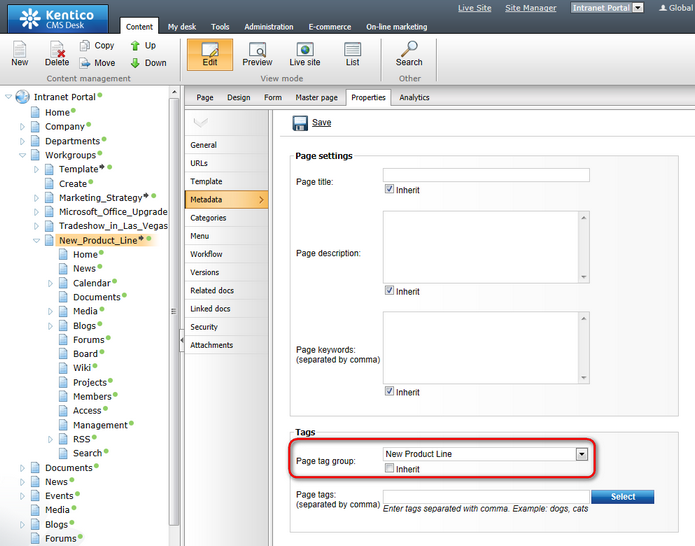
Click ![]() Save. All child documents will inherit this tag group.
Save. All child documents will inherit this tag group.
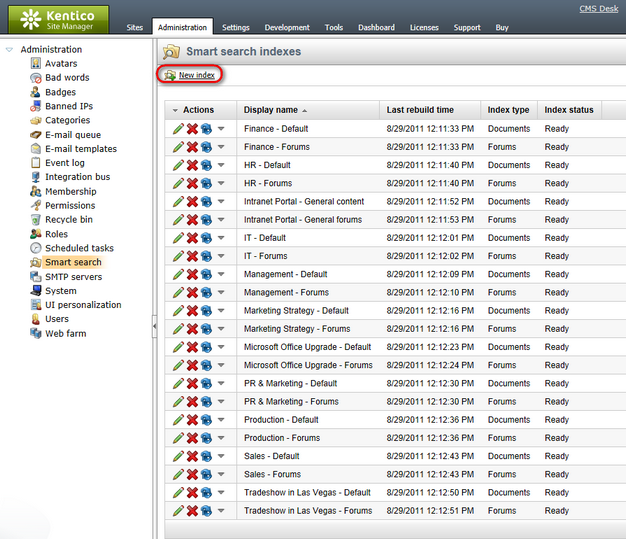
10. Next, to ensure that searching within the new workgroup is possible, appropriate smart search indexes must be defined. To learn more about the smart search module, please see Developer's Guide -> Modules -> Smart search. Go to Site Manager -> Administration -> Smart search and click the ![]() New index link.
New index link.
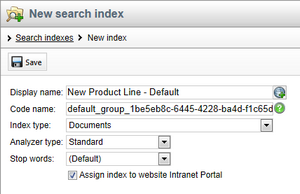
First, create the index for regular workgroup documents by entering the following values into the New search index form:
•Display name - the name of the index used in the administration interface. The standard format for this name is <Display name of the indexed workgroup> - Default, for example New Product Line - Default. This format is used when a workgroup search index is created automatically, but it is not strictly necessary.
•Code name - a unique name used to identify the index. It must be in format default_group_<GUID of the indexed workgroup> in order for the index to be applied to the given workgroup.
•Analyzer type - leave the default value.
•Stop words - leave the default value.
•Index type - select Documents.
•Assign index to website Intranet Portal - leave this box checked.
Click ![]() Save. Now switch to the Index tab of the newly created index, click the
Save. Now switch to the Index tab of the newly created index, click the ![]() Add allowed content button and fill in the displayed form according to the following information:
Add allowed content button and fill in the displayed form according to the following information:
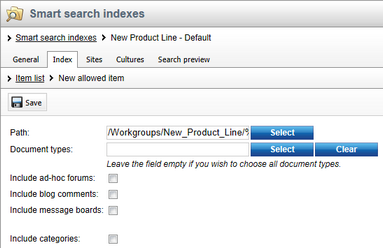
•Path - the path to the documents that should be indexed. For this example, either manually enter /Workgroups/New_Product_Line/% or click the Select button and choose the /Workgroups/New_Product_Line node with the Only sub-items box checked.
•Document types - the document types that should be indexed. It is recommended to leave this field empty to allow all types of workgroup content to be indexed.
•Include ad-hoc forums, Include blog comments, Include message boards, Include categories - these fields determine what types of additional content should be indexed. When a workgroup index is created automatically, these fields are disabled, but you may set them as required. Please note, the forums contained by default Intranet Portal workgroups are not ad‑hoc forums, they are pre‑defined and thus require their own search index as shown in the next step.
Click ![]() Save. Switch to the Cultures tab and add the culture(s) used by your website. Finally, return to the General tab and
Save. Switch to the Cultures tab and add the culture(s) used by your website. Finally, return to the General tab and ![]() Rebuild the index.
Rebuild the index.
11. In a similar fashion, a second search index must be added to allow searching of the workgroup's forums. To do this, go back to the Smart search indexes list, click the ![]() New index link again and enter the following values into the form:
New index link again and enter the following values into the form:
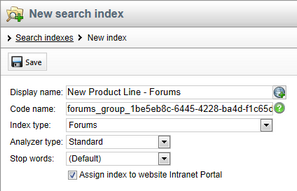
•Display name - the name of the index used in the administration interface. The standard format for this name is <Display name of the indexed workgroup> - Forums, for example New Product Line - Forums. This format is used when a workgroup search index is created automatically, but it is not strictly necessary.
•Code name - a unique name used to identify the index. It must be in format forums_group_<GUID of the indexed workgroup> in order for the index to be applied to the given workgroup.
•Analyzer type - leave the default value.
•Stop words - leave the default value.
•Index type - select Forums.
•Assign index to website Intranet Portal - leave this box checked.
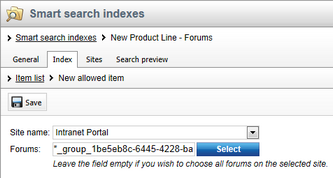
Click ![]() Save. Switch to the Index tab of the new index and click the
Save. Switch to the Index tab of the new index and click the ![]() Add allowed forums link. Use the Site name drop‑down list to select your Intranet Portal website. Now enter a string in the following format into the Forums field: *_group_<GUID of the indexed workgroup>. The asterisk character (*) serves as a wildcard, ensuring that all forums under the specified workgroup using the correct code name format (as specified in step 7) are indexed. The Select button cannot be used to assign the index to workgroup forums.
Add allowed forums link. Use the Site name drop‑down list to select your Intranet Portal website. Now enter a string in the following format into the Forums field: *_group_<GUID of the indexed workgroup>. The asterisk character (*) serves as a wildcard, ensuring that all forums under the specified workgroup using the correct code name format (as specified in step 7) are indexed. The Select button cannot be used to assign the index to workgroup forums.
Click ![]() Save. Now return to the General tab and
Save. Now return to the General tab and ![]() Rebuild the index.
Rebuild the index.
|
Please keep in mind
When a workgroup is deleted, its search indexes will remain in the system and must be removed manually.
|
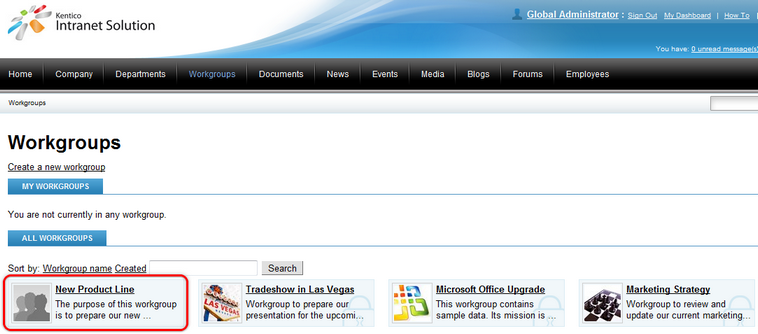
12. The workgroup and its associated objects are now created. If you go to the live site, you should see it listed under the Workgroups section of the portal, as depicted below. If you open the workgroup, all sections should be fully functional (but without any content).