|
|

Creating widgets |

|

|

|

|
|
Creating widgets |
|
|

|
|
|
|
Creating widgets |
|
|
|
|
|
Creating widgets |
|
|
|
|
|
|
||
The basic functionality provided by a widget is determined by the parent web part that is assigned to it. This topic will lead you through the process of creating and configuring a widget that will allow content editors to place their own editable text regions onto pages with editor widget zones.
1. To start, open Site Manager -> Development -> Widgets to access the administration interface used to manage widgets.
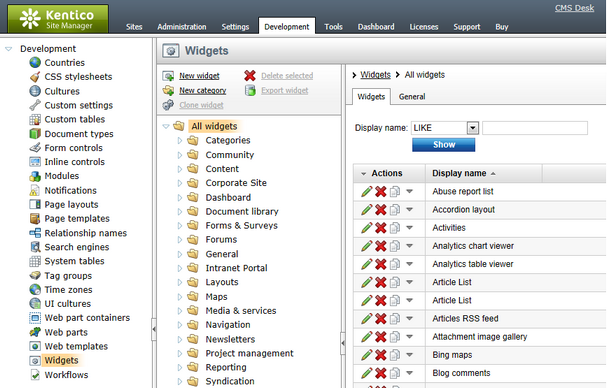
Widgets are grouped into categories. It is important to note that categories are only used for the purposes of organization. The category under which a widget is stored does not affect where the widget can be used or its functionality.
2. Select and expand the Text category and click the ![]() New widget button.
New widget button.
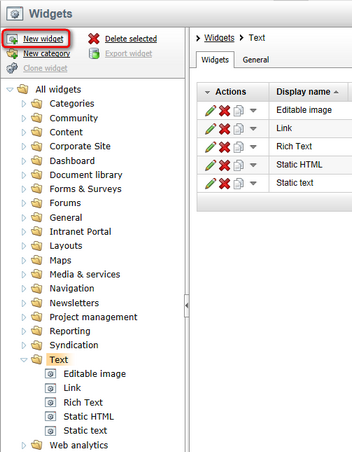
A web part selection dialog will be displayed, where you can choose the web part on which the widget will be based. If you ever need to create a widget with completely new custom functionality, you must first develop the appropriate web part. Select the Text & Images -> Editable text web part and click the OK button to confirm the selection. The widget will now be created.
3. Switch to the Properties tab of the new widget, where all the properties taken from the parent web part are listed. By default, none of these properties are available for editing by users when creating or configuring the widget. Select the RegionTitle property, check the Display attribute in the editing form box and click the ![]() Save button. Next, do the same for the DialogHeight property.
Save button. Next, do the same for the DialogHeight property.
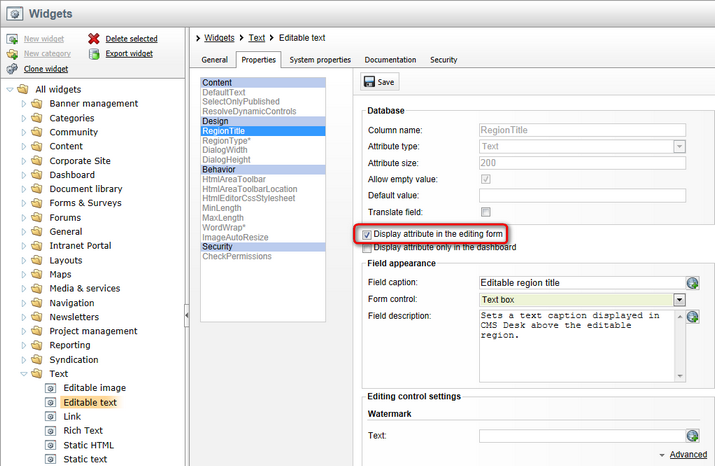
This setting ensures that the given property will be displayed in the widget configuration dialog. It is recommended to carefully consider which properties should be set as visible, since many widgets are meant to be accessed by users who are not administrators, even directly on the live site in some cases. Certain properties could be used to configure the widget in an undesirable way, view administration related data or are simply unnecessary for the intended purpose of the widget. A configuration dialog with a small amount of properties will also provide a simpler, easier to use interface.
4. Now open the Security tab in order to specify where and by what type of users the widget can be used. By default, the widget is forbidden for all zone types and is not usable by any users. Check the This widget can be used in editor zones box and select the Authenticated users option.
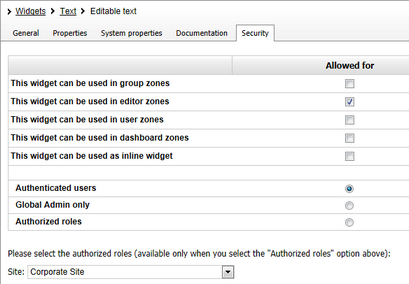
The widget will now be available for all registered users when managing editor type zones. In addition to these security settings, users must also be allowed to access the interface where the given type of widgets is managed. So in this case (page editor zones), access to CMS Desk and Modify permission for page content are also required.
|
Security settings and existing widget instances
Changing the security settings of a widget will not affect the instances of the widget that are already placed on pages by users.
If the permissions for an existing widget are removed by an administrator, it will still be displayed. However, adding new instances of that widget will not be possible. |
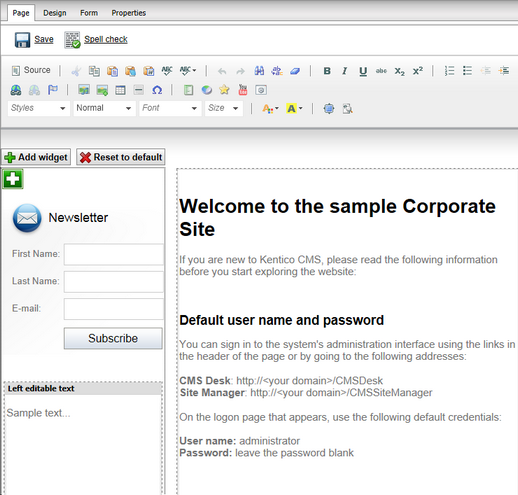
5. The configuration is now complete and the widget is ready to be placed on a page. Switch to CMS Desk, select the Home page in the content tree, view it on the Edit -> Page tab, click the Add widget (![]() ) button and choose the newly created Text -> Editable text widget. In the Widget properties dialog, enter the following values into the two properties that were allowed:
) button and choose the newly created Text -> Editable text widget. In the Widget properties dialog, enter the following values into the two properties that were allowed:
•Editable region title: Left editable text
•Editable region height: 100
The fields in the Widget container section are system properties and are available for all editor widgets. You may leave them empty in this case. Now click OK and an editable text area will be added to the page as shown below.