Checkout process |

|

|

|

|
|
Checkout process |

|

|

|

|
|
|
||
In this topic you will learn how to configure the checkout process that the users go through when purchasing in your on-line store.
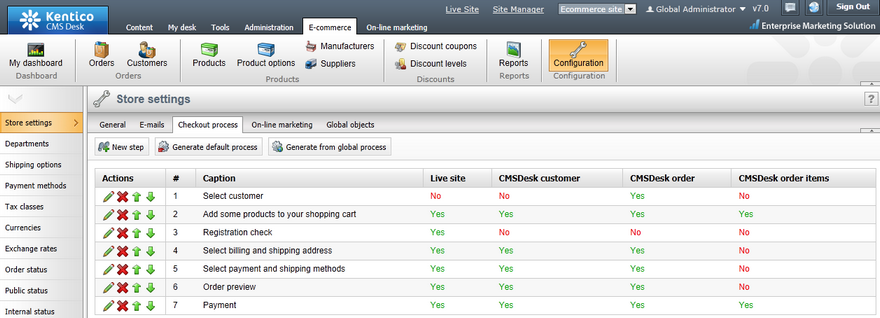
The checkout process can be configured in CMS Desk -> E-commerce -> Configuration -> Store settings -> Checkout process (or in Site Manager -> Tools -> E-commerce configuration -> Store settings -> Checkout process; global checkout process only). In this section of the administration interface, you can see a list of all currently defined checkout process steps. You can create a new step by clicking the ![]() New step button and you can also Edit (
New step button and you can also Edit (![]() ) or Delete (
) or Delete (![]() ) the existing steps or change their succession (
) the existing steps or change their succession (![]() ), (
), (![]() ). Besides, you can generate a default process using the
). Besides, you can generate a default process using the ![]() Generate default process button or you can generate the process from global settings using the
Generate default process button or you can generate the process from global settings using the ![]() Generate from global process button (CMS Desk only). However, in both these cases, your current process will be lost. Please note that the purchase process can be enhanced with your custom steps.
Generate from global process button (CMS Desk only). However, in both these cases, your current process will be lost. Please note that the purchase process can be enhanced with your custom steps.
In the four right columns of the list you can see if the particular step is displayed (Yes) or not (No) in the given section of the CMS.

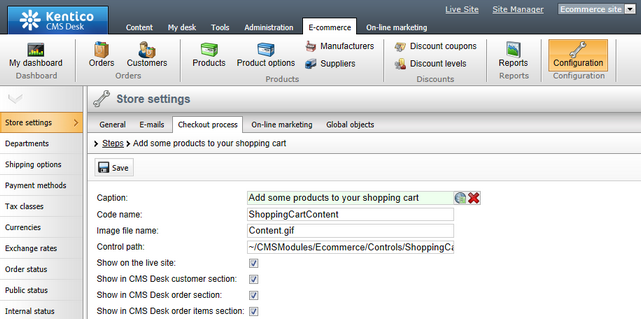
When creating a new step or editing an existing one, you can specify the following properties:
•Caption - the name of the step displayed to users on the live site and in the administration interface.
•Code name - the name of the step used by developers in the code.
•Image file name - here you can set the name of the image file used for the current step.
•Control path - allows you to specify the path to the control file.
•Show on the live site - indicates if the step should be displayed on the live site.
•Show in CMSDesk customer section - indicates if the step should be displayed in the customer section.
•Show in CMSDesk order section - indicates if the step should be displayed in the order section.
•Show in CMSDesk order items section - indicates if the step should be displayed in the order items section.

Checkout process can be performed at four different locations:
•Creating a new order on the live site.
•Creating a new order in CMS Desk -> E-commerce -> Orders.
•Editing an existing order in CMS Desk -> E-commerce -> Orders -> Edit (![]() ) order -> Items.
) order -> Items.
•Creating a new order or editing an existing one in CMS Desk -> E-commerce -> Customers -> Edit (![]() ) customer -> Orders.
) customer -> Orders.