|
|

Configuring e-mail notifications |

|

|

|

|
|
Configuring e-mail notifications |
|
|

|
|
|
|
Configuring e-mail notifications |
|
|
|
|
|
Configuring e-mail notifications |
|
|
|
|
|
|
||
When a document reaches a workflow step, the system can send out notification e-mail messages to those involved in the workflow process. This topic describes how to enable e-mail notifications globally, for a workflow or for a workflow step. The topic applies to both basic and advanced workflow.
The e-mails are based on e-mail templates. Kentico CMS comes with several default templates, which you can use without any additional configuration. If you want to create your own e-mail templates for workflow notifications, follow the instructions in the Writing workflow e‑mail templates section.
The system sends notification e-mails according to the following rules:
•When a document reaches a step (except Edit, Published and Archived), the Waiting for approval e-mail is sent to users allowed to approve or reject the current (new) step.
•When someone approves a document, i.e., moves it from an approval step to the next step, the Approved e-mail is sent to the user who submitted the document for approval.
•When someone rejects a document, i.e, moves it to the previous step, the Rejected e-mail is sent to the user who submitted the document for approval.
•E-mails are never sent to users who performed the action that invoked the sending.
1. Open Site Manager and navigate to Settings -> Content -> Content management.
2. Turn the Send workflow e-mails setting on.
4. Type an address into the Send workflow e-mails from setting. This address will appear to recipients as the sender of the e‑mails.
5. Click ![]() Save.
Save.
1. Edit (![]() ) the workflow and switch to the E-mails tab.
) the workflow and switch to the E-mails tab.
2. Set the Send notification e-mails setting to Yes. Alternatively, you can Use site settings. See Enabling workflow e-mail notifications globally.
3. Check the box next to events that you want users to be notified about:
•Send waiting for approval - sends an e-mail when a document reaches an approval step (i.e. all steps except Edit, Published and Archived).
•Send approved - sends an e-mail when a document leaves an approval step in the direction towards the end of the workflow process.
•Send rejected - sends an e-mail when a document leaves a step in the direction towards the beginning of the workflow process.
•Send published - sends an e-mail when a document reaches a Published step.
•Send archived - sends an e-mail when a document reaches an Archived step.
4. (Optional) Select an e-mail template for events for which you don't want to use the default template.
•To bring up the list of available templates, click Select.
•To edit the currently selected template, click Edit.
•To create a new template, click New.
•To clear your template selection and revert back to the default template, click Clear.
5. (Optional) Specify whether you want to notify users who are not involved in the process. This notification will be sent every time a document reaches a step that needs to be manually approved.
a.Select users using the Add users button.
b.(Optional) Select an e-mail template. Otherwise, the default template will be used.
6. Click ![]() Save.
Save.
1. Edit the step and switch to the E-mails tab.
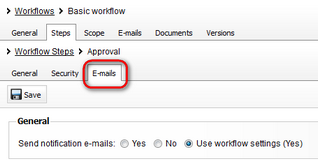
2. Set the Send notification e-mails setting to Yes. Alternatively, you can Use workflow settings. See Configuring e-mail notifications for a workflow.
3. Choose events you want users to be notified about.
•Send waiting for approval - sends an e-mail when a document reaches the step.
•Send approved - sends an e-mail when a document leaves the step in the direction towards the end of the workflow process.
•Send rejected - sends an e-mail when a document leaves the step in the direction towards the beginning of the workflow process.
4. (Optional) Select an e-mail template for events for which you don't want to use the default template.
•To bring up the list of available templates, click Select.
•To edit the currently selected template, click Edit.
•To create a new template, click New.
•To clear your template selection and revert back to the default template, click Clear.
5. Click ![]() Save.
Save.
1. Navigate to Site Manager -> Administration -> E-mail templates.
2. Select a site you want the template to be available on and click ![]() New template.
New template.
3. Enter a name for the new template into the Display name field.
4. Choose Workflow from the E-mail type drop-down list. This ensures that you will have relevant macros available to insert into the template's text.
5. (Optional) Specify a sender, a recipient, copy and blind copy recipients and a subject (From, Cc, Bcc and Subject fields).
6. Write the text of the template. An e-mail template can have two formats - HTML and plain text. You should write the template text at least in the format that you use on you websites. By default, the system sends HTML e-mails. You can find out what your settings are in Site Manager -> Settings -> System -> E-mails -> E-mail format.
You can insert context-specific information into the template's text, such as the current step name, the link to edit the document, etc., by using macros. See the Macros in workflow e-mail templates section for a list of available macros.
7. Click ![]() Save.
Save.
In e-mail templates of the Workflow type, you can use macros that hold information about the workflow and about the document that invoked sending the e-mail. The following list presents workflow-related macros that you can use:
•ActionDefinition - object that holds the parameters of the current step, if the current step is an action step.
•ApplicationURL - URL address of the application.
•Comment - comment that users can add when approving or rejecting documents.
•CurrentStep - object that holds data of the step the document is currently in.
•CurrentUser - object that holds data of the currently logged in user.
•Document - object that holds data of the document.
•DocumentPreviewUrl - address where anyone can view the latest version of the document as it would appear on the live site.
•DocumentEditUrl - address pointing to the page in CMS Desk, where editors can modify the document.
•DocumentActionName - name of the action that was performed with the document. The macro has four possible values.
oApprove
oArchive
oPublish
oReject
•OriginalStep - object that holds data of the step the document was in before it was moved to the current step.
•Workflow - object that holds data of the workflow process.
Besides the listed macros, you can also use any other macro expression, as described in the Macro expressions chapter.