|
|

Using Data source web parts |

|

|

|

|
|
Using Data source web parts |
|
|

|
|
|
|
Using Data source web parts |
|
|
|
|
|
Using Data source web parts |
|
|
|
|
|
|
||
Data source web parts retrieve data from the database (or other sources) and send it to be displayed by other connected web parts. This allows you to distribute the following functions between multiple web parts:
•Loading data
•Displaying and formatting data
•Allowing users to filter the displayed data
•Paging
The diagram below shows how to link together a data source and other types of components. You can place these web parts anywhere on the same page without any change in functionality.
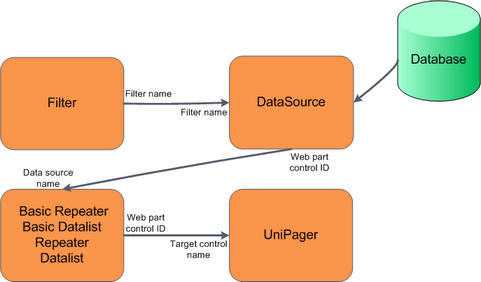
The line captions show which properties connect the web parts. The properties at the beginning and end of each line must have identical values.
Many listing web parts contain a built-in data source. For example, the default Repeater and Datalist provide their own data source for loading documents. If you wish to connect a separate data source to these web parts, the type of the data source web part must match the internal data source (e.g. the Repeater web part can only display data from a Documents data source).
To display items from any type of data source, use the Basic repeater or Basic datalist. These web parts do not load data on their own and require a connected data source web part to work correctly.
The following example demonstrates the data source concept in practice. It creates a group of interconnected web parts that load product documents, display them on the website and also provide filtering and paging functionality for the data.
1. Sign in to CMS Desk and edit the sample Corporate site.
2. Create a new Page (menu item) document under the Products section. Choose the Create a blank page option in the page template selection dialog.
3. Add the Products data source web part to the web part zone on the page. Leave the default values for all of the web part's properties.
4. Add the Basic repeater web part to the same web part zone. Set the following properties:
•Data source name: ProductsDataSource (this is the default ID of the Products data source web part)
•Transformation name: CMS.Product.Default (this is a basic transformation for formatting product data)
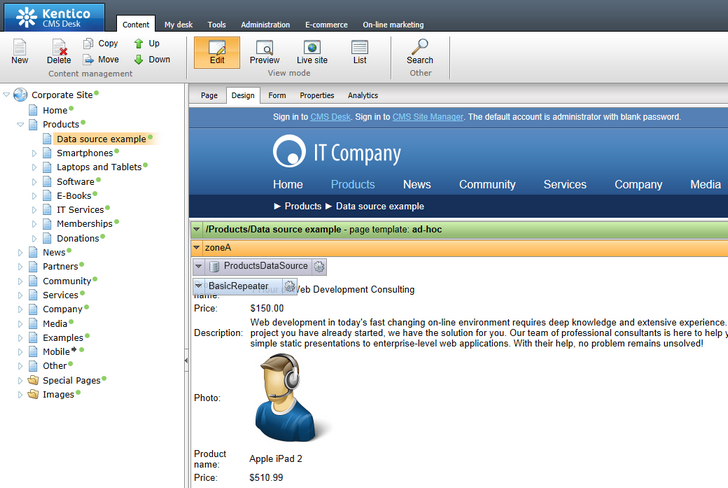
Basic repeater displaying products loaded from the connected data source web part
5. Add the Product filter web part to the same web part zone. Set the following property of the filter web part:
•Filter name: ProductFilter
This filter allows users to limit which products the page displays based on various criteria.
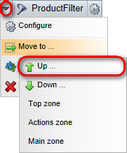
6. If you inserted the product filter web part using the zone's Add web part (![]() ) action, the system automatically adds the filter to the bottom of the zone. In this case, scroll down to the filter web part and move it above the repeater:
) action, the system automatically adds the filter to the bottom of the zone. In this case, scroll down to the filter web part and move it above the repeater:
a.Right-click the web part.
b.Hover over ![]() Move to and click
Move to and click ![]() Up.
Up.
7. Configure (![]() ) the properties of the Products data source web part and type the filter's name (ProductFilter) into the Filter name property.
) the properties of the Products data source web part and type the filter's name (ProductFilter) into the Filter name property.
oThis connects the filter to the data source. The data source web part now loads a limited set of items according to the current filter settings.
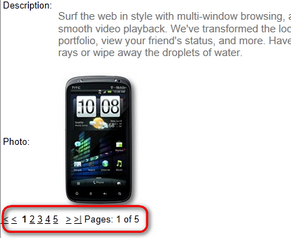
8. Add the Universal pager web part to the zone with the following properties:
•Target control name: BasicRepeater
•Page size: 5
•Group size: 5
•Pager layout transformation: CMS.PagerTransformations.General-PagerLayout
This web part connects to the repeater and separates the displayed data into multiple shorter pages. Paging can be useful when displaying a large number of records.
You can try out the functionality of the page by switching to Live site mode.
For example, use the filter to display only products that have the Featured Status and sort the items by price from high to low.
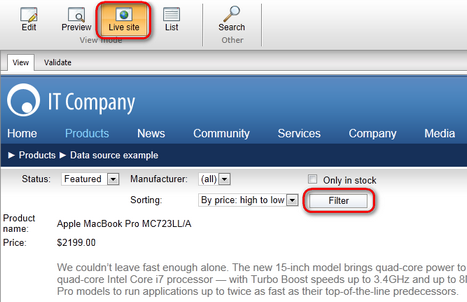
The pager below the data ensures that the list only includes up to 5 products and allows users to switch between pages.