Translating documents |

|

|

|

|
|
Translating documents |

|

|

|

|
|
|
||
The main purpose of translation services is to create language versions of the website's documents based on the content in another language. There are several different ways to submit documents for translation.
Requirements:
•The Enable translation services setting must be enabled in Site Manager -> Settings -> Content -> Translation services.
•Your website needs to be configured for multiple content cultures, including all languages that you plan to use.
To create new language versions of documents using a translation service:
1. Select the document that you wish to translate in the content tree.
2. Switch to the target language using the selector on the main CMS Desk toolbar.
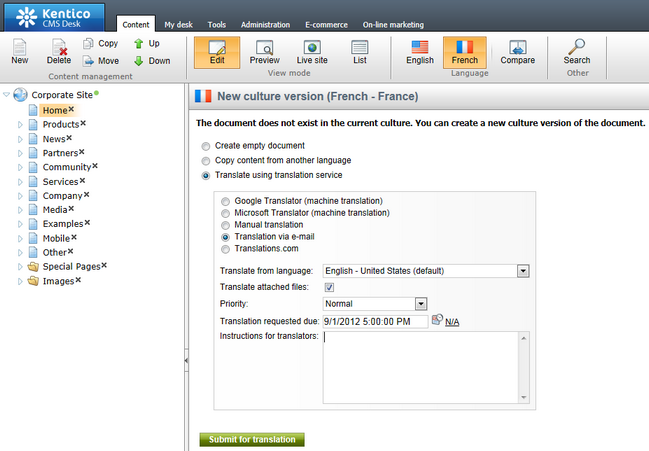
3. Select Translate using translation service in the New culture version dialog.
4. Choose one of the available translation services.
5. Fill in the following details for the translation (some of the options may not be supported by the selected service):
Translate from language |
If the document already exists in more than one language, you can choose which one the service uses as the source for the translation. |
Human translation parameters |
|
Translate attached files |
Enable this option to submit the document's file attachments for translation along with the main content.
The system adds file attachments directly into the XLIFF translation source as binary data encoded in Base64 format. |
Priority |
Sets the priority of the translation (low, normal or high). |
Translation requested due |
Specifies a deadline date for the translation. |
Instructions for translators |
Here you can enter additional instructions for human translators. |

Submitting a new document language version for translation
6. Click Submit for translation.
The system adds the new language version of the document.
•Machine services immediately insert the translated content into the new document version.
•When using standard (human) translation services, the system initially creates the new document version as a copy of the source language. The content tree shows the Waiting for translation status icon (![]() ) next to documents in this state. You can manage the translation through a submission ticket in CMS Desk -> Tools -> Translations. Once the service completes the translation, you can process the submission to transfer the new content into the appropriate language version of the document.
) next to documents in this state. You can manage the translation through a submission ticket in CMS Desk -> Tools -> Translations. Once the service completes the translation, you can process the submission to transfer the new content into the appropriate language version of the document.
|
Tip
You can integrate document translation via services into your workflow process. Advanced workflow offers action steps that allow you to automatically manage document translations.
There are two predefined workflows (in Site Manager -> Development -> Workflows) that you can configure and apply to your website:
•Translation - Default language version - automatically sends documents for translation via a selected service when a user approves the default language version. •Translation - Import to other language versions - periodically checks for translations completed by standard services and imports them into the appropriate documents when ready.
|
You can submit documents for translation even if they already exist in the target language. This allows you to use translation services to update the language versions of a document after making changes to its main content.
1. Select the document in the content tree.
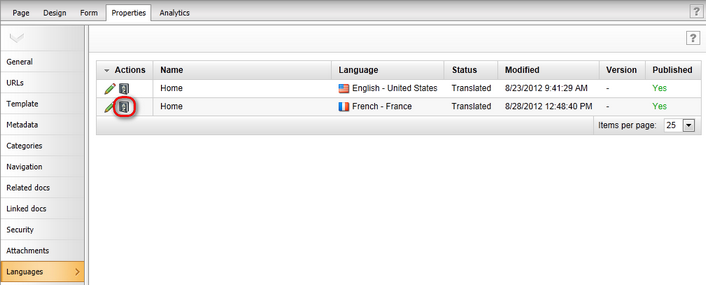
2. Open the Properties -> Languages tab.
3. Click the Translate document (![]() ) action for the language version that you wish to re-translate.
) action for the language version that you wish to re-translate.

A translation dialog opens.
4. Choose a service and specify the parameters of the translation.
5. Click Translate.
The system submits the document for translation just like when creating a new language version. The text returned by the translation service overwrites the original content of the document in the selected language.
|
Note
You may also use the Properties -> Languages tab to create new language versions of documents (even if the given document does not exist in the target language).
|
To translate more than one document using a single action:
1. Open the List mode of CMS Desk.
2. Select the parent of the documents that you wish to translate in the content tree.
3. Select the target language of the translation on the main CMS Desk toolbar.
4. Mark documents for translation using the checkboxes next to the listed items.
5. Select the Translate action below the document list and click OK.
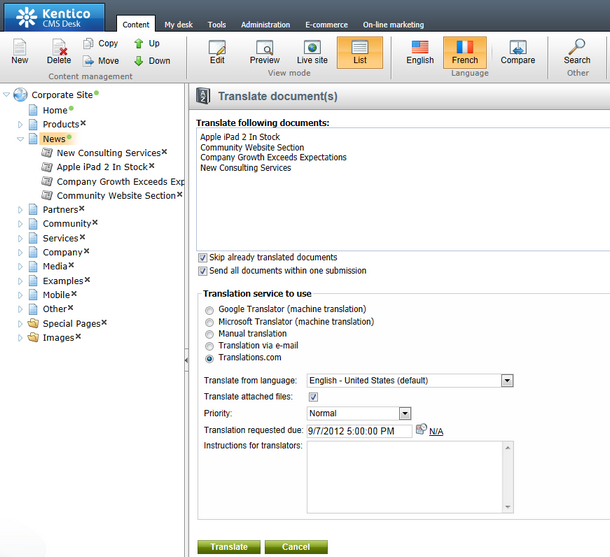
6. Choose a service and specify the parameters of the translation. When submitting multiple documents for translation, you can also enable or disable the following options:
Skip already translated documents |
If checked, documents that already exist in the target language are not submitted for translation.
Disable this option to overwrite the current content of the documents with the text returned by the translation service. |
Send all documents within one submission |
If enabled, the system includes all listed documents in a single translation submission. Otherwise, separate submissions are created for individual documents. Only applicable when using a human translation service. |

Translating all documents under the News sections of a website
7. Click Translate.
The translation process works the same way as for single items, but the system performs it for all selected documents.