|
|

Developing layout web parts |

|

|

|

|
|
Developing layout web parts |
|
|

|
|
|
|
Developing layout web parts |
|
|
|
|
|
Developing layout web parts |
|
|
|
|
|
|
||
Even though Kentico CMS is delivered with multiple layout web parts that may be used out‑of‑the‑box, it is also possible to customize them or develop completely new web parts to define layouts that exactly match your specific requirements.
The development process is similar as with standard web parts, but there are several important differences. All layout web parts must inherit from the CMSAbstractLayoutWebPart base class (rather than the standard CMSAbstractWebPart), which can be found in the CMS.PortalControls namespace. The most important members inherited from this base class that can be used to implement the layout are described in the example below.
The following example demonstrates how a custom layout web part can be developed. For the sake of simplicity, this sample layout will only provide a single web part zone with a configurable width and height. It is only intended for demonstration purposes and not for practical use. For further inspiration, you can view the code of the more advanced built-in layout web parts found in the ~/CMSWebParts/Layouts folder of your web project.
1. Open the web project in Visual Studio, right click the CMSWebparts/Layouts folder and select Add New Item. Now create a Web User Control named CustomZone.ascx.
2. Next, edit the control's code behind file. Add references, set the control to inherit from the appropriate base class and define two properties according to the following code:
[C#]
using CMS.PortalControls; |
The Width and Height public properties are used to handle the corresponding properties of the web part object that will be defined later in the example. The properties use the string type, since the width/height is assigned as a CSS style text value.
3. Add the following private method to the class:
[C#]
/// <summary>
// Defines the DIV element's id attribute used to identify the zone's envelope in Design mode. if (IsDesign) |
The following members inherited from the base class are used:
•Append(params string[] text) - this method is a fundamental tool used to build the output code that defines the web part layout. When the method is called, the content of its parameters is added to the end of the current layout code. Any number of string parameters may be specified.
•AddZone(string id, string title) - creates a new web part zone, adds it to the layout and passes it back as the return value. If the layout is added as a widget, this method automatically ensures that the zones in the layout are created as widget zones of the same type as the parent zone.
•IsDesign - true if the web part is currently being viewed on the Design tab of CMS Desk.
The InsertZone() method is used to define the web part zone that will be displayed in the layout and surrounding code that allows its width and height to be configured. It will be called later by the code added in the next step of the example.
4. Every layout web part must override the PrepareLayout() virtual method, which is where the output code of the layout is generated. Use the following code to add the method:
[C#]
/// <summary>
// Wraps the layout into a table with additional content if the web part is edited in Design mode. if (IsDesign) // Generates dynamic resizers for the zone if the Allow design mode property of the web part is enabled. if (AllowDesignMode) // Adds a horizontal resizer. } // Saves the current status of the layout code and ensures that it is rendered on the page. } |
The following members inherited from the base class are used:
•StartLayout() - initializes the building of the layout code. You may start using the Append() method only after this method is called.
•GetHorizontalResizerScript(string elementId, string widthPropertyName) - returns a script that adds the functionality of a dynamic width resizer. The first parameter is used to specify the ID of the element that will be resized and the second sets the property that will be modified when the width is changed via the resizer.
•GetVerticalResizerScript(string elementId, string heightPropertyName) - returns a script that adds the functionality of a dynamic height resizer. The parameters work the same way as for the horizontal resizer.
•FinishLayout() - this method finalizes the layout code of the web part. It must always be used as the last modification of the layout (i.e. once it is called, the Append() method will no longer work correctly).
As you can see, the method added in this step initializes the layout code, calls the method created in the previous step and then finalizes the output. In addition, it adds a table element around the web part zone, which is displayed only when the layout web part is viewed in design mode. If the Allow design mode property of the web part is enabled, this table also includes elements that can be dragged with the mouse to directly resize the layout's zone. It is not necessary to define the AllowDesignMode property for the control, since it is automatically inherited from the CMSAbstractLayoutWebPart base class.
Save the changes. If your Kentico CMS project was installed as a web application, you must also Build the project.
5. Next, register the web part in the system. Go to Site Manager -> Development -> Web parts, select the Layouts category and click ![]() New web part. Choose to Create a new web part and enter the following values:
New web part. Choose to Create a new web part and enter the following values:
•Display name: Custom zone layout
•Code name: CustomZone
•File path: ~/CMSWebParts/Layouts/CustomZone.ascx
•Generate the code files: false
Click ![]() Save and you will be redirected to the web part's General tab. Here, select the Layout option from the Type drop‑down list and click
Save and you will be redirected to the web part's General tab. Here, select the Layout option from the Type drop‑down list and click ![]() Save again. All layout web parts must use this type in order to function correctly.
Save again. All layout web parts must use this type in order to function correctly.
6. Switch to the Properties tab and add (![]() ) three properties according to the information below. Click
) three properties according to the information below. Click ![]() Save for each property before moving on to the next one.
Save for each property before moving on to the next one.
•Column name: Width
•Attribute type: Text
•Attribute size: 100
•Allow empty value: yes (checked)
•Field caption: Zone width
•Form control: Text box
•Column name: Height
•Attribute type: Text
•Attribute size: 100
•Allow empty value: yes (checked)
•Field caption: Zone height
•Form control: Text box
•Column name: AllowDesignMode
•Attribute type: Boolean (Yes/No)
•Allow empty value: yes (checked)
•Default value: yes (checked)
•Field caption: Allow resizing in design mode
•Form control: Check box
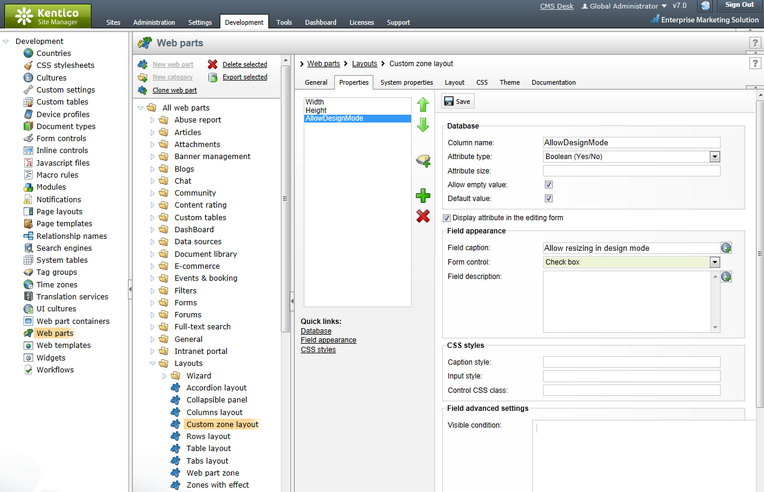
These properties will be available in the web part's configuration dialog. They are handled by the corresponding properties in the code of the user control implementing the web part.
7. The custom layout web part is now complete and ready to be used. You can try out its functionality by adding it onto one of your pages in CMS Desk.
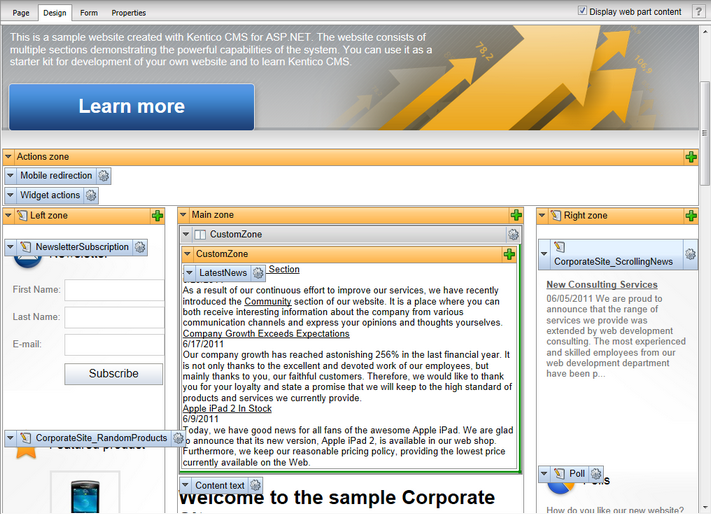
You can use a similar approach (with more advanced layout code) to implement a custom web part to generate any required layout.