|
|

Creating new tables |

|

|

|

|
|
Creating new tables |
|
|

|
|
|
|
Creating new tables |
|
|
|
|
|
Creating new tables |
|
|
|
|
|
|
||
Tables allow you to retrieve data from the Kentico CMS database using an SQL query. You can display the data by placing the table into the layout of a report.
The following properties can be used to configure tables:
Default |
|
Display name |
The name of the table shown in the user interface. |
Code name |
Name used in your code. |
Enable export |
If enabled, users who view the table are able to export the displayed data to external files using the Microsoft Excel (XLSX), CSV or XML format. The data export feature may be accessed by right‑clicking the table in the report, which opens a context menu with possible export actions. |
Enable subscription |
If enabled, users will be able to subscribe to the currently edited report table. To allow subscriptions, it is also necessary to have the Enable subscription box checked on the General tab of the given report. |
Query |
|
Query |
Here you can add the SQL query used to retrieve data to be displayed by the table. |
Is stored procedure |
Indicates if the query is a stored procedure or not. |
Connection string |
Sets the database connection string used by the table's query.
Only users who have the Set connection string permission for the Reporting module are allowed to change this value.
The system loads the list of connection strings from the <connectionStrings> section of the application's web.config file. The (default) option represents the CMSConnectionString added by the application's initial database installer.
You can check the Inherit box to load the Connection string value set for the parent report. |
No record text |
Text to be displayed if the query doesn't return any data. |
Skin |
|
Skin ID |
ID of the .NET skin (stored in the .skin files in ~/AppThemes/<theme name>) which will be used for the table. |
Paging |
|
Enable paging |
If enabled, paging will be enabled when the report table is displayed. The paging can be configured by the two properties below. |
Page size |
Number of table rows per page. |
Paging mode |
Type of paging controls displayed below the table. The following options are available:
•Previous-next buttons - displays buttons leading to the previous and next page •Page numbers - displays page numbers leading to the corresponding pages •Previous-next-first-last buttons - displays buttons leading to the first, last, previous and next page •Page numbers-first-last buttons - displays page numbers leading to the corresponding pages and buttons leading to the first and last page |
Tables are entered into the report layout editor as an expression in the following format:
%%control:ReportTable?<report code name>.<table code name>%%
This is done automatically when the Insert button is used.
|
Writing queries for tables
The queries you write for tables are standard SQL queries that pull data from the Kentico CMS database. You can find the description of Kentico CMS database tables and views in Kentico CMS Database Reference that is a part of the standard installation.
For information about documents, you can use the View_CMS_Tree_Joined table that returns published versions of all documents.
Table column names
The table column names use the same names as the column names from the returned data set. If you need to use user friendly names, you can use the following syntax in the query:
|
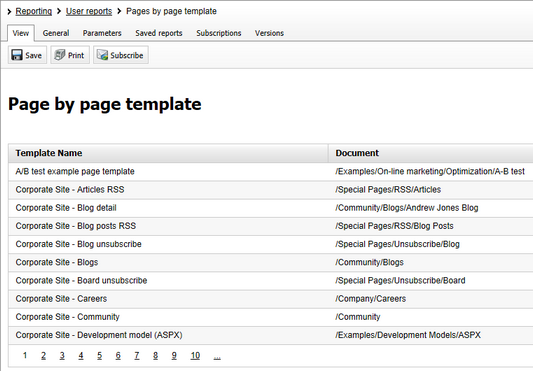
•Display name: Pages by Page Template
•Code name: PagesByPageTemplate
•Query:
SELECT PageTemplateDisplayName AS [Template Name], DocumentNamePath AS [Document] |
•Is stored procedure: no
•SkinID: leave empty
•Enable paging: enabled
•Page size: 10
•Page mode: Page numbers
Click OK.
2. Place the cursor in the layout editor on a new line under the title, select the table from the drop-down list in the Tables section and click Insert. A string like %%control:ReportTable?PagesByPageTemplate.PagesByPageTemplate%% is added to the text area.
Click ![]() Save and switch to the View tab. You will see a report like this:
Save and switch to the View tab. You will see a report like this:
Continued in the example section of the Creating new graphs topic.
