|
|

Publishing events |

|

|

|

|
|
Publishing events |
|
|

|
|
|
|
Publishing events |
|
|
|
|
|
Publishing events |
|
|
|
|
|
|
||
Events managed by the Events module are stored in the content tree as documents of the Event (booking system) document type (code name CMS.BookingEvent). The document type has the following fields:
Event name |
Name of the event. |
Event summary |
Text summarizing the event. |
Event details |
Detailed text providing full details about the event. |
Event location |
Location of the event. |
Start date |
Date and time of the event's start. |
End date |
Date and time of the event's end. This value is optional and if not entered, the event will be displayed as one-day event occurring on the date specified by the Start date value. |
All day event |
Indicates if the event occurs during the whole day. |
Capacity |
Maximal number of registered attendees. |
Allow registration over capacity |
Indicates if the number of registered attendees can be higher than the defined capacity. |
Open from |
Date and time when attendee registration starts. |
Open to |
Date and time when attendee registration ends. |
Log on-line marketing activity |
Indicates if registration should be logged as an activity by the Contact management module. |
Publish from |
Date and time from when the event should be published on the website. |
Publish to |
Date and time until when the event should be published on the website. |
In a typical scenario, events are displayed using the Event calendar web part, while registration to the events is ensured by the Event registration web part. You can see an example of such setup on the Events page of the sample Corporate Site.
In the following example, you will learn how to schedule new events and create a page where the events will be displayed in a calendar, with the possibility to register for them. For the purpose of this example, we will create a sample Training sessions page on the sample Corporate Site and use it to schedule a few events.
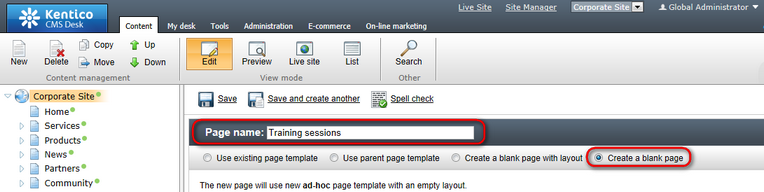
1. To get started, log on to CMS Desk and create a new Page (menu item) in the root of the content tree. When creating it, enter Training sessions as its Page name and choose the Create a blank page option. Finally, click Save.
2. Once the page is created, view it on the Design tab and click the Add web part (![]() ) icon in the top right corner of the only web part zone on the page. In the web part selection dialog, choose the Events & booking -> Event calendar web part. Configure its properties as follows:
) icon in the top right corner of the only web part zone on the page. In the web part selection dialog, choose the Events & booking -> Event calendar web part. Configure its properties as follows:
•Path: /Training-sessions/%; path where displayed event documents will be stored.
•Event start field: EventDate; document field that determines the event's start date and time.
•Event end field: EventEndDate; document field that determines the event's end date and time.
•Document types: cms.bookingevent; document type used to store the displayed events in the content tree.
•Skin ID: EventCalendar; skin applied to the calendar.
•Hide default day number: true (checked); this needs to be enabled to avoid doubled numbers for each day, because the number is already included in the transformations that will be selected.
•Transformation: CorporateSite.Transformations.CalendarEventItem; you can use any suitable transformation, this one and the two below are chosen just to match the whole website's style.
•No event transformation: CorporateSite.Transformations.CalendarNoEvent
•Event detail transformation name: CorporateSite.Transformations.CalendarEventDetail
•Content before: <div style="width: 500px;">; this just ensures that the calendar will have limited width so that it doesn't span over the whole web part zone.
•Content after: </div>
Leave the rest of the properties at their default values and click OK.
3. Click the Add web part (![]() ) icon again and add the Events & booking -> Event registration web part. Configure its properties the following way:
) icon again and add the Events & booking -> Event registration web part. Configure its properties the following way:
•Show for document types: CMS.BookingEvent; this ensures that the web part will be displayed only when an event is selected in the calendar above, letting you register for the selected event.
•Registration title: leave the field blank as we will ensure the title in the web part container.
•Web part container: Corporate Site - Light gradient box
•Container title: Registration
Again, leave the rest of the properties at their default values and click OK.
4. The page is now ready. On the Design tab, it should look as in the following screenshot.
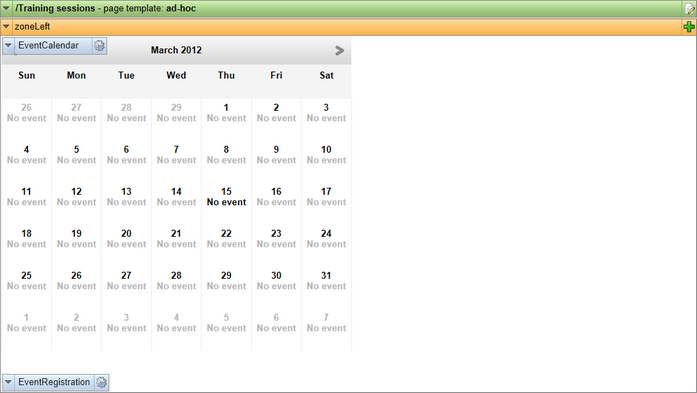
The page is now ready to display events. But as you can see in the screenshot above, there are no events to be displayed yet. To see the required functionality working, we need to create the events now.
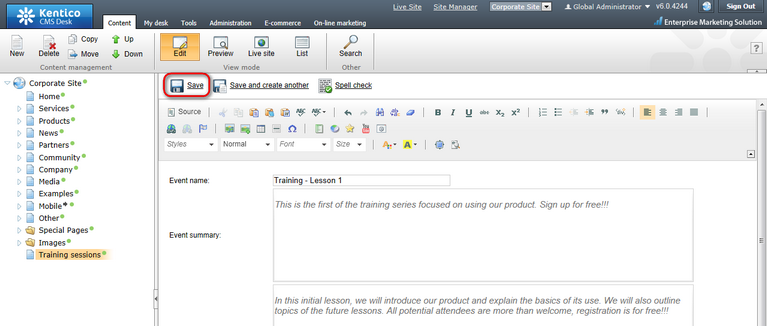
5. First, we will create a one-day event. Still in CMS Desk, select the Training sessions document in the content tree. Click the New button above and choose the Event (booking system) document type. Enter the following details into the form:
•Event name: Training - Lesson 1
•Event summary: This is the first of the training series focused on using our product. Sign up for free!!!
•Event details: In this initial lesson, we will introduce our product and explain the basics of its use. We will also outline topics of the future lessons. All potential attendees are more than welcome, registration is for free!!!
•Event location: London Office
•Start date: enter a future date and time in the current month so that you can instantly see it in the calendar.
•End date: enter a later time on the same day as entered above.
•All day event: disabled
•Capacity: 50
Leave the rest of the fields blank or at default values and click Save.
6. Now let's repeat the previous step and create a multi-day event. Select the Training sessions document again, click the New button and choose the Event (booking system) document type. This time, enter the following details:
•Event name: Training - Lesson 2
•Event summary: This is the second lesson focused on using our product. Sign up for free!!!
•Event details: In this two-day lesson, we will present some more advanced approaches to using our product. Before attending, it is recommended to be acknowledged with the information presented at the previous session. All potential attendees are more than welcome, registration is for free!!!
•Event location: London Office
•Start date: enter a future date in the current month so that you can instantly see it in the calendar.
•End date: enter a date one day after the Start date so that a multi-day event is created.
•All day event: disabled
•Capacity: 50
Leave the rest of the fields blank or at default values and click Save.
7. Switch to the live site. If you navigate to the newly created page, you should see the events in the calendar as in the screenshot below.
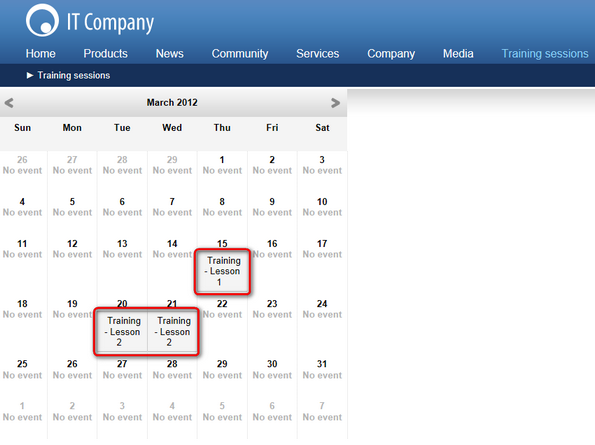
8. If you click the date field where an event is displayed, you should get its details displayed below the calendar. You should also see the registration form, enabling you to register for the event.
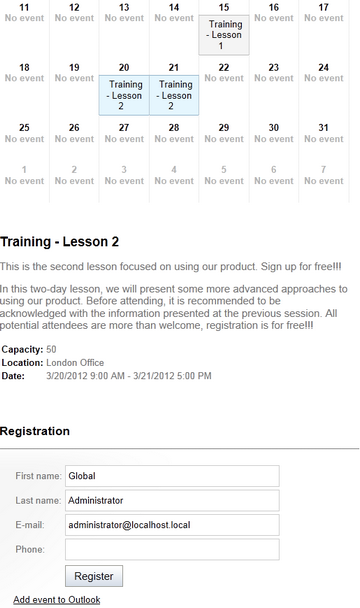
Try filling in the registration form a few times. You will be able to check the submitted registrations in CMS Desk -> Tools -> Events, as described in the Managing attendees topic.